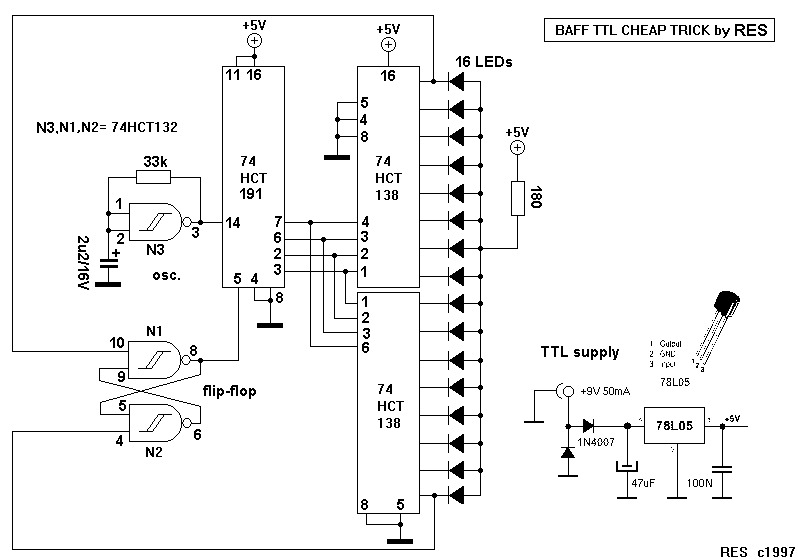
8x LED (red)
1x 180 ohm
1x 10k ohm
1x 33k ohm
1x 2u2/16V
1x 74HCT191
1x 74HCT132
2x 74HCT138
1x 78L05
1x 47uF/16V
1x 100n
2x 1N4007
Yet another version:
Here an example with 4 TTL ICs. This is I think the cheapest solution with standard logic ICs. The 74HCT191 is a Presettable Synchronous 4-Bit Binary Up/Down Counter. Pin 14 is the clock input (from the osc.) Pin 5 is the Up/Down input, this lets the counter counts up or down (via the flip-flop) when reaching the last LED. Enable the counter by connecting pin 4 to GND. The counter generates 4 bits data at the 4 outputs (Q0 to Q3) The data goes to the two 3-to-8 line decoder/demultiplexers, the trick is this, you have 3 address inputs (btw 2^3 = 8) and two Enabling inputs (pin 4 and 6), with these you can enable each 74HCT138 individually. At the first clock of the oscillator (N3), the counter starts at 0001 (first LED on), so pin 4 and 6 are both 0, so only one 74HCT138 is enabled at a time. When reaching the 9th clockpulse, the two 74HCT138s flip, because the counter is at 1001.

For more detail: 16 LED Knight Rider using 74HCT138 microcontroller
16 LED Knight Rider using 74HCT138 microcontroller
