Introduction
Perusing through the impressive list of past projects, we decided to make our final project a combination of two technologies—wireless technology and the MP3 player. Specifically, we decided to create an MP3 player that broadcasted the songs to an FM dial. We call this the “MP3 Radio.”
To accomplish this, we used an ATMEL ATmega32 MCU, a STA013 MP3 decoder, and an IF VCO MAX2606 FM transmitter as our main hardware components. On our software side, we used C and PHP-GTK as our programming languages; and CodeVision C Compiler and Visual Studio C++ as our compilers.
The user interface consists of two components: one on the PC side, and one on the external hardware piece. On the PC, using PHP-GTK, we created a GUI application, which allowed the user to create the playlist and then start the “broadcast.” Externally, on the STK-500, the user can control the MP3 player with the following pushbuttons:
- button 1: (un)pause song;
- button 2: stop song;
- button 3: play song;
- button 4: go to next track;
- button 5: go to previous track;
- button 6: toggle mode (between normal, rock, jazz, & classical);
- button 7: increase volume; and
- button 8: decrease volume.
Using our “MP3 radio,” users are no longer confined by the limits of traditional speakers. In fact, speakers are no longer needed, as long as there’s a radio nearby. One very practicable application is to adapt this as an add-on to a PDA. Thus, you can transform your walkman and your car radio into MP3 players. Moreover, it was a great way for us to explore two distinct technologies we are interested in.
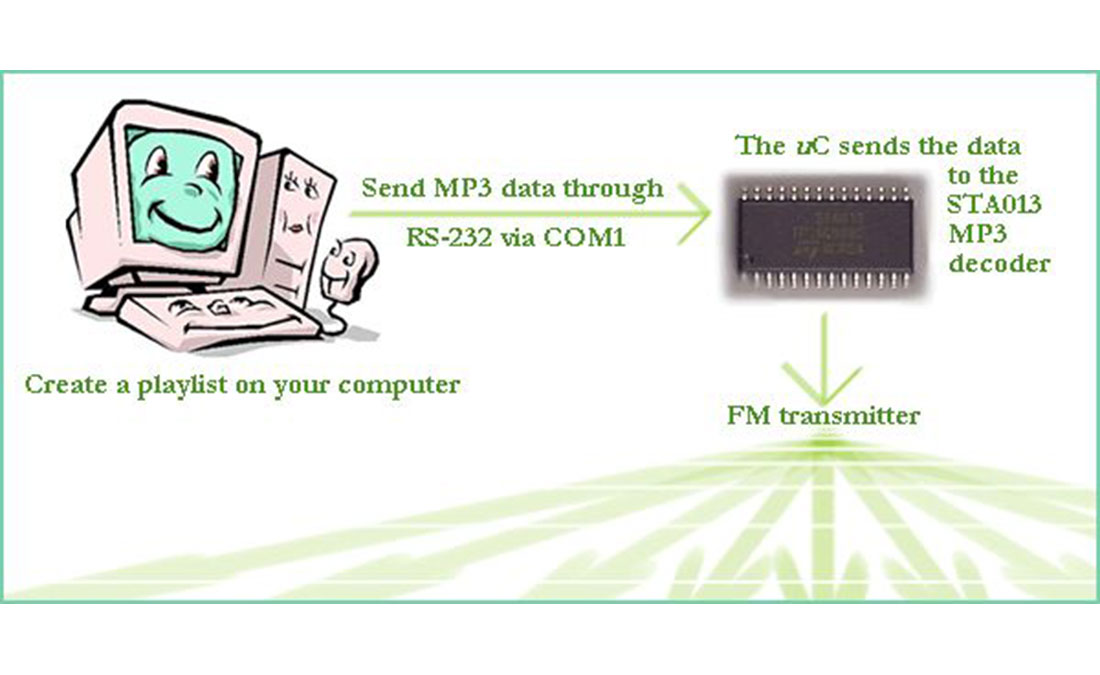
The flow of how our project works is fairly straightforward. It is outlined by the steps below:
- GUI: The GUI (source code: mp3radio.php), coded with PHP-GTK, generates the playlist. To do this, it merely moves the selected MP3s to a specific directory “.\playlist\.” Then, the button “Broadcast MP3s” calls the script serialOut.exe. To compile the PHP, we experimented with several programs. Finally, we found one that actually worked, called PriadoBlender.
- As the name suggests, serialOut.exe (source code: serialOut.c) sends stuff through a serial connection. This is done using COM1. We generated an array storing all the names of all the MP3s in the “playlist” directory. Then, we send each file, character by character, through the RS232 connected to COM1. To do this, we modified a terminal program donated to us by Bob Gardner (@AVRFreaks.net). We set the baud rate to 57,600 bps.
- Our mcu, via the USART interrupt, reads the data sent in from the RS232 from COM1. If a pushbutton is pressed or a song is done playing, the mcu sends the appropriate command to the computer.
- Next, the mcu sends the MP3 data to the decoder. We did not bother buffering our data, because our baud rate is so much slower than the maximum data input rate of our STA013 MP3 decoder, 20Mbits/sec. Moreover, our memory was too small to create a reasonably sized buffer.
- Our decoder outputs the correct clock and data waveforms for our digital to analog converter (CS4334 DAC).
- Finally, the output signal from the DAC is fed into our FM transmitter. Our transmitter can send signals at frequencies between 88.0 and 108.0 MHz.
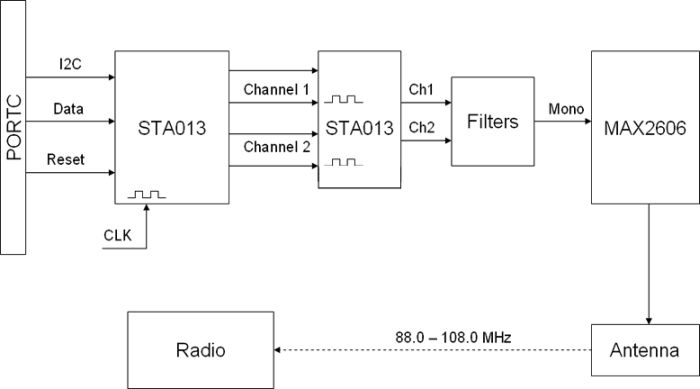
The following diagram illustrates this high-level structure:
Hardware/Software Tradeoffs:
The most significant tradeoff involved the limiting speed of the RS-232. We found that, due to the error associated with the higher baud rates (e.g. -3.7% with 115,200 bps), the small amount of memory on the microcontroller, and cycles overheard in C programming, we had to send at a baud rate of 38,400 bps. Thus, we had to encode our MP3s into 32 kbps bitrate MP3s, which is the smallest, lowest-quality possible bitrate for an MP3.
A second tradeoff, as mentioned, is the small amount of memory—only 1 kB of SRAM. Thus, we were unable to effectively buffer the MP3 data before sending it to the STA013 decoder. This means we had to stream the MP3 data from the computer directly to the decoder, which is the reason why we chose a baud rate of 38,400 bps.
Finally, the quality of our songs was compromised by the FM transmitter, which can only transmit in mono. Higher quality songs are possible if we use a stereo-quality FM transmitter chip, which would require transmitting at two different frequencies. Due to our budget and time constraints, we were unable to use a stereo-quality chip.
Relevant Standards:
This topic will be discussed in the Conclusion.
Program/Hardware Design
The Software
As aforementioned, we programmed our scripts using C and PHP-GTK. In total, our project requires 3 scripts to operate:
- mp3radio.php;
- serialOut.c; and
- serialIn.c.
Please note that these scripts have only been tested on Windows 2000/XP. In fact, it is very unlikely that there will run on other operating systems as the initialization of the serial ports are very specific.
Mp3radio.php
This first script, mp3radio.php, acts as the user interface for creating his or her playlist. It includes a list of the current tracks on the playlist, and the following buttons:
- “Upload New MP3 File,” which opens a file upload dialog box. Users are limited to choosing a *.MP3 file. Once they choose one, the MP3 file copied to a folder called “playlist” (located in the same directory as mp3radio.exe). Then, the list of tracks is refreshed by re-parsing the “playlist” folder for filenames.
- “Remove Song from Playlist,” which deletes the highlighted song from the “playlist” folder. Again, the playlist is refreshed.
- “Start MP3 Broadcast (FM),” which executes serialOut.exe using the PHP function exec().
- “Close Program,” which exits out of the program.
This script contains the following functions…
- killwin() Closes the popup GUI window.
- genPl() Parses the “playlist” directory to return an array of the tracks’ filenames.
- fileUpload() Opens the file upload window. The user uses this feature to find songs located in the computer for his/her playlist.
- uploadMP3($fs) Copies the MP3 selected to the “playlist” folder.
- removeSong($list, $plEntries) Removes the highlighted song from the playlist.
- runSerialOut($window) Closes the GUI window and then executes serialOut.exe.
- destroy() Quits the program.
- refreshPl() Refreshes the playlists.
The reason we chose to code in PHP is because it is an easy-to-learn web-based language. We wanted a web language, so that we can easily incorporate a file upload option. However, at first, we ran into a deadend as we were unsuccessful in our many attempts to compile PHP into an executable. Thus, we rewrote our program using PHP-GTK, a GUI add-on to PHP, and were finally able to compile our program using PriadoBlender. However, in order for mp3radio.exe to run properly, the following DLL files must be in the same folder: iconv.dll, intl.dll, libgdk-0.dll, libglib-2.0-0.dll, libgmodule-2.0-0.dll, libgtk-0.dll, mmcache.dll, php4ts.dll, php_gtk.dll. These files are required for PHP and PHP-GTK to run properly on computers without these softwares installed. Here’s a rocking screenshot:
SerialOut.c
Of the three scripts, this was the most difficult to write. It took three completely different tries. But, as they say, third time’s the charm.
- Try 1: We initially wrote our script based off of the “Interfacing the Serial/RS232 Port” tutorial located at BeyondLogic.org. However, our attempts proved quite fruitless. We soon learned that Windows 2000/NT/XP do not apply port operations to be executed at the application level, due to security reasons. The tutorial at BeyondLogic.org was probably for earlier versions of Windows.
- Try 2: Next, we wrote a script that utilized IO.dll. This library, theoretically, should’ve allowed “seamless I/O operations for Windows 95/98/NT/2000/XP.” However, due to the lack of documentation, we were unable to successfully send data through COM1.
- Try 3: Finally, we received some aid from a kind fellow from AVRFreaks.net, Bob Gardner. He gave us a C script he wrote that acted as a terminal program, which sent data through COM1 at a baud rate of 9600. This code was very easy to understand and we modified it for our needs. Thus, the current version of serialOut.c was born.We wrote and compiled this script using Microsoft Visual Studios C++ 6.0. The important functions were…
- void initcom1(void) This initialized COM1 to I/O.
- int auxchk1(void) This function would return 1 whenever a char was received through the serial RS232 connection.
- void main(void) Here, we first initialized COM1 with initcom1() and initialized the playlist with initPlaylistInfo(). Then we sent the first track. After that has been processed, we enter an infinite while loop that incessantly calls controlStates().
- char auxin1(void) This function grabs the incoming char from the serial connection.
- void auxout1(char c) This sends a char through the serial connection.
- void sendMP3(char[]) This function sends an MP3 through the serial connection, specified by the MP3 filename. It will also poll for commands from COM1, and act accordingly—e.g. stop, pause, play, etc.
- void controlStates(void) As the name implies, this regulates and controls the states of the program. In this case, the states signify “current track,” “next track,” and “previous track.” Thus, it regulates what song to send.
- void initPlaylistInfo(void) This function initializes the playlist. It is required before any MP3 can be sent, so that legitimate files will be sent.
We configured our script to work with COM1 and send at a baud rate of 38,400 bps. The theoretical max, 115,200 bps, was tested; however, the error percentage was too large (-3.7%) to yield acceptable results. With 57,600 bps, we found that we lost data (since we couldn’t implement a buffer). Thus, we sent our data with a baud rate of 38,400 bps. With this baud rate, we could only send MP3s that have bitrates of 32 kbps. The next lowest bit rate, 42 kbps, equates to 43,008 bps, and already exceeds our baud rate.
This program also contained a state machine, which is controlled by the first 5 pushbuttons on the external user interface, (un)pause, stop, play, next, and previous. Once a song is finished playing, the mcu sends the “next track command” to this program. Thus, as this last statement implies, whether or not a track is complete is not determined on the PC side. This is because, when parsing an MP3 file, the traditional “EOF” (end of file) check cannot be implemented.
SerialIn.c
This is the microcontroller-side script. Each time data is received, we break into the USART interrupt and send the MP3 data, bit by bit, to the decoder. This script included the following functions… Some code was borrowed from the spring 2002 MP3 project by Nelson Li and Jason Dirner
- void main(void) Like usual, this function calls initialize() first. Then, the STA013 decoder is configured and started by calling the respective functions config_sta013() and sta013_start. If no errors are detected, we proceed into our lovable infinite while(1) loop.
- void initialize(void) This initializes all the global variables. The USART is initialized: it’s set to COM1 and a baud rate of 38,400. TIMER0 compare interrupt is set up, PORTB (i.e. the LEDs) is set for output, and PORTA (i.e. pushbuttons) for input.
- void sta013_I2C_start(void) This and the next 3 functions are used when starting up the STA013.
- void sta013_I2C_stop(void)
- void sta013_I2C_read(void)
- void sta013_I2C_write(void)
- void sta013_read(void) This function reads the data stored at a specific address in the STA013.
- void sta013_write(void) This function writes specified data to a specific address in the STA013.
- unsigned int config_sta013(void) This configures the STA013, and returns a 0 for a successful configuration or a 1 if there were errors during configuration.
- void sta013_start(void) This instructs the STA013 to start running.
- void sta013_play(void) This sets the STA013 to playback mode.
- void sta013_stop(void) This ends the playback mode on the STA013.
- void toDecoder(void) This sends the last received word from COM1 to the STA013 decoder one bit at a time.
- void checkSongEnd(void) This determines whether the current track has finished playing.
- unsigned char swapbits(unsigned char x) This is used by toDecoder() to flip the bits, so we can send the bits to the decoder in the order of MSB to LSB.
- void deBouncer(void) This debounces the pushbuttons and executes the buttons’ respective commands. It does this by either sending data through the serial RS-232 connection to serialIn.exe (as in for the PAUSE, STOP, PLAY, NEXT, and PREV functions) or by writing values to specific addresses in the STA013 (as in for the MODE and VOLUME CONTROL functions).
As stated, we also used two interrupts, [USART_RXC] and [TIM0_COMP]. Each time data is received through COM1, the USART is triggered. It then grabs the character from UDR and checks whether DATA_REQ is low. DATA_REQ is an active-low value controlled by the decoder. If the STA013 decoder buffer is full, DATA_REQ is set to 1. Otherwise, it remains at 0, indicating that the mcu can send it more data. Thus, if DATA_REQ is 0, we call toDecoder() to send out the received char; otherwise, we send the PAUSE command to serialOut.exe, thus discontinuing any more MP3 from being sent.
The timer0 compare interrupt is used to keep track of time. It is set to trigger each millisecond. This is needed for two functions:
- As in previous implementations, we use this interrupt to control the deBouncer() statemachine.
- The second, not as obvious use, is to check whether a track has finished playing. As aforementioned, we are unable to implement the EOF (end of file) on the PC-side (i.e. check if track is finished from serialOut.exe). Thus, to make up for this setback, we monitor whether the current song has been silent for 3 seconds. We do this using the timer0 compare interrupt (to keep track of the time) and the checkSongEnd() function.
Using pushbutton 5, the user able to toggle between 4 distinct modes: NORMAL, ROCK, JAZZ, and CLASSICAL (in this order). These modes are preprogrammed settings which characterize specific genres of music. To do this, we set the treble and bass levels to different values for each mode. Check it…
| MODE | Treble (dB) | Bass (dB) |
|---|---|---|
| NORMAL | 0 | 0 |
| ROCK | 0 | 4.5 |
| JAZZ | -4.5 | 13.5 |
| CLASSICAL | -13.5 | -6.5 |
Table 1: Modes
Notice that we’ve set the rock mode’s trebel level to 0 decibels. This is because any positive value of trebel seemed to yield extreme distortion (that was unbearable to the ear).
The Hardware
The hardware consists of the following chips:
- STA013 MP3 decoder from STMicroelectronics;
- CS4334 dual 24-bit DAC from Cirrus Logic;
- MAX2606 integrated IF VCO from Maxim-IC;
- MAX884 linear voltage regulator from Maxim-IC;
- ATMega32 Microcontroller from Atmel; and
- 74HC04 Hex Inverter from Phillips Semiconductor.
Parts List:
| Item | Manufacturer | Part Number | Cost |
|---|---|---|---|
| MP3 Decoder | STMicroelectronics | STA013 | $12 |
| 24-Bit DAC | Cirrus Logic | CS4334 | $5 |
| Shipping & Handling | PJRC | $5.18 | |
| 14.7456 MHz Xtal | Maxim-IC | SE3431-ND | $0.96 |
| Solder Boards | Professor Land | $2.50 (x1 large) $2.10 (x3 small)$4.90 |
|
| Surf Boards | Professor Land | $10 | |
| ATMega32 | Atmel | ATMEGA32-16PI | $0 (free sample) |
| Voltage Regulator | Maxim-IC | MAX884 | $0 (free sample) |
| IF VCO | Maxim-IC | MAX2606 | $0 (free sample) |
| Resistors & Capacitors | Digital & Analog labs | free | |
| 8-pin, 14-pin sockets | Analog lab | free | |
| STK-500 | Digital lab | free | |
| 16 MHz Xtal | Digital lab | free | |
| Total: | $38.04 | ||
For more detail: The Ultimate MP3 Radio