I have been tinkering with Word Clocks for years. There is only one thing I like more than making word clocks… it’s designing them so that they are easy to put together. This tutorial will go through my latest version (5!!!!!). By the end of it you will have a clock with: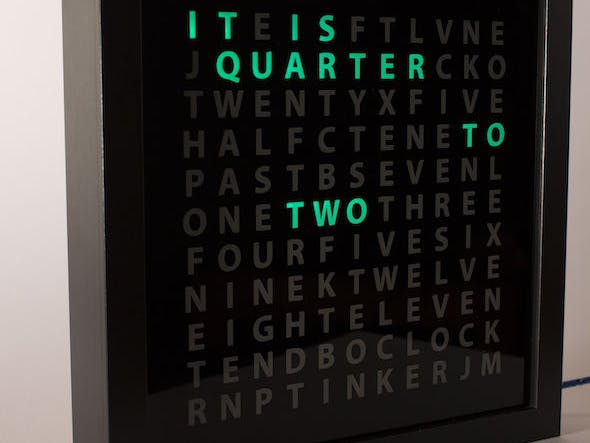
- User selectable colours (Red, Blue, Green, Yellow, Pink, Purple)
- Beautiful clean crisp letters
- An understanding of what is inside and how it goes together!
If you have already bought the kit feel free to jump to the Assembling the Electronics section!
There are three ways to go about getting your own Word Clock:
- Make it from scratch – I include all schematics and mechanical instructions.
- Buy it in kit form – I provide kits with all parts collected in one spot here: http://www.tinkerelectric.com/product/tinkers-word-clock-kit/
- Buy it already assembled – If you simply love the look and want it, its here: http://www.tinkerelectric.com/product/word-clock-2/ So, without any more delays, let’s begin building it:
Step 1: Gathering the parts
Three major components go into building this clock:
- The Electrical (The Good) – this keeps track of the time, changes the colour and makes it glow all pretty. This is made of the ‘PCB’ (Printed Circuit Board), microcontroller and power via USB.
- The Mechanical (The Bad, ass) – This is responsible for its structure and preventing the light seeping into other letters. Its mainly made of the ‘baffle’ and a backing plate.
- The Face (The Pretty) – To get the face done nicely we use a vinyl sticker with frosting. Out of all the methods I’ve found this to work the best. The face is responsible for the letters appearing crisp and readable.
Next, we collect all the parts!
Gather the following parts:
Mechanical:
- Acrylic for internal structure – 2mm black opaque acrylic sheet 16.5 inches (420mm) by 28.3 inches (720mm). This will need to be laser cut later. There are a variety of local laser cutting workshops available to do this.
- Ikea Ribba frame (9inch / 23cm square), either black or white http://www.ikea.com/us/en/catalog/products/600780… This will be our outside frame.
Electrical:
The following parts below are needed. Note: the lithium battery is not normally included due to flight restrictions.
Bill Of Materials (BoM) (see attached image)
PCB and Schematic: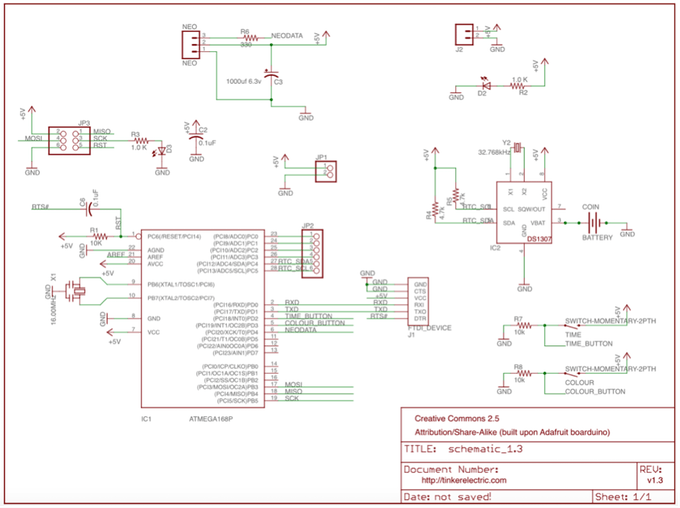
-Attached is the Eagle schematic and board. As well as the GERBER files needed to get the board produced at a PCB house. (I use PCBWay.com, good quality, good price, good service)
Face: The face is to be cut out of vinyl adhesive. An additional ‘frosting’ layer is added to diffuse the light.
For more detail: Tinker’s Word Clock – REVISITED! NOW 110% more AWESOME