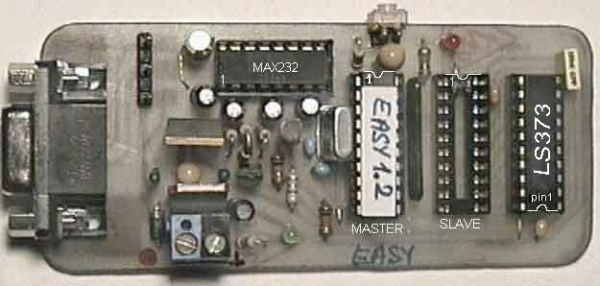
The upgraded part is only the PCB,the software remains the same as in original project which you can findat EasyDownloader V 1.1
Here you have a single side versionof PCB of the Easy-DownloaderV1.1 by WichitSirichote. The board is 10x4cm in a full size. That newPCB has some small modifications comparing to original scheme. It has anMAX232(or similar) instead of DS275, one LED (green) for 5Vcc indicating(instead of straight voltage in), also one LED for write process(red LED on the right top of PCB), one DB9F connector for serialaccess (can connect here a serial DB9F to DB9M cable [3 wires, pin 2 topin2, pin 3 to pin 3, pin 5 to pin 5] – that connector can be removedif not needed, board can be cutout following the light blue line betweenthe DB9F connector and rest of the board, in that case you will solderthe wires on 3 pins small RS232 connector which is in the top-left sideof the board), reset switch for Master uC (can connect a switch at X1 SIPconnector (top middle) for reset operation).
All can be easy done in ONE SIDE PCB with only 3 short straps! I recommendto print the GIF picture (using a laser printer at least 300DPI) at rightscale (you can do some experiences on normal paper to find the correctscale for printing [you can place over the holes on the paper an 20 pinsIC to see if it match over the holes, once is matching, the other partswill also do, and you can print it and print it on a full transparent UVsheet of plastic (transparent plastic sheet for laser printers will beOK) and than, using the Positive spray technology (spray, UV exposure,developing, etching), to transfer the GIF on the copper side of board (theGIF is bottom side view from top, so, turn it [mirror] before put it onboard).
Also, the board can be done by hand draw, taking care about inter-pinscrossing tracks. Take care for short circuits! A good idea is to mountall ICs on sockets (not only the slave uC, but also the rest), in thatcase if something is going wrong is very easy to replace the defectivepart! Also, there are 2 parts (R11 and D4) which are mounted under theMaster uC, so you can mount them below (inside) the uC socket or, if notpossible, you can mount them on the other side of PCB (bottom side).
For more detail: Very Easy Single-Side PCB forEasy-Downloader V1.1 using 89C2051

