Step 1: Parts needed
I bought my parts from Digikey and Sparkfun Electronics – they’re 2 of my favorite places to buy components. Anyway, here’s the list:
#1 – (Qty: 1) – ATMega328 chip with Arduino bootloader pre-installed ($5.50)
#2 – (Qty: 1) – 5VDC Switching power supply ($5.95)
(Note: If you don’t use a switching power supply, you must add in a voltage regulator and a couple of capacitors…see below)
#3 – (Qty: 2) – 22 pF ceramic disc capacitors ($.24 / ea)
#4 – (Qty: 1) – 16MHz Crystal ($1.50)
#5 – (Qty: 1) – Power jack ($.38) (Optional)
#6 – (Qty: 1) – Breadboard (hopefully you have one laying around, but if not, here’s one. ($8.73)
#7 – Small pieces of 22 awg solid wire. If you don’t have any, you can probably pick some up at your favorite electronics store.
Total cost for above before tax/shipping: about $14 (not including breadboard).
Alternatives / options:
Option / Alternative #1:
If you want to use an existing power supply you have around the house, make sure it is between 5V – 16V. If you are not sure if it is a regulated switching power supply, then you must use the following components too:
#1 option – (Qty: 1) – 5V Voltage Regulator (or another similar 5V voltage regulator) ($.57)
and
#1 option – (Qty: 2) – 10 uF Aluminum Capacitor ($.15 / ea)
(See below reference links for how to hook them up)
Option / Alternative #2:
If you don’t want to use standard items #3 and #4, you can replace those with:
#2 option – (Qty: 1) – 16 MHz Ceramic Resonator (w/cap) ($.54)
This part looks like a ceramic capacitor, and you hook the 2 outside pins up to where you would hook the crystal up (covered later in the Instructable), and the middle pin goes to ground. At least this is what I’ve read – I haven’t tried it yet. But as you may note, it is a little cheaper to go this route. 🙂
Ok, let’s start hooking stuff up!
Step 2: Hooking up power
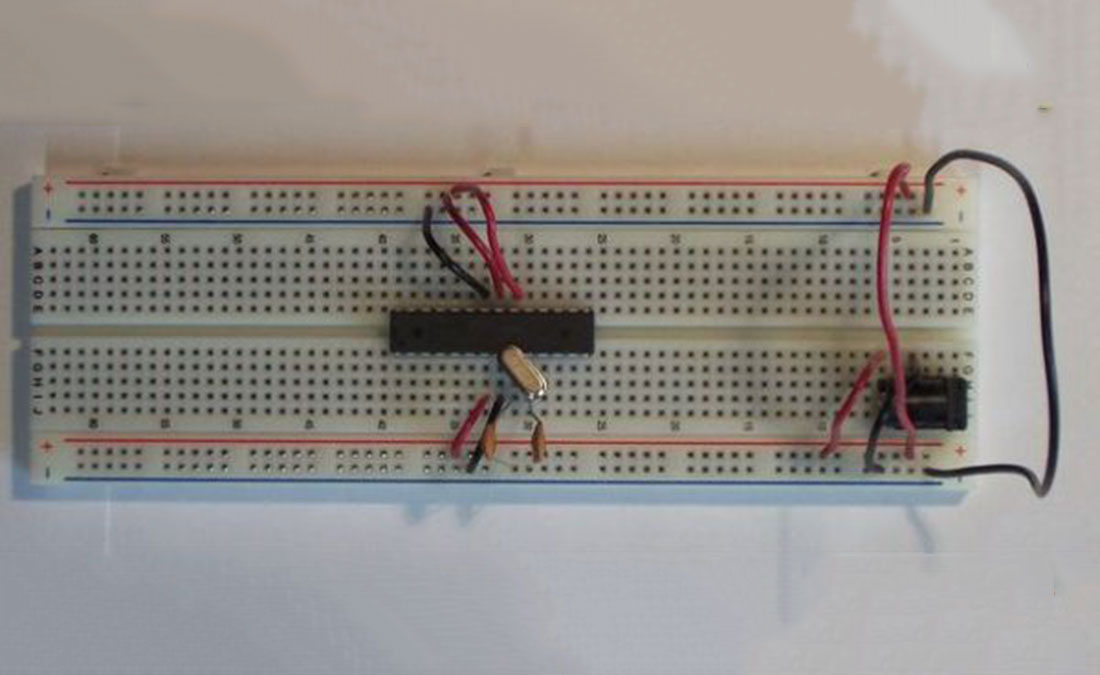
Go ahead and connect your power jack as shown in the first photo if you are using a power jack. Next, hookup a couple of wires as shown in the photo connecting the respective power (+ and -) rails together.
Now we want to put the microcontroller on your breadboard as shown in the photo. If this is a brand new chip, you have to bend both rows of pins in a little bit. What I do, is I hold the chip from both sides, and press the chip a little bit against a flat surface like a desk, and do this on both sides so that both sides are bent in equailly.
You most likely won’t have to do this if you’re pulling your chip from your Arduino – they’re already bent from being in the socket.
Please note the orientation of the chip – in the photos and for this Instructable, please place the chip so that the little half-round ‘notch’ is on the left.
For more detail: Standalone Arduino / ATMega chip on breadboard