Summary of ATmega versus STM32 – Which Microcontroller is Best for Your Application
Comparing ATmega and STM32 microcontrollers, the article advises choosing based on total system cost, required peripherals, power and voltage needs, development tools, and migration path. ATmega (8-bit) is simpler, easier to develop for, and sometimes better for low-power or 5V designs. STM32 (32-bit ARM) offers far higher performance, more variants, and better upgrade paths but has steeper tooling and initialization complexity.
Parts used in theATmega versus STM32 – Which Microcontroller is Best for Your Application:
- ATmega328 microcontroller (example: Arduino Uno)
- ATmega3208 microcontroller (ATmega 0-series example)
- STM32F030K6T6 microcontroller
- STM32F103C8T6 microcontroller (example shown in CubeMx code)
- ST-Link V2 programmer/debugger
- ST-Link V3 programmer/debugger
- AVR ICE MK II (programmer/debugger for ATmega)
- 3x 1.5V series-connected batteries (example for 5V ATmega operation)
- 3.3V LDO regulator (required for STM32 battery-powered designs)
- Development tools: AVR Studio IDE with GCC, STM32 CubeMx/CubeMxIDE, Eclipse (optional), IAR compiler (optional)
This article compares the ATmega and STM32 microcontrollers so that you can choose the best one for your own tech product, by considering overall cost and system cost, as well as the upward migration path.
Comparing ATmega and STM32 microcontrollers is a bit like comparing apples and oranges. At a very general level, they are both fruits, in this case they are both microcontrollers. To take things a bit further, there are many variants of both.
A direct comparison of the Atmega and STM32 would not make much sense. However, there are cases where it makes more sense to choose one over the other.
This article will help you make the best choice for your particular tech product. Several, somewhat conflicting areas need to be considered when choosing a given microcontroller for an application.
Among them are overall cost, not just of the microcontroller itself, but the total system cost.
For example, if a microcontroller already has a built-in peripheral that removes the need for an external one, then that’s a much better way of approaching a design.
On the other hand, choosing an expensive microcontroller, with lots of extra peripherals that won’t be used, simply because it has one that is actually needed is not a wise choice.
Another thing to consider is the upward migration path of a given microcontroller family. It is important to consider the availability of tools, both hardware and software, and the ease of writing and debugging the application firmware.
ATmega Microcontrollers
The ATmega series of microcontrollers was originally made by Atmel which was then acquired by Microchip in early 2016. Microchip is the manufacturer of the PIC series of microcontrollers, which, in many ways is much closer to the AVR series than the STM32.
The ATmega is a relatively simple 8-bit Reduced Instruction Set Computer, or RISC, microcontroller with a Harvard architecture.
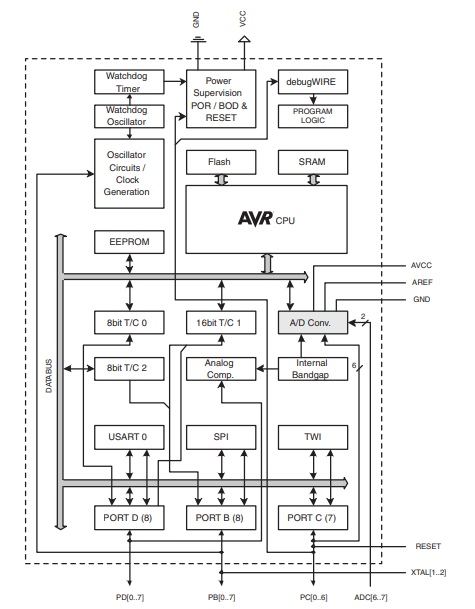
Figure 1 shows the internal block diagram of an ATmega328 as is found in the Arduino Uno. The separate instruction and data paths to the flash and SRAM of the Harvard architecture can clearly be seen in this block diagram.
Also evident in this block diagram is the regular, no fuss architecture.
Table 1 summarizes the main specs of the ATmega328. You can see that it is a relatively limited microcontroller and is not suitable for developing large, data intensive, applications.
In general, the main advantage of the ATmega family is they are quite easy to configure, without having to go through several layers of hardware abstraction. This is what makes it great for some classes of applications, for example controllers dedicated to doing certain control tasks.
However, as the range of Arduino-based projects out there amply demonstrates, there is a lot that can be accomplished by having this type of microcontroller as the main controller.
One additional area that needs to be mentioned is that the ATmega328, and other members of this family, is not cheap on a cost to performance basis. For example, as of this time, it lists for $2.08 at Digikey for a quantity of one.
However, Microchip seems to have realized this, and the latest ATmega 0-series is, in almost all areas, superior to the older ATmega microcontrollers, and are also cheaper.
For example, their ATmega3208 costs $1.03 in quantity of one. The architecture is somewhat different, but still quite close to, the older ATmega microcontrollers. So, unless there is a good reason to stick to the older ATmega microcontrollers, the newer 0-series should be considered.
| Clock Frequency (MHz) | 20 max. |
| Flash size (KB) | 32 |
| SRAM size (Bytes) | 2048 |
| EEPROM SIZE (Bytes) | 1024 |
| UART | 1 |
| SPI | 2 |
| I2C | 1 |
| Timers | 1 x 16-bit, 2 x 8-bit |
| ADC | 8 x 10bit (TQFP Package) |
| GPIO | 23 (shared with other peripherals) |
| Internal ADC reference | Yes |
STM32 Microcontrollers
The STM32 series of microcontrollers from ST Microelectronics is a popular, and very large, family of ARM-based 32-bit microcontrollers.
Being ARM-based means that the core of the microcontroller is one of the various ARM cores licensed from Advanced RISC Machines. In the case of the STM32, these can be Cortex M0/M0+, M3, M33, M4 or M7, either in single, or multiple, core configurations.
Being a very large family means that there are many variants to suit just about any embedded application. Figure 2 shows a high-level classification of the STM32 microcontroller line-up and their suggested application areas.
Within each one of these main microcontroller branches, there are many variants. In total, there are a few hundred microcontrollers in the STM32 family. So, choosing one can be quite an undertaking in itself.
Having chosen a suitable microcontroller, the next step is to actually understand its internal architecture so as to be able to successfully set it up for the intended application. While the STM32 microcontrollers are quite versatile and highly configurable, it is this very fact that makes them hard to initialize.
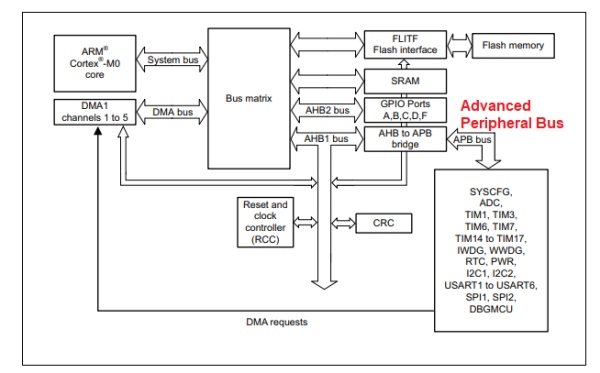
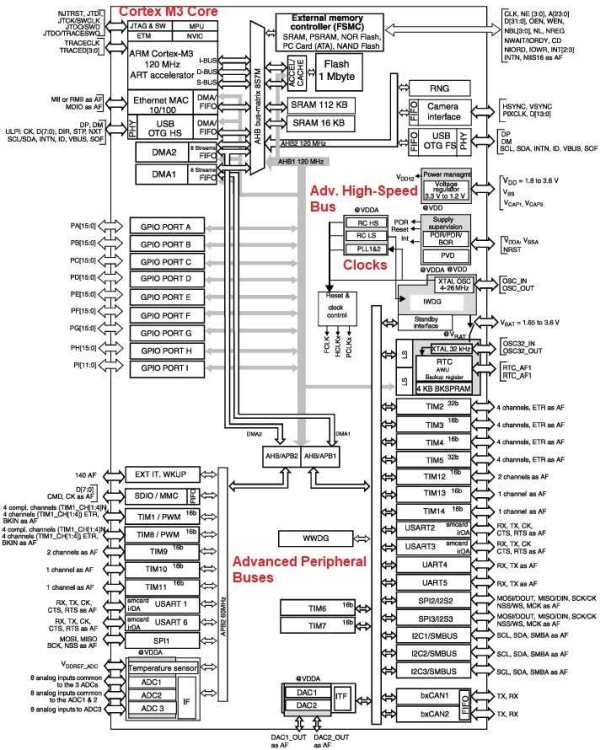
Figures 3 and 4 show typical internal architectures for STM32 microcontrollers based on Cortex M0 and Cortex M3 cores respectively.
As can be seen, there is quite a bit of difference between the two, and knowledge of one does not necessarily mean automatic knowledge of the other.
Adding to that is the fact that initialization involves not only the peripherals such as GPIOs, UARTs or SPIs, but the Cortex core itself. Without the proper tools, this endeavor can be very time-consuming and error-prone.

Despite all these complications, however, the STM32 microcontrollers have some major hardware advantages over the ATmega microcontrollers.
As an example, the STM32F030K6T6 has a Cortex-M0 core, and lists for $1.44 for a quantity of one at Digikey. Table 2 lists some of its main features. Compared to the ATmega328, it performs better in most respects at a lower piece price.
| Clock frequency (MHz) | 48 max. |
| Flash size (KB) | 32 |
| SRAM size (Bytes) | 4096 |
| EEPROM SIZE (Bytes) | None. |
| USART | 1 |
| SPI | 1 |
| I2C | 1 |
| Timers | 4 x 16-bit |
| ADC | 10 x 12-bit |
| GPIO | 26 (shared with other peripherals) |
| Internal ADC reference | Yes |
As a final note for this section, it is worth emphasizing that the STM32 family has members that are simply out of reach of any ATmega microcontroller in performance and features.
Furthermore, STM32 microcontrollers usually have many variants in the same sub-family, allowing for easy migration should the application require it.
For example, the STM32F030K6T6 I just described has variants offering up to 256KB of flash, 32KB of SRAM, with two SPI and two I2C channels. Since the architecture is essentially the same, it is quite straightforward to port the existing code without much effort.
Software Development
Both the ATmega and the STM32 series of microcontrollers are well supported when it comes to developing application code.
For the ATmega series, the usual development environment is the AVR Studio IDE with GCC C/C++ compiler. The IDE can also be augmented with many useful extensions, and there are plenty of examples of fully functional code available.
Because the peripherals are fairly simple to configure, they are usually initialized by simply writing the configuration values to the appropriate registers.
One further aspect of ATmega code development that is worth mentioning is the Arduino angle. Many ATmega microcontrollers, such as the ATmega328, are used as the microcontroller in Arduino boards. It is quite possible to develop in Arduino, and load the compiled binary into the microcontroller.
Even if not using a directly compatible one, it is relatively easy to port an Arduino library, which is written mostly in C++, to another ATmega microcontroller. That way, it is possible to take advantage of the vast Arduino library base already out there.
To actually program the microcontroller, there is a large range of products with varying debug capabilities, including the AVR ICE MK II and some really inexpensive ones. It is also possible to build one, or use an Arduino as a device programmer from instructions that are available online.
Developing code for the STM32 is not as simple, or as straightforward, as for the ATmega case. While it is possible to write the initialization code from scratch, it is better to spend the time learning how to use STM32 CubeMx or CubeMxIDE.
The CubeMxIDE comes with its own compiler. CubeMX allows the use of another editor such as Eclipse, and an external compiler such as the excellent, but expensive, IAR compiler.
These tools, provided for free by ST Microelectronics, will save countless hours of frustration reading, and thoroughly understanding, the datasheet of the target microcontroller. These can run into well over a thousand pages.
These tools will automatically generate the initialization code for the target device. Even then, it need to at least understand the various options available for a given device.
So, it is fair to say that writing code for the STM32 is quite a bit more complicated than in the case of the ATmega.
For example, here is the initialization code, directly lifted from CubeMx, just to get an STM32F103C8T6 to be able to drive a couple of LEDs, for example.
/** * @brief System Clock Configuration * @retval None */ void SystemClock_Config(void) { RCC_OscInitTypeDef RCC_OscInitStruct = {0}; RCC_ClkInitTypeDef RCC_ClkInitStruct = {0}; /** Initializes the CPU, AHB and APB busses clocks */ RCC_OscInitStruct.OscillatorType = RCC_OSCILLATORTYPE_HSE; RCC_OscInitStruct.HSEState = RCC_HSE_ON; RCC_OscInitStruct.HSEPredivValue = RCC_HSE_PREDIV_DIV1; RCC_OscInitStruct.HSIState = RCC_HSI_ON; RCC_OscInitStruct.PLL.PLLState = RCC_PLL_ON; RCC_OscInitStruct.PLL.PLLSource = RCC_PLLSOURCE_HSE; RCC_OscInitStruct.PLL.PLLMUL = RCC_PLL_MUL9; if (HAL_RCC_OscConfig(&RCC_OscInitStruct) != HAL_OK) { Error_Handler(); } /** Initializes the CPU, AHB and APB busses clocks */ RCC_ClkInitStruct.ClockType = RCC_CLOCKTYPE_HCLK|RCC_CLOCKTYPE_SYSCLK |RCC_CLOCKTYPE_PCLK1|RCC_CLOCKTYPE_PCLK2; RCC_ClkInitStruct.SYSCLKSource = RCC_SYSCLKSOURCE_PLLCLK; RCC_ClkInitStruct.AHBCLKDivider = RCC_SYSCLK_DIV1; RCC_ClkInitStruct.APB1CLKDivider = RCC_HCLK_DIV2; RCC_ClkInitStruct.APB2CLKDivider = RCC_HCLK_DIV1; if (HAL_RCC_ClockConfig(&RCC_ClkInitStruct, FLASH_LATENCY_2) != HAL_OK) { Error_Handler(); } } /** * @brief GPIO Initialization Function * @param None * @retval None */ static void MX_GPIO_Init(void) { GPIO_InitTypeDef GPIO_InitStruct = {0}; /* GPIO Ports Clock Enable */ __HAL_RCC_GPIOC_CLK_ENABLE(); __HAL_RCC_GPIOD_CLK_ENABLE(); /*Configure GPIO pin Output Level */ HAL_GPIO_WritePin(LED_GPIO_Port, LED_Pin, GPIO_PIN_RESET); /*Configure GPIO pin : LED_Pin */ GPIO_InitStruct.Pin = LED_Pin; GPIO_InitStruct.Mode = GPIO_MODE_OUTPUT_PP; GPIO_InitStruct.Pull = GPIO_NOPULL; GPIO_InitStruct.Speed = GPIO_SPEED_FREQ_HIGH; HAL_GPIO_Init(LED_GPIO_Port, &GPIO_InitStruct);}
Compare this to the equivalent code for the ATmega328 as given here, and the difference is quite obvious.
static void setup_IOPorts(void) { DDRB = SETUP_PBDDR; PORTB = SETUP_PBINIT; DDRC = SETUP_PCDDR; PORTC = SETUP_PCINIT; DDRD = SETUP_PDDDR; PORTD = SETUP_PDINIT;DIDR0 = SETUP_DIDR0; }
Once the code is developed, downloading it to the device is fairly simple using a ST-Link V2 or ST-Link V3. There are also readily available, very inexpensive, ST-LinkV2 clones.
Also, because most STM32 have some kind of debug port, the device programmers can also serve as debuggers.
ATmega or STM32
While this section is about choosing between the ATmega and STM32 microcontrollers, most of it generally applies to 8-bit vs. 32-bit microcontrollers from a hardware perspective.
Here are some points to consider:
- In general, the quiescent current of the ATmega is lower than the STM microcontroller. This is especially true if the STM32 has lots of unused peripherals that cannot be turned off by the firmware. They just suck up power without doing anything useful in the user application. This, of course, might be a very important, or even prime, consideration.
- Most ATmega microcontrollers can run off 5V, whereas STM32, at most, have 5V tolerant inputs. The ATmega can happily run off three 1.5V series-connected batteries without any regulators, and can continue running until the batteries are fully depleted. For STM32s, 3.3V LDOs are needed, and they will go out of regulation when the battery voltage drops below the dropout limit of the LDO.
- Due to the larger feature size of their internal transistors, ATmegas withstand electrostatic discharge, or ESD, better than STM32s. In other words, their survivability rate to ESD is much higher.
- In some applications, the 5V logic is a big advantage when it comes to being immune to electrical noise.
- ATmegas generally have better drive capability compared to STM32s, which can minimize the use of external hardware drivers.
- Some of the peripherals of the ATmega microcontrollers are actually better than the equivalent STM32 ones, for example the ADCs.
- ATmegas have true EEPROM. Single bytes can be written or erased. STM32s can emulate EEPROM functionality in their Flash. While it can be made transparent to the user, it does involve another layer of firmware, and the number of erase cycles are not as good.
- In simple applications, all that is needed is just the ATmega microcontroller all by itself.
Conclusion
The STM32 can do anything that the ATmega can, and much more.
However, just as it makes more sense to drive to get groceries rather than take a helicopter, it is similarly more sensible to use an ATmega instead of a STM32 in some applications.
It is easier to develop applications for, and easier to use. In some applications, that is all that really matters.Finally, don’t forget to download your free PDF: Ultimate Guide to Develop and Sell Your New Electronic Hardware Product. You will also receive my weekly newsletter where I share premium content not available on my blog.
Other content you may like:
- Introduction to the STM32CubeIDE for STM32 Microcontrollers
- Introduction to the Ultra High-Performance STM32H7 32-bit Microcontroller
- How to Select the Microcontroller for Your New Product
- Top 10 Most Popular Blogs for 2020
- Introduction to Embedded Firmware Development
Source: ATmega versus STM32 – Which Microcontroller is Best for Your Application
- What are the main architectural differences between ATmega and STM32?
ATmega is an 8-bit RISC microcontroller with Harvard architecture, while STM32 are 32-bit ARM-based microcontrollers using various Cortex cores. - Which is easier to develop code for, ATmega or STM32?
ATmega is easier and more straightforward to develop for; STM32 development is more complicated and benefits from using CubeMx or CubeMxIDE. - Does STM32 offer better performance than ATmega?
Yes, STM32 generally performs better and offers many variants with higher features and performance. - Can ATmega run directly from batteries without a regulator?
Yes, many ATmega microcontrollers can run off three 1.5V series-connected batteries without regulators. - Do STM32 microcontrollers include true EEPROM?
No, STM32s do not have true EEPROM; they can emulate EEPROM in Flash which requires extra firmware and has fewer erase cycles. - Which microcontroller typically has lower quiescent current?
In general, ATmega microcontrollers have lower quiescent current than STM32s, especially when STM32s have unused peripherals that draw power. - Are STM32 tools available for free?
Yes, ST Microelectronics provides free tools like CubeMx and CubeMxIDE to generate initialization code and aid development. - Is it easy to migrate within the STM32 family?
Yes, STM32 families often have many variants with similar architectures, enabling relatively straightforward code porting and upward migration. - Which MCU is better for 5V tolerant or noise-immune designs?
ATmega is better for 5V logic and noise immunity; STM32 typically has 5V tolerant inputs but runs at 3.3V.