Summary of Battery Powered Simple Waste Auditing Data Logger ♻️
This project is an automated waste tracking system using an ESP32-CAM and HC-SR04 ultrasonic sensor to measure bin fullness and capture images of discarded items. Designed for environmental consciousness, it functions as a portable waste audit tool. The device utilizes deep sleep modes for power efficiency, running on three rechargeable AA batteries to last over a week. It connects to Wi-Fi to timestamp data via an NTP server, offering insights into waste accumulation trends similar to university-scale deployments like ZotBins.
Parts used in the Automated Waste Tracking System:
- ESP32-CAM
- 2 or 4GB micro SD card
- 5V Boost Converter
- HC-SR04 ultrasonic sensor
- Solid Wire
- Prototyping Board
- Female Header Pins
- Solder
- PLA Filament
- 3 AA Rechargeable Batteries
- 3 AA Battery Case
- M3 Screws
- Soldering Iron
- 3D Printer
- Wire Strippers
- Computer with Arduino IDE Installed
- FT232RL FTDI USB to TTL Serial Adapter Module
- 4 Female to Female Jumper Wires
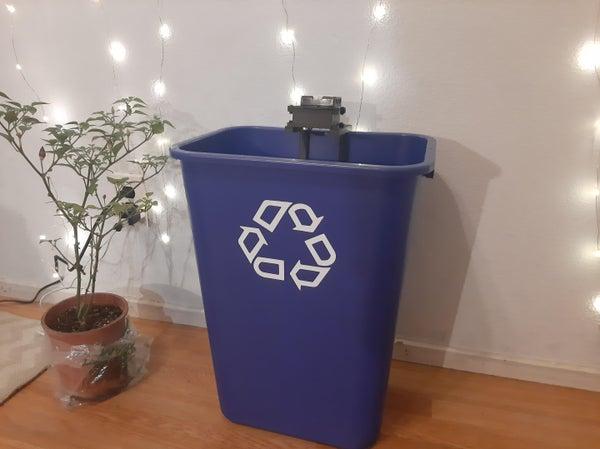
I wanted a way to keep track of how much waste I was generating just to be more environmentally conscious. So I created this project as an automated way to help keep track of waste accumulation through fullness measurements while also taking pictures of the objects thrown away.
To achieve this, I use the HC-SR04 ultrasonic sensor along with the ESP32-CAM. Doing this type of waste tracking is called a waste audit, which is a common practice used by universities to keep track of waste goals while also looking for opportunities increasing waste diversion rates.
I’ve actually done a couple in-person waste audits before at my University, it was actually pretty fun and insightful. With this concept I was also able to deploy sensors on 9 bins on campus with a research group called ZotBins. These types of devices helped provide useful insights such as bin usage and fullness trends. I hope to use this project to find my own insights about my own waste stream. This device could have a lot of potential as an IoT device, see the Further Discussion Section below for more details about this.
Step 1: Supplies ????????

Materials Needed
- ESP32-CAM (~$9 per unit)
- 2 or 4GB micro SD card(~$3.60 per unit)
- 5V Boost Converter (~$1.5)
- HC-SR04 (~$1.60 per unit)
- Solid Wire
- Prototyping Board (~$0.80 per unit)
- Female Header Pins
- Solder
- PLA Filament
- 3 AA Rechargeable Batteries* (~$4.50 per set of 3)
- 3 AA Battery Case (~$0.76 per unit)
- M3 Screws**
*Let’s be sustainable and use rechargeable ones 🙂
**8 mm screws are sufficient, but if you want two bolt the end of the screw you need at least a 12 mm screw (see 3D Printing the Case for a better idea of where the screws will go)
Tools Needed
- Soldering Iron
- 3D Printer
- Wire Strippers
- Computer with Arduino IDE Installed
- FT232RL FTDI USB to TTL Serial Adapter Module (~$3.50 per unit)
- 4 Female to Female Jumper Wires (link above comes with female to female jumper wires)
A lot of the materials and tools I linked could be found cheaper prices if bought from other vendors such as Ali Express or Banggood.
Step 2: Solder Components on Prototyping Board ????
- Use a 4cm x 3cm prototyping board. This will be approximately the same size as the ESP32 CAM. I cut a 4cm x 6cm board in half to get that size.
- Use two 8-pin female headers and place it on the center of board for the ESP32-CAM. I just cut a 20 pin female header piece to get the 8-pin female headers.
- (Optional) Place a 2-pin screw terminal block connector near the top. You can use this to conveniently plug in my battery pack of 3 AA batteries. If you don’t follow this step just solder the wires from your battery pack directly into the prototyping board.
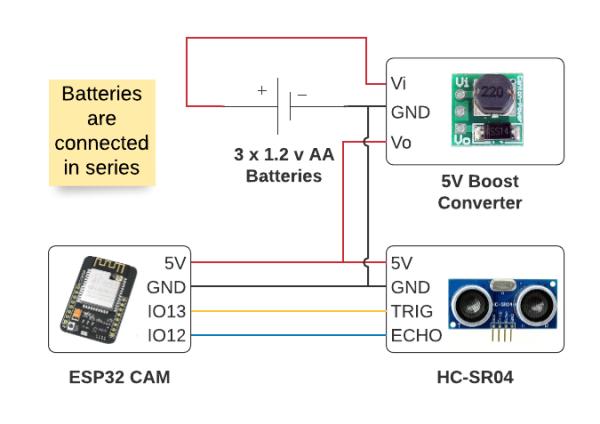
- Solder wires for HC-SR04 and the 5V Boost Converter. These wires will be used to connect the components to the prototyping board.
- Solder Components. Once everything is placed, just solder those components in place. See image above of my setup for reference.
- Plug in your ESP32 CAM into the female headers for reference. Helps you see which pins for the female headers correspond to which pin on the ESP32 CAM.
- Solder connections according to wiring diagram above.
Circuit Explanation
I decided to use the female headers because I wanted to reuse my ESP32-CAM for other projects as well. If you don’t mind, you can directly solder everything on the ESP32-CAM.
Step 3: Power Analysis ⚡
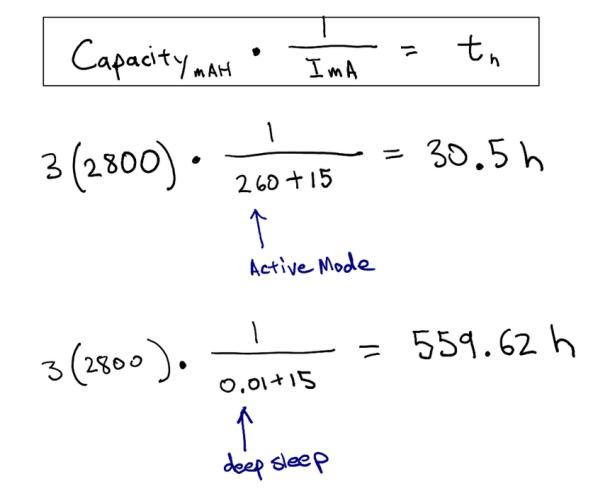
Current Draw Values
ESP32-CAM Active Mode 1 = 60-260 mA
ESP32-CAM Deep Sleep = 10uA
HC-SR04 Working Current = 15 mA
Explanation
With the values above I settled on using three 2,800 mAh capacity rechargeable AA batteries. I determined this by doing some quick calculations. I first did a high power consumption calculation where the ESP32-CAM is always in active mode, the battery lasted only 30.5 hours. Then I did a low power consumption calculation where the ESP32-CAM was always in deep sleep, the battery lasted 559.62 hours. I know that my code is in deep sleep most of the time so my estimates on how long this will power the sensor module will probably just be a couple hours less than 559.62 hours. So definitely enough to power the project for at least a week!
Step 4: Download the Arduino IDE and Add ESP32 Package ⬇️
I was going to write my own instructions for this, but mine was really just going to be a derivative of the one on Random Nerd Tutorials. Their content is really amazing and informative so big thank you and acknowledgement to the blog creators Sara and Rui for making these resource available to the public. So instead, please follow the instructions by watching their video or by following their tutorial, but please stop once you havethe Arduino IDE and the ESP32 by Espressif Systems package installed. I will give specific instructions for setting up the ESP32 CAM that varies from the tutorials in the next step.
Video Tutorial: Install the ESP32 Board in Arduino IDE in less than 1 minute (Windows, Mac OS X, and Linux)
Written Tutorial: Installing the ESP32 Board in Arduino IDE (Mac OS X and Linux instructions)
By the end of this tutorial you should have the following:
- An Arduino IDE
- The correct esp32 library added in the Preferences from this source: https://dl.espressif.com/dl/package_esp32_index.json
- esp32 library by Espressif Systems installed from Tools > Board > Boards Manager
Step 5: Select AI Thinker ESP32-CAM As Board in Arduino IDE ✅
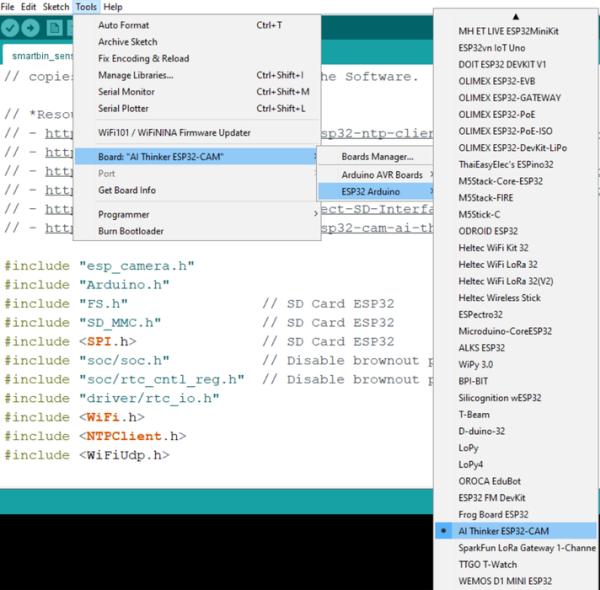
Refer to picture above for reference.
- Near the top left of the Arduino IDE select Tools
- Then go to Board > ESP32 Arduino > AI Thinker ESP32-CAM
- You might have to scroll down a bit to select AI Thinker ESP32-CAM
Step 6: Installing the NTP Client Library ????

We’ll be using Wifi and connecting to a NTP server to keep automatically determine the date-time stamp of when the fullness data was collected and when the image was taken. The NTP server is in UTC time, you can add offsets in the code to match your timezone, I explain this in the Code Explanation section.
- Download the NTP Client Library from GitHub here: https://github.com/taranais/NTPClient/archive/master.zip
- Unzip the file and go into the folder. Rename the folder NTPClient-master to NTPClient
- Move the folder to your Arduino IDE installation libraries folder. On Windows, I move the folder here: C:\Users\REPLACE_WITH_YOUR_USERNAME\Documents\Arduino\libraries
- Restart the Arduino IDE
Source: Battery Powered Simple Waste Auditing Data Logger
- What components are required to build this waste tracker?
The project requires an ESP32-CAM, HC-SR04 sensor, 5V boost converter, prototyping board, female header pins, solder, PLA filament, three AA rechargeable batteries, a battery case, M3 screws, a soldering iron, a 3D printer, wire strippers, an FT232RL adapter, and jumper wires. - How long will the batteries last during operation?
Using three 2800 mAh rechargeable batteries, the device can operate for approximately 559 hours in deep sleep mode, lasting at least a week in typical usage scenarios. - Does the system use Wi-Fi for time synchronization?
Yes, the system connects to a Wi-Fi network to access an NTP server which automatically determines the date-time stamp for collected data and images. - Can I reuse the ESP32-CAM for other projects?
Yes, the author used female headers to allow the ESP32-CAM to be easily removed and reused for other projects instead of being permanently soldered. - What software is needed to program the device?
You need the Arduino IDE, the ESP32 by Espressif Systems package installed via the Boards Manager, and the NTP Client library from GitHub. - Which specific board model should be selected in the Arduino IDE?
You must select AI Thinker ESP32-CAM under Tools > Board > ESP32 Arduino within the IDE settings. - Is it necessary to buy parts from a specific vendor?
No, materials can often be found at cheaper prices from vendors such as Ali Express or Banggood. - What is the primary purpose of the NTP client library in this project?
The library allows the device to connect to an NTP server to automatically determine the UTC time for timestamps, which can then be adjusted for local timezones.