Summary of BBC Micro:bit and Scratch – Interactive Steering Wheel & Driving Game
This project recreates a vintage racing game using a BBC Micro:bit and Scratch. The Micro:bit's accelerometer controls steering, while two switches trigger a horn sound. A ThreadBoard serves as the embedded system interface, connecting the microcontroller to conductive thread for easy button integration without sewing. The game features a user-controlled car dodging oncoming traffic in a two-lane highway setting.
Parts used in the BBC Micro Driver:
- ThreadBoard
- BBC Micro:bit
- 4mm (Diameter) x 3mm (Height) magnets
- Foam sheets
- Stainless steel conductive thread
- Tape
One of my class assignments this week is to use the BBC Micro:bit to interface with a Scratch program we’ve written. I thought that this was the perfect opportunity to use my ThreadBoard to create an embedded system! My inspiration for the scratch program comes from vintage handheld electronic games that my mother would get for me and my brother from the Goodwill or the corner store. I have many fond memories of those dusty LCDs, discolored plastic casings, and buttons that would mysteriously stick when pressed. I particularly remember the racing games that we would play (e.g. figure 2) where you could only shift between two lanes to dodge oncoming cars. In the spirit of revisiting my youth, I’ve recreated this type of game in Scratch.
The Micro:bit’s accelerometer is used to control the steering of the car, and the two switches are used to control the car’s horn. Scratch is used to play the driving game, titled: BBC Micro Driver.
The project page can be found here: https://scratch.mit.edu/projects/428740218/
If you have any questions, want to keep up with my work, or just toss around ideas, please do so on my Twitter: @4Eyes6Senses. Thanks!
The music in the video was provided by Vincent Haney.
Step 1: Materials
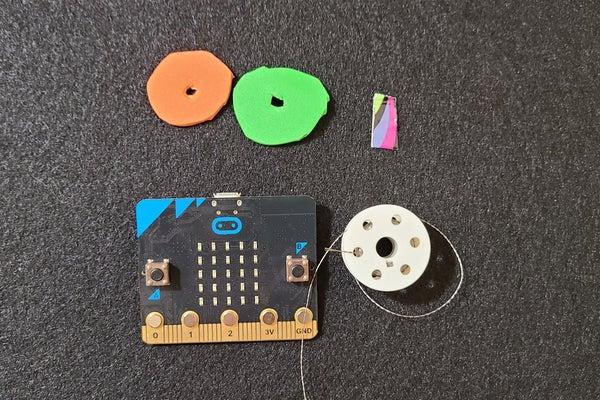
ThreadBoard – Link
BBC Micro:bit – Link – Follow these instructions to connect your microcontroller to Scratch
4mm (Diameter) x 3mm (Height) magnets – Link
Foam sheets – Link
Stainless steel conductive thread – Link
A Scratch account – Link
Tape
Step 2: Adding Magnets to Your Micro:bit Pins
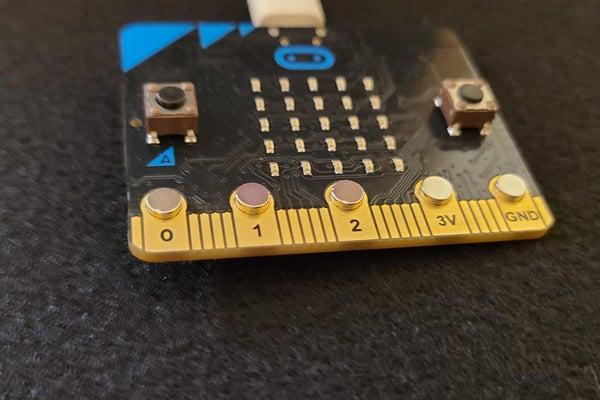
Now that you have the materials it’s time to add magnets to the five Micro:bit pins. The reason we are adding magnets to the pins is to (1) hold the Micro:bit securely to the magnet enriched ThreadBoard and to (2) allow for the easy connection between the pins and the conductive thread. Typically, to connect the Micro:bit with conductive thread you would need to sew and secure the thread around the open pins, and if you wanted to change your design you’d need to cut the thread attached to the Micro:bit and possibly resew your project. With the ThreadBoard you can simply drop your conductive thread on top of the magnets and they will keep the thread secure to the Micro:bit pins and the ThreadBoard.
– Isolate one disk magnet from the set. Make sure that you have identified which end of the magnet will attract or repel the other magnets, the poles of the five magnets need to be the same so that they are attracted to the magnets that will be embedded into the ThreadBoard.
– Gently push the magnet through the pin until it is secured. The magnet at this point should be crooked in the pin and will detach if placed on a metallic surface and pulled. Continue this process for the next four magnets.
– Using pliers or a flat surface, apply light pressure on the bottom of the magnets until they are secured in the pins and sit even. If at any point you want to remove the magnets, apply light pressure on the top and they’ll pop out easily.
Step 3: Create the Controller
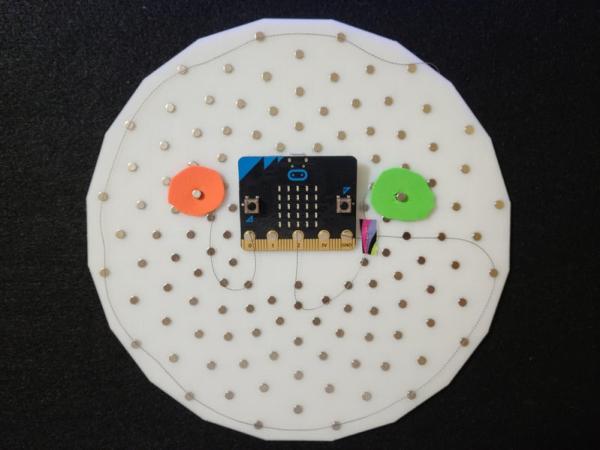
Once you have your materials, I suggest you start with wiring the two switches. The way the switches work is that you place a ground wire around the outer halo of the ThreadBoard, where your hands will hold the controller. Then, when your fingers touch the wires connected to the ThreadBoard’s “0” or “2” pins you will bridge the connection and cause the car to honk. Here are the steps:
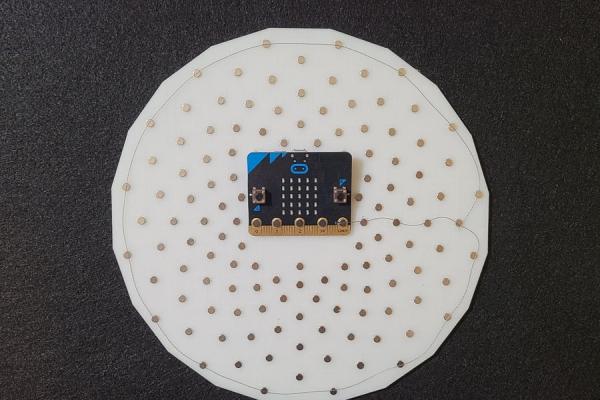
– Place the conductive thread on the outermost ring of magnets and then place the thread on the “GND” pin of the Micro:bit (Figure 1).
– For the left button, place one end of the conductive thread on the “0” pin of the Micro:bit. Create a trail to the left and place the end where you want the button. Grab your cut foam and thread it with the conductive thread (Figure 2), once you know where you want to place the button, secure the foam and thread with one of your extra magnets (Figure 3).
– For the right button, place a small piece of tape over the thread connected to “GND” (Figure 4) this will isolate the two wires and avoid causing a short. then follow the same steps as the left button.
Step 4: Create the Program
The link for the project can be found here: https://scratch.mit.edu/projects/428740218/. The code is broken into three parts: the user’s car, car 1 (the blue car), and car 2 (the red car). Car 1 & 2’s code is relatively the same, just with different x and y coordinates and a different “wait” function.
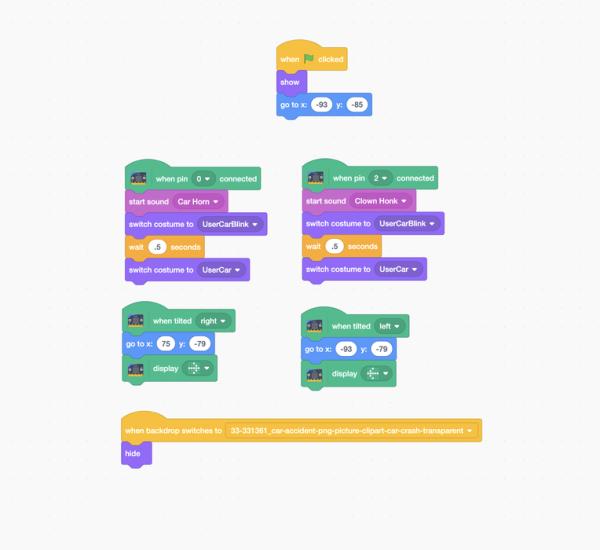
– User’s car (Figure 1): When the user presses the green flag/start button their car will start at a predetermined position. when the user tilts the controller left or right the micro:bit will display the direction, and the program will move the user’s sprite to either the left or right side of the road. When the user presses the switch on the controller the car will make either a car horn or clown honk (depending on if they press the left or right button), this will also cause the car’s tail lights to turn on (switch costume). When the car crashes with another car (this is handled in the car 1 and car 2 code) the backdrop will switch to the game over screen and the user’s car will disappear.
Car 1 & car 2 (Figures 2 & 3): When the user presses the green flag/start button, the score is reset to 0 and the game over screen switched to the main highway scene. The “repeat until” loop makes sure that cars are continuously generated as the user plays. The car is placed at the top and “glides” down the screen at a random interval ranging from 1 to 5 or 10 seconds (depending on the car). The if statement checks if there’s a collision between the user’s car and car 1 or 2, if yes, then we switch the backdrop to the game over screen and end the game. if there isn’t a collision, then we add 1 to the user’s score and the car disappears off the bottom of the screen.
Source: BBC Micro:bit and Scratch – Interactive Steering Wheel & Driving Game
- How is the car steered in the game?
The Micro:bit's accelerometer detects tilting left or right to move the user's sprite. - What components control the car's horn?
Two switches connected to the ThreadBoard bridge connections to trigger the horn. - Why are magnets added to the Micro:bit pins?
Magnets hold the board securely to the ThreadBoard and secure conductive threads without sewing. - How do the foam buttons work?
Conductive thread runs through cut foam pieces to create touch-sensitive areas that bridge circuits. - What happens when the car crashes with another vehicle?
The backdrop switches to a game over screen and the user's car disappears. - Can the design be changed easily?
Yes, the ThreadBoard allows changing designs by simply moving conductive threads rather than resewing. - How are the opponent cars generated?
A repeat until loop places cars at the top of the screen to glide down at random intervals. - What visual feedback occurs when the horn is pressed?
The car's tail lights turn on and the switch costume changes.