I’ve always thought it would be nice to have a car with a parking sensor. I don’t want to spend that kind of money until I pay off my student loans. However I do have the materials to make one myself thanks to a class I took on microcontrollers. Part of my motivation is that my car doesn’t make parking particularly easy. The back end is tall and it doesn’t extend out very far so I’m usually too far or too close.
This project will show you how to build your own parking obstacle sensor for your car.
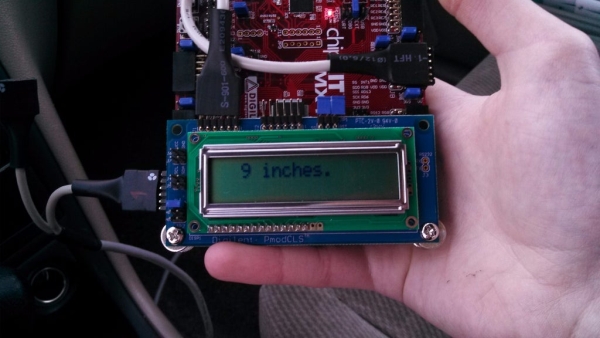
This obstacle sensor shows the distance in inches, cm, or mm depending on the “units” variable you can change in the code. It also displays between 0 to 16 bars in the bottom indicating 0 to 255 inches. The sonar module can only detect between 6 and 255 inches. Any less than 6 will show as 6 and any more than 255 will display as 255.
Step 1: Tools and Materials
What do you need?
Tools
- Soldering Iron
- Solder
- Pliers and Wire Strippers
- Screwdriver
- Multimeter
- Helping Hands (optional but highly recommended)
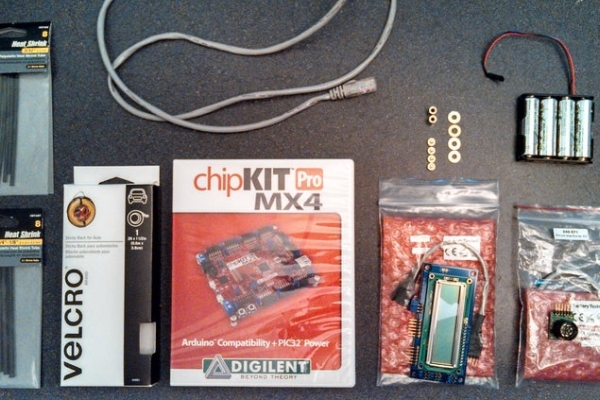
Materials
- 3/32 inch dia black heat shrink tubing – $3.49
- 1/4 – 1/8 inch dia black heat shrink tubing – $2.99
- Velcro for Auto BLACK : 1-1/2IN X 2 FT – $9.49 (You only need 1-1/2 in X 4 in. I just bought extra for other projects)
- 25 ft cat5e patch cable – $7.99
- chipKIT Pro MX4 : Embedded Systems Trainer Board – $79
- PmodCLS: Character LCD with Serial Interface – $39.99
- PmodMAXSONAR: Maxbotix Ultrasonic Range Finder – $34.99
- Standoffs – $1.49
- Battery Holder – $2.99
- 2x Pmod cable kit: 6-pin (6 in) $3.99
Step 2: Initial Testing

Test the hardware first to make sure it works and you have the pin selections right. To do this you will need MPIDE. I had used my board with MPLAB X IDE previously so I needed to reinstall the bootloader on the MX4 before I could use it with MPIDE. If you have a fresh board you will not have to do this.
Now download the example project for the PmodCLS LCD screen here. Get the one under MPIDE and follow the README contained within. Open the example project CLSDemo under CLS and upload it to the board. If all the jumpers are in the right places the program will run and show the screen you can see in the first picture.
note: If you get the error indicating you need Bounce.h get it from here and add it to your libraries.
To run the example project for the MAXSonar module on an MX4 you’ll need to change a few pin definitions in the program.
#define ANpin 48
#define RXpin 49
#define PWpin 50
Get the example installed and change the pins to the following and plug the sonar module into the top row of JH. If you upload your revised example project and open the Serial Monitor window in MPIDE you should see the same output as you see in the Serial Monitor.
With that taken care of we can put the obstacle sensor together and program it.
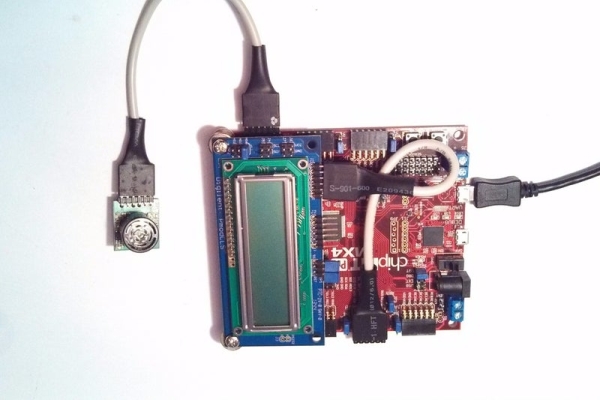
Step 3: Hardware Layout

I wanted this project to be as portable as I could make it given the size of the MX4. The screw holes on the LCD line up perfectly with the left or right screw holes on the MX4 so I decided to screw it to the top using standoffs. They were a touch too short so I added washers on the top and bottom of the standoffs as you can see in picture 2.
To stop the LCD cable sticking out the side bend the Pmod Header pins around. Use a pair of pliers to bend all of the pins up. It doesn’t take very long.
The battery will be attached to the back using velcro in a later step.
Step 4: Software
Download the MyRangeDisplay folder and open MyRangeDisplay.pde with MPIDE. Upload this to your MX4 board and it should display the distance from the sonar module to the nearest detectable obstacle. I only have one sensor displaying on the screen but when I get another one I will modify it to show both on the same screen. It might be more cramped on the display but it will help when backing towards something at an angle.
The most up to date version of this program will be on my GitHub here. I know I’ll have to tweak the program to make it more to my liking.
Source: ChipKIT Parking Obstacle Sensor