
Summary of Control Daikin AC From Anywhere With Beautiful UI and Losant
This article details a project to remotely control a Daikin air conditioner globally using an ESP8266 microcontroller and the Losant IoT platform. The system connects the chip to Wi-Fi, listens for commands from a custom dashboard, and sends IR signals to the AC unit. Users can adjust status, fan speed, temperature, quiet mode, and powerful mode via a web interface.
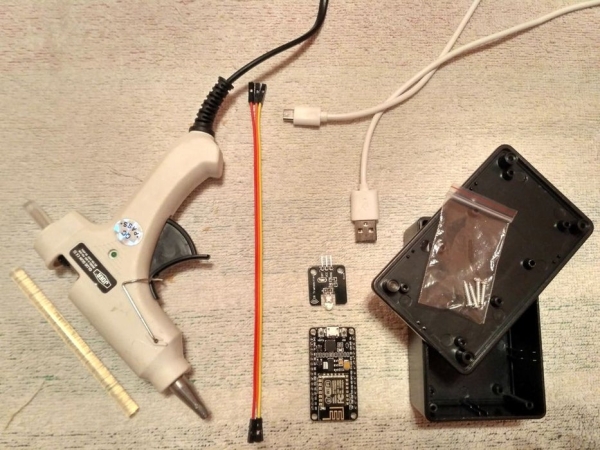
Parts used in the Control Daikin AC From Anywhere Project:
- Plastic case
- ESP8266
- IR Transmitter
- USB Cable
- Jump Wires
- Hot Glue Gun
In this instructable we will learn how to control Daikin air-conditioner from any point in the world using Losant IoT Enterprise Platform and their amazing UI dashboard
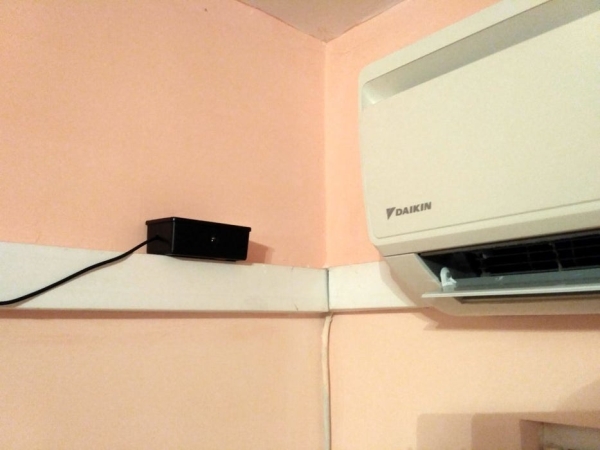
The ESP8266 is a low-cost Wi-Fi chip with full TCP/IP stack and MCU (microcontroller unit)
Step 1: How It Works
The microcontroller (ESP8266) connects Losant IoT platform and waits for input (user changes something in the dashboard) then the IR sensor sends information to the Daikin air-conditioner
Make sure the IR transmitter is as close as possible to the AC
Step 2: Required Parts and Components
Step 3: Assembling the B0X
- Drill 2 holes with screwdriver or drill or whatever is easy for you
- Hot glue the transmitter to one of the holes (the one which will point to the AC)
- Connect ESP8266 to the IR Transmitter
- Connect the USB cable to the ESP8266
- Run the USB cable through the other hole
- Close the case with 4 screws
- You are done 🙂
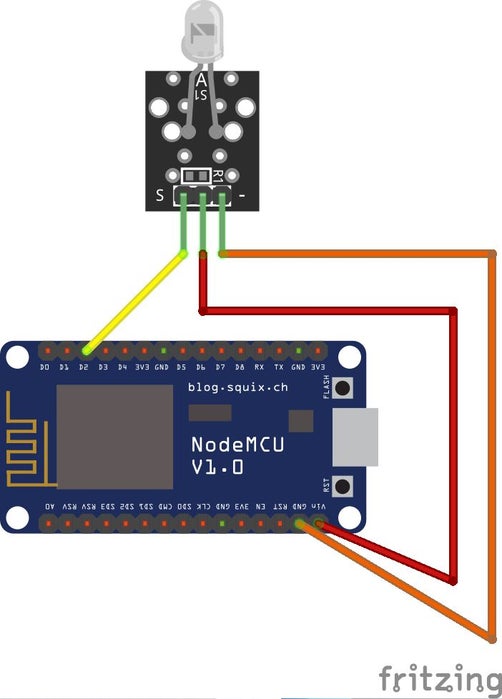
Wiring the IR Transmitter to the ESP8266
IR Transmitter – EPS8266
– (minus, GND) – GND
+ (plus, VCC) – VIN
S (DAT) – D2
Step 4: Setting Up the Device in Losant
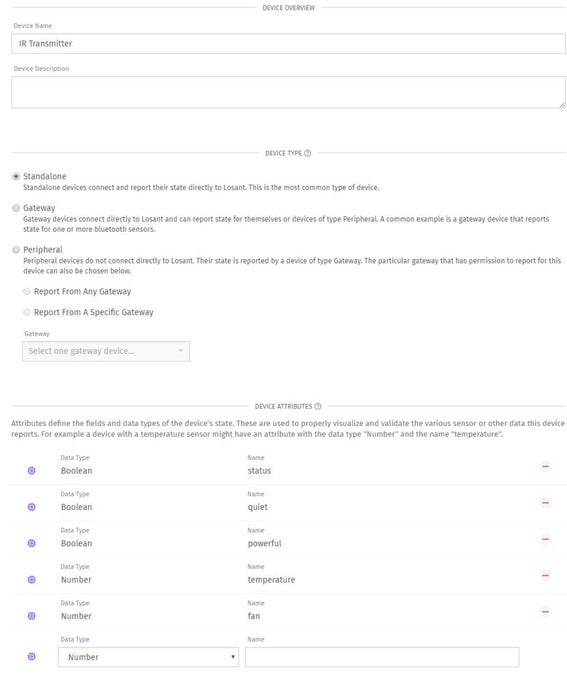
- Create a device called IR Transmitter
- Add 5 device attributes
- Data type – Boolean with Name status
- Data type – Boolean with Name quiet
- Data type – Boolean with Name powerful
- Data type – Number with Name temperature
- Data type – Number with Name fan
Here a full tutorial on how to get started by Losant
Step 5: Making the Dashboard
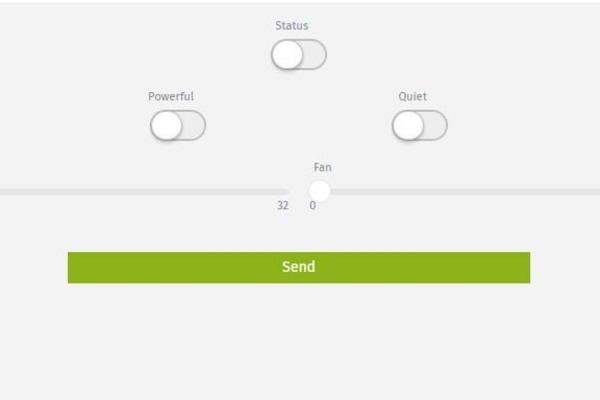
Create a dashboard called AC DASHBOARD and Input Controls Block
Add 6 Controls
- Toggle Input with Label = Status, Template-ID = toggle-0, Dynamic Value, Device IDs/Tags = IR Transmitter, Attribute = status, Default value = false
- Toggle Input with Label = Quiet, Template-ID = toggle-1, Dynamic Value, Device IDs/Tags = IR Transmitter, Attribute = quiet, Default value = false
- Toggle Input with Label = Powerful, Template-ID = toggle-0, Dynamic Value, Device IDs/Tags = IR Transmitter, Attribute = powerful, Default value = false
- Range Input with Label = Temperature, Template-ID = range-0, Min = 18, Max = 32, Device IDs/Tags = IR Transmitter, Attribute = temperature, Default value = 18
- Range Input with Label = Fan, Template-ID = range-1, Min = 0, Max = 5, Device IDs/Tags = IR Transmitter, Attribute = fan, Default value = 0
- Button trigger with Label = Send, On Click = Send Device Command, Device IDs/Tags = IR Transmitter, Command name = command, Payload = check below
Payload:
{
"status" : {{toggle-0}},
"quite" : {{toggle-1}},
"powerful" : {{toggle-2}},
"temperature" : {{range-0}},
"fan" : {{range-1}}
}
Step 6: Upload the Code to the ESP8266
You need to add the Losant library
Upload it to the ESP8266
Congratulations you can now control your AC from anywhere
#include <ESP8266WiFi.h>
#include <IRremoteESP826.h>
#include <IRsend.h>
#include <Losant.h>
#include <ir_Daikin.h>const char *WIFI_SSID = "ssid";
const char *WIFI_PASS = "pass";const char *DEVICE_ID = "device-id";
const char *ACCESS_KEY = "access-key";
const char *ACCESS_SECRET = "access-secret";WiFiClientSecure wifiClient;
IRDaikinESP dakinir(D2);LosantDevice device(DEVICE_ID);void handleCommand(LosantCommand *command) {
  Serial.println();
  Serial.print("Command received: ");
  Serial.println(command->name);  if (strcmp(command->name, "command") == 0) {    JsonObject &payload = *command->payload;
    payload.printTo(Serial);
    char json[400];    StaticJsonBuffer<200> jsonBuffer;    payload.printTo(json, sizeof(json));    JsonObject &root = jsonBuffer.parseObject(json);    if (!root.success()) {
      Serial.println("parseObject() failed");
      return;
    }    bool status = root["status"];
    bool quiet = root["quite"];
    bool powerful = root["powerful"];    int16_t temperature = root["temperature"];
    int16_t fan = root["fan"];    if (status) {
      dakinir.on();
    } else {
      dakinir.off();
    }
    dakinir.setFan(fan);
    dakinir.setTemp(temperature);
    dakinir.setQuiet(quiet);
    dakinir.setPowerful(powerful);    dakinir.send();
  }
}void connect() {
  Serial.print("Connecting to ");
  Serial.println(WIFI_SSID);  WiFi.begin(WIFI_SSID, WIFI_PASS);  while (WiFi.status() != WL_CONNECTED) {
    delay(500);
    Serial.print(".");
  }  Serial.println();
  Serial.println("WiFi connected");
  Serial.println("IP address: ");
  Serial.println(WiFi.localIP());  Serial.println();
  Serial.print("Connecting to Losant...");  device.connectSecure(wifiClient, ACCESS_KEY, ACCESS_SECRET);  while (!device.connected()) {
    delay(500);
    Serial.print(".");
  }  dakinir.begin();  Serial.println("Connected successfully");
}void setup() {
  Serial.begin(115200);  device.onCommand(&handleCommand);  connect();
}void loop() {
  bool toReconnect = false;  if (WiFi.status() != WL_CONNECTED) {
    Serial.println("Disconnected from WiFi");
    toReconnect = true;
  }  if (!device.connected()) {
    Serial.println("Disconnected from Losant");
    Serial.println(device.mqttClient.state());
    toReconnect = true;
  }  if (toReconnect) {
    connect();
  }  device.loop();
}
Source: Control Daikin AC From Anywhere With Beautiful UI and Losant
- How does the microcontroller interact with the air conditioner?
The ESP8266 waits for input from the Losant dashboard and then uses the IR sensor to send information to the Daikin air-conditioner. - Where should the IR transmitter be placed?
The IR transmitter must be positioned as close as possible to the AC unit. - What are the five device attributes required in Losant?
The required attributes are status (Boolean), quiet (Boolean), powerful (Boolean), temperature (Number), and fan (Number). - How is the IR Transmitter wired to the ESP8266?
Connect the minus GND to GND, plus VCC to VIN, and S DAT to D2 on the ESP8266. - What components are needed to assemble the box?
You need a plastic case, an IR transmitter, an ESP8266, a USB cable, jump wires, and a hot glue gun. - Can I control the AC from anywhere?
Yes, once the code is uploaded and connected to Losant, you can control your AC from anywhere. - What libraries are required for the code upload?
You need to add the Losant library along with ESP8266WiFi, IRremoteESP826.h, IRsend.h, and ir_Daikin.h. - What happens if the device disconnects from WiFi or Losant?
The loop function detects the disconnection and automatically triggers the connect function to re-establish the link.
