Summary of Dual Cores & Interrupts on Pi Pico
This article demonstrates using the Raspberry Pi Pico with MicroPython to manage dual cores and interrupts. It explains how to set up Core 0 for counting and Core 1 for LED control, utilizing global variables and interrupt service routines triggered by buttons. The guide highlights best practices like printing from only one core, shutting down cores in sequence, and using garbage collection to maintain stability during long-running tasks.
Parts used in the Dual Cores & Interrupts on Pi Pico:
- Raspberry Pi Pico microcontroller
- Pimoroni Pico Display screen
- Pimoroni .UF2 file for Pico
- Thonny Editor
- Pico Decker
- USB cable
- Stripboard or Breadboard
- 2 x momentary button switches
- 4 x LED
- 4 x 330 Ohm resistors
- Connection jumper wires
The new Raspberry Pi Pico offers Dual Cores and Interrupts if you use MicroPython. I thought I would give it a go and try explain some of the pitfalls to avoid.
This project keeps the action running on the two cores very simple, so that we can concentrate on new aspects of the code:
- setting up and activating the cores
- shutting down the cores in sequence
- using interrupts
The video shows this simple example, with a rapid, on screen, count running on Core 0 and blinking/ moving LEDs on Core 1. The first core begins counting but does not start the second core until the count has got to 30, so we can see that it does not slow down as the LEDs start moving. The two buttons offer control. The first button changes the direction of movement of the blinking LED each time it is pressed. The second halts both cores when we have had enough.
Each time a button is pressed an interrupt service routine changes a global value which is shared by both cores. ‘running’ changing to from True to False halts the program while ‘led-dir’ has values of +1 or -1 to specify the direction of the ‘moving-led’.
Supplies:
Raspberry Pi Pico microcontroller
Pimoroni Pico Display screen
Pimoroni .UF2 file for Pico
Thonny Editor
Pico Decker
USB cable
Stripboard or Breadboard
2 x momentary button switches
4 x LED
4 x 330 Ohm resistors
Connection jumper wires
Step 1: The Circuit
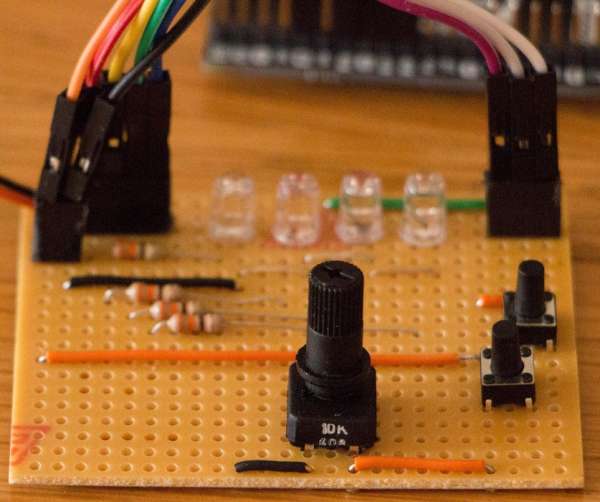
The LEDs, with 330 Ohm protection resistors, are on pins GP2, GP3, GP4 and GP5.
The button switches, with internal pull-downs, are on GP27 (LED blink direction) and GP26 (run/halt).
The Pi Pico, and Pico Display screen are plugged into a Pico Decker.
Step 2: Initial Section of Code
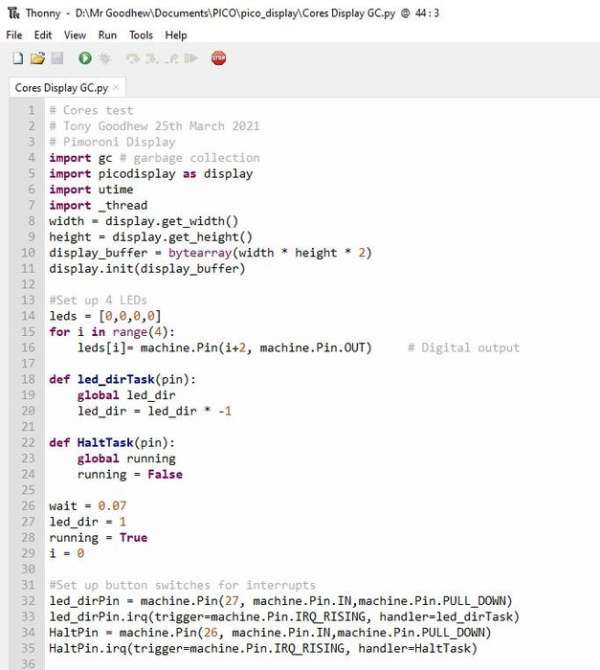
This section does the following:
- reads in the required libraries
- sets up the screen
- sets up the LEDs
- defines the interrupt services routines
- sets some initial values
- sets up the buttons for interrupts as the pin goes LOW to HIGH, when pressed
Step 3: Code – Section 2
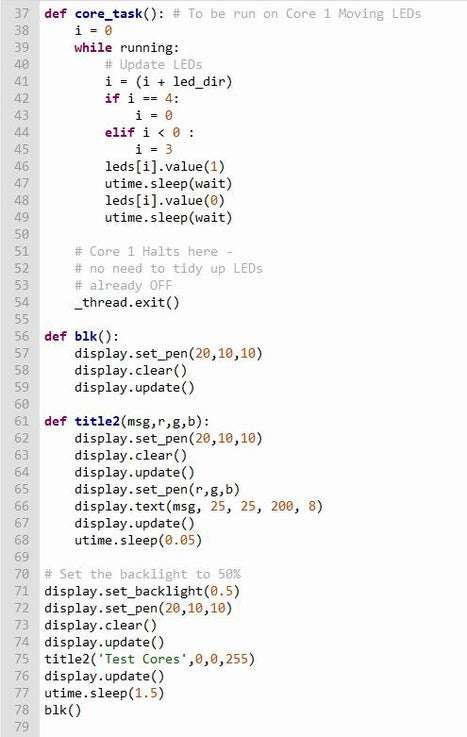
Here we:
Setup the task for Core1 – running the LEDs
Define basic routines for the display
Start the program with a Title
Note that the loop is terminated by the global variable running changing to False. At the bottom of the loop the LEDs are already OFF so we do not need to turn them off to tidy up. The Core 1 task is then killed with the exit() instruction.
Step 4: Code – Final Section
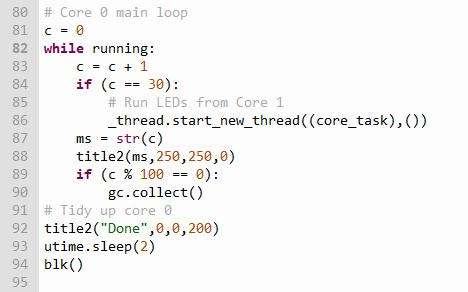
This is the code for the main loop, running on Core 0.
It starts counting on the screen and when it gets to 30 it activates the the Task running on Core 1.
Every time the counts passes another hundred it activates a garbage collection routine to tidy up the memory.
It will keep running the loop until the HALT button is pressed and running is changed from True to False.
It tidies up with a Done message, waits to make sure the other core has finished. (Which was also terminated by the global variable running changing to False.
Step 5: Things to Keep in Mind With Cores & Interrupts
Only print from one core, preferably Core 0. Thonny jumbles up messages if you use both cores for printing. It can also produce strange output in the REPL. (The Thonny/Pico connection can occasionally be lost. It may be better to output results to a screen rather than the REPL.)
Always finish Core 1 before Core 0. If you interrupt with the STOP icon in Thonny this may only halt core 0 and leave core 1 running. This will cause a problem when you try to run the script again. (Unplug the USB cable to power down and stop both cores.
I’m not sure why but adding the occasional garbage collection routine kept things going longer. (I got the counter up to 35500 before I stopped the cores.)
Interrupt service routines must be very short. Do not attempt to print anything in a service routine as this is very slow.
Use global variables to pass values between cores.
Please let me know how you get on and if you found this useful. Have fun with your coding.
Source: Dual Cores & Interrupts on Pi Pico
- How do I change the direction of the blinking LED?
Pressing the first button triggers an interrupt that changes the global led-dir value to +1 or -1. - What happens when the second button is pressed?
It triggers an interrupt that changes the running variable from True to False, halting both cores. - Can I print messages from both cores simultaneously?
No, you should only print from one core, preferably Core 0, because Thonny jumbles messages if both are used. - Why does adding a garbage collection routine help?
Adding occasional garbage collection keeps the program running longer and prevents memory issues. - What is the correct order for shutting down the cores?
You must always finish Core 1 before Core 0 to avoid problems when running the script again. - How can I stop both cores if Thonny fails?
If the STOP icon only halts Core 0, unplug the USB cable to power down and stop both cores completely. - What is the recommended length for an interrupt service routine?
Interrupt service routines must be very short and should not attempt to print anything as it is slow. - How do cores communicate values between each other?
Use global variables to pass values between cores, such as changing the running state or led-dir.