Introduction
The “Electric Etch” project takes the classic Etch-a-Sketch® toy and turns it into a non-volatile, continuous-line display capable of drawing the current time and text messages.
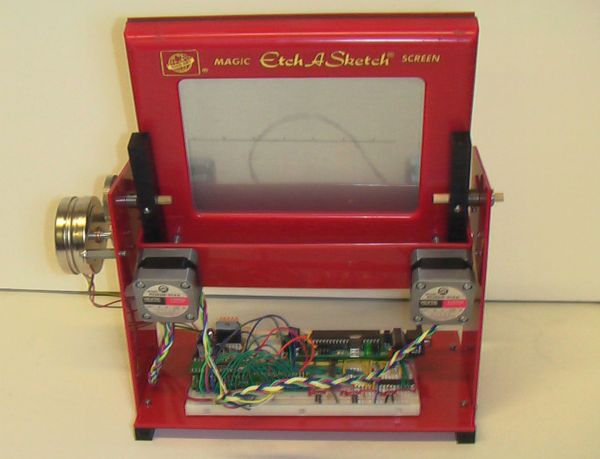
On the classic Etch-a-Sketch, it is notably difficult to draw shapes by hand that involve elements any more complex than simple horizontal and vertical lines. That’s why we decided to motorize this toy and apply our knowledge of circuitry, software, and mechanics for a curious mix of retro playthings and high-tech embedded microcontroller applications. Not only did we want to slap accurate motors on the Etch-a-Sketch’s knobs, but we also sought to implement a tipping mechanism that would completely remove manual manipulation from the handheld toy. It would draw and erase completely autonomously, with accuracy and speed that is otherwise unattainable by hand. The end result met our expectations and revealed many the challenges involved in combining mechanics, electronics, and software in one project.
High Level Design
Inspiration
When we set about brainstorming ideas for an ECE 4760 final project, we wanted to involve a good mix of software, electronics, and mechanics. As we looked to the web for inspiration, we stumbled across a curious project by Angela Yuan: a motorized Etch-a-Sketch that would draw the time once every minute and then erase itself. We immediately found this mix of retro childhood toys and high technology attractive; it had the potential to involve significant mechanics, a fair bit of software, and high-power motor circuitry – just what we were looking for. Angela’s project – itself inspired by the work of Scott Ferguson – looked quite polished, and it was apparent that she had access to complex CNC machinery and expensive mechanical components, such as laser cutters and belt drives. These resources were out of our reach and budget, and so we decided that making a comparably-polished motorized Etch-a-Sketch would be both challenging and fun. To differentiate our project from Angela’s, we wanted to use a full-sized Etch-a-Sketch (not the “Pocket” version in her project), and add the feature of printing arbitrary messages on the screen through an RS-232-based interface running on a PC. This proved to be a project with many challenges and caveats, but in the end we learned much and were satisfied with our result.
Background Math
The most significant mathematics involved in our project dealt with drawing lines of arbitrary slopes in an efficient manner on an 8-bit microcontroller which had no floating-point unit. As line-drawing was one of the first applications of computer graphics, it was a well-documented problem with solutions dating back to the early 1960’s. The line-drawing algorithm developed Jack Bresenham at IBM in 1962 was used for efficiently computing quantized approximations of lines between two arbitrary points for applications such as linear plotters. In the Lab 4 exercise of ECE 4760, sample code was provided to compute arbitrary line rasterization into a screen buffer. The algorithm used therein was specifically optimized for low-level, limited-computing calculation that involves no multiplication or division, and instead is implemented using only integer arithmetic: addition, subtraction, shifts, and comparisons. For details about this method of optimized line drawing, see the University of North Carolina line-drawing algorithm web page. It works by iterating over the longer dimension of a line between two x-y points to ensure that the slope is always less than one, which in turn enables the use of integer-only operations, allowing the algorithm to be very fast.
As used in our project, the algorithm is modified to progress the horizontal and vertical stepper motors which directly drive the Etch-a-Sketch’s respective knobs. The stepper motors we chose to do this job provided for very high accuracy; at 400 steps per revolution, they allowed us to define the Etch-a-Sketch’s screen space with a rough resolution of 2000 horizontal increments and 1300 vertical – far more than we expected and, quite frankly, needed. This resolution was also flawed by the Etch-a-Sketch’s considerable mechanical backlash – a problem discussed later. By abstracting the function of line drawing to an act of going from the current point on the screen to a desired point by a straight line, we were able to define alphanumeric characters and common punctuations as a set of x-y points. These x-y points mapped to absolute positions on the Etch-a-Sketch’s screen, and moving its cursor between them was a matter of updating the desired position in software.
To generate 42 character mappings (10 numbers, 26 capital letters, and 5 punctuations and a space), we wrote scripts in MatLab that allowed us to rapidly produce good-looking characters with accuracy by plotting the points in MatLab figures. For the curved lines of numbers like “8” and letters like “G”, we used sinusoidal and elliptical functions to generate coordinates of various arcs. The curves were approximated with points connected by straight lines. The more simple characters, like the number 1, were defined in about 10 points, whereas the complex, curvy characters, like the letter S, had upwards of 72 points. To simplify the drawing of all the characters, their points were defined in x-y coordinates relative to an “anchor point” which was near the bottom left of the letter. This also allowed us to arbitrarily scale the size of the letters by simply multiplying all their coordinates by a set factor and aspect ratio. The MatLab scripts also output the final coordinates automatically in a format understood by the C compiler used in the AVR development tools.
Design Tradeoffs
To obtain accurate actuation of the Etch-a-Sketch’s knobs and precise tilt angles for erasing the screen, we opted to use stepper motors. Stepper motors progress in a direction by a defined angular increment when given an appropriate sequence of currents to their magnetic coils, known as phases. They also provide considerable torque, which was necessary to overcome the stiffness of the Etch-a-Sketch’s knobs and the force required to tip it for erasing the screen. The tradeoff in using stepper motors is their rather sophisticated control. The phases of the stepper motors need to be energized in specific directions (i.e., the directions of the current in the motor’s coils) and at specific intervals to provide for clockwise and counter-clockwise turning. This is typically done with a state machine, and usually involves upwards of eight states to progress the motors in either directions. To ease the load off of the microcontroller code, we opted to use dedicated stepper-motor controller IC’s for all three motors. These IC’s required a minimum of two binary signals – a direction signal for clockwise and counter-clockwise rotation and a clock signal which would progress the motor’s position by one step angle with every pulse.
A second tradeoff in using stepper motors is the lack of internal feedback. The microcontroller and driver IC rather dumbly assume that the motors progress appropriately when given the right signals, but have no way of actually confirming that the motor did, in fact, progress in that direction. This became a problem when the Etch-a-Sketch’s knobs stiffened up at certain points on the screen and the stepper motors failed to rotate when they could not overcome the sudden increase in opposing torque. The software, however, would not be aware of this unless more circuitry was developed to accurately sense the rotation – a feat that was outside of our budget and time allowance. The first stepper motors we used provided just slightly more torque than the minimum required to turn the Etch-a-Sketch’s knobs, and suffered greatly from this skipping problem when they encountered increase opposing force from the toy’s imprecision. When we upgraded to stronger stepper motors, the problem was minimized but still occurred occasionally. An alternative solution that we briefly investigated was using servomotors, which have built-in feedback mechanisms that ensure proper rotation. However, the high torques required in this application caused suitable servomotors to be very expensive and large, so stepper motors were chosen in the end and generally worked well.
From these hardware tradeoffs come our high-level software tradeoffs. As described, our software has no feedback loops to determine whether the stepper motors progressed to the determined position. Involving feedback methods would have greatly complicated our code and required much more time, so we sacrificed this functionality in order to keep things simple. As a result, we had to accept the occasional hitch in the motors’ actuation brought on by inconsistent load torque. Secondly, we avoided implementing the state machines necessary to manage stepper motors in software in order to maintain simplicity. The tradeoff was using more discrete components, i.e., the L297 stepper drivers, which complicated our circuitry.
Intellectual Property and Standards
The Etch-a-Sketch toy is trademarked by the Ohio Art Company and was patented in 1962 (coincidentally, the same year that Bresenham invented his line-drawing algorithm!) and we respected the company’s rights to the product. We did not attempt to reverse-engineer it or intend our use of the Etch-a-Sketch for profit– we simply replaced hands with motors for completely academic purposes. Save for tapping a few holes and removing the white plastic knobs of the device, we did not do any extensive modification.
The only standard to which we complied with in the scope of the project was the RS-232 (Recommended Standard 232) used for serial communication between the microcontroller and the computer. This long-standing standard, again coincidentally established in the 1960’s, is defined by the Electronics Industries Association. The details of this standard were largely unseen to us as the designers, as the MEGA644’s USART circuitry and the MAX233 level-shifting IC took care of all protocol and voltage level specifications.
Implementation
Mechanics
The major mechanical components of Electric Etch were the front motor-mounting plate and the tilting chassis. The front motor-mounting plate is to hold two motors that drive the vertical and horizontal knobs; the chassis is to tilt Etch-a-Sketch about its center of mass to erase the screen. For ease of mechanical manipulation, acrylic was chosen to be the basic material of the mechanical structure. Despite its brittle characteristic, acrylic proved to be sturdy enough to hold relatively heavy motors as well as Etch-a-Sketch.
Parts List:
| Item | Part Number | Vendor | Unit Price | Quantity | Cost |
|---|---|---|---|---|---|
| Total Cost | $51 | ||||
| Microcontroller | ATmega644 | ATMEL | $8 | 1 | $8 |
| Etch-a-Sketch | N/A | Ohio Art Company | $11 | 1 | $11 |
| Unipolar stepper motor | Vexta PX243M-01AA | Jameco | $10 | 2 | $20 |
| Bipolar stepper motor | Airpax LB82773-M1 | Scrap(476 lab) | Borrowed | 1 | 0 |
| Darlington arrays | ULN2003A | STMicroelectronics | Sampled | 6 | 0 |
| Stepper motor controller | L297 | STMicroelectronics | Sampled | 3 | 0 |
| H-bridge | L298 | STMicroelectronics | Sampled | 1 | 0 |
| RS232 level shifter | MAX233CPP | Maxim | Sampled | 1 | 0 |
| White board | N/A | N/A | $6 | 2 | $12 |
| Custom PC board | N/A | N/A | Owned | 1 | 0 |
| Gear set | N/A | Scrap(TAM lab) | Borrowed | 1 | 0 |
| Bushings | N/A | Scrap(TAM lab) | Borrowed | 3 | 0 |
| Diode | 1N5350B | Scrap(CUAUV lab) | Borrowed | 8 | 0 |
| SOIC carrier | N/A | Scrap(CUAUV lab) | Borrowed | 3 | 0 |
| Heat sink | N/A | Scrap(CUAUV lab) | Borrowed | 1 | 0 |
| Acrylic and plastic | N/A | Scrap(CUAUV lab) | Borrowed | N/A | 0 |
| Screws | N/A | Scrap(CUAUV lab) | Borrowed | 30 | 0 |
| Power supply | ATX power supply | Scrap(CUAUV lab) | Borrowed | 1 | 0 |
For more detail: Electric Etch Using Atmega32