Summary of Entertainment Center Cooling System
This article details a DIY cooling solution for an entertainment center plagued by high internal temperatures. The author replaced a loud, manually controlled fan with an automated system that adjusts speed based on real-time temperature readings. Using Microchip and Mikroe hardware, the project ensures quiet operation while maintaining optimal thermal conditions without manual intervention.
Parts used in the Entertainment Center Cooling System:
- Xpress evaluation board (DM164140)
- MEBus Breakout board
- Thermo 5 Click module
- Fan Controller Click module
- 4 Wire Fan (92mmx32mm)
- 12V Wall Adapter (1A or higher)
As nice as an entertainment center with all the AV equipment neatly stacked behind a glass door looks, the ventilation leaves a lot to be desired, which meant temperatures inside the enclosure were often well in excess of 100F. I could just leave the door open while things were running, but that looked bad. At first I cut a hole in the back and had a computer fan blowing at full power, but the sound was loud enough to be annoying. While putting a potentiometer in series to control speed could work to fix that, I didn’t want to have to tweak it if I added more things to the entertainment center, or have it going louder than it needed to be if not everything was on and generating heat. My solution was to adjust the fan speed based on temperature, using an off the shelf temperature sensor and fan controller module from Mikroe, and control it with an evaluation board from Microchip.

Step 1: Hardware
For this project, I used the following:
Xpress evaluation board
http://www.microchip.com/Developmenttools/ProductDetails.aspx?PartNO=DM164140
This particular board has the advantage of both its low cost, and the onboard regulator which would allow me to power both the board and the fan from the same source.
MEBus Breakout board
https://www.tindie.com/products/perkyguy/xpress-dual-click/
Thermo 5 Click
https://shop.mikroe.com/thermo-5-click
Fan Controller Click
https://shop.mikroe.com/fan-click
4 Wire Fan
Any 4 wire fan will work for this, this one was just cheapest at the time
12V Wall Adapter
I just used one I had on hand, make sure whichever one you use can supply at least 1A.
This breakout board was necessary to use two Click modules on the Xpress board.
Step 2: Electrical Setup

Electrical setup was fairly straightforward. I plugged the breakout board into the Xpress board, then plugged both clicks into the breakout board. I soldered wires onto a four pin male header to connect to the fan, and then put those wires (except for the one for power) into the screw terminals on the fan board. I soldered ground on the power supply to ground on the board, and 12V to both the power wire for the fan, and to V+ on the Xpress board.
Step 3: The Code
I made use of the click module support for Microchip Code Configurator, available here, to handle most of the heavy lifting for device setup. The, code, available here, reads the temperature, and then sets the motor speed proportional to the temperature. At 90F or below, the fan goes at minimum speed, ramping up to full speed at around 100F.
Step 4: Installing the Fan
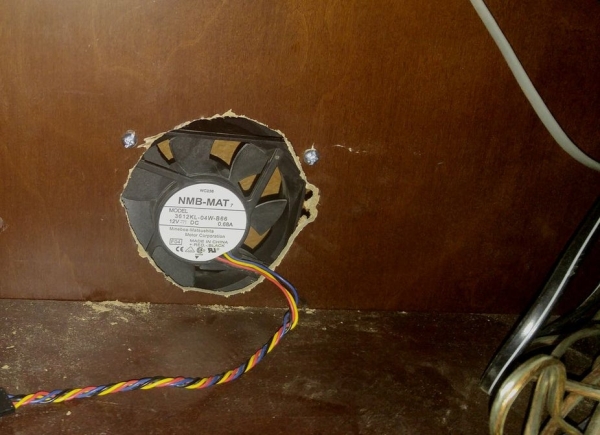
I drew a circle the correct size on the wood, and used a Dremel cutting tool to cut out the circle. The quality of the cut isn’t great, and if I did it again I would use a drill circle cutter, but the fan will be hidden behind the audio system, so it’s not a huge deal. I installed the fan on the back of the entertainment center to save room inside because I had room in the back, but it would have been fine to have it inside. If you don’t want to cut a hole in your furniture, even just having the fan providing some circulation inside should improve temperatures, although not as well.
Once the fan was installed, I put the control system into the back of the case, plugged the motor wire into the four pin header, and plugged in the power supply.
Step 5: Final Thoughts
The temperature inside the entertainment center is now at a reasonable level, and the sound produced by the fan is barely noticeable. If I ever add any more equipment into the case, the system will automatically compensate for the additional heat, meaning I should never need to update the code on the system. In the future I might add a second fan at the top for a push pull configuration, or add a second temperature sensor to base speed on difference from ambient temperature. Overall I’m very happy with the results, especially given how easy it was to get working.Add Tip
Source: Entertainment Center Cooling System
- Why did the author replace the original fan setup?
The previous setup was too loud, and a potentiometer required constant tweaking as equipment usage changed. - How does the new system adjust fan speed?
The code sets motor speed proportional to temperature, running at minimum speed below 90F and ramping to full speed near 100F. - What hardware components are necessary to interface two Click modules?
A MEBus Breakout board is required to connect two Click modules to the Xpress evaluation board. - Can any 4-wire fan be used for this project?
Yes, any 4-wire fan will work, though the author selected one based on price at the time. - What power supply specifications are recommended?
A 12V wall adapter capable of supplying at least 1A is required to power the system. - Where was the fan installed in the entertainment center?
The fan was installed on the back of the unit to save internal space, though inside installation was also viable. - Does the system require code updates if more equipment is added?
No, the system automatically compensates for additional heat generated by new equipment.