Summary of How to Run Servo Motors Using Moto:bit With Micro:bit
This article explains how to control servo motors using a micro:bit and the moto:bit expansion board. It details the physical setup, including connecting power sources and motors to specific pins, and provides step-by-step instructions for programming motor movements in MakeCode. The guide covers running one or two motors, adjusting positions, and experimenting with timing loops to create mechanical projects.
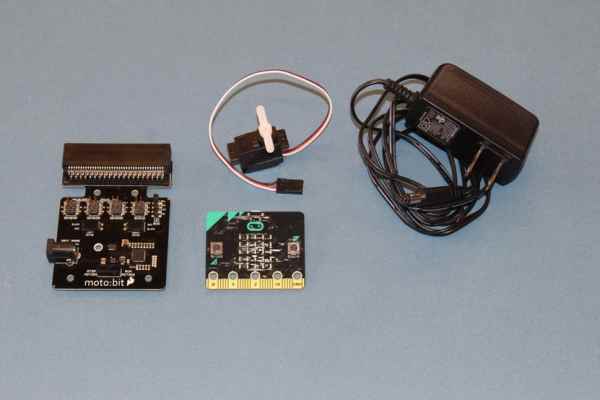
Parts used in the Servo Motor Project:
- moto:bit board
- bbc micro:bit
- servo motor
- power supply with a barrel jack plug
- USB cable
One way to extend the functionality of the micro:bit is to use a board called moto:bit by SparkFun Electronics (approximately $15-20). It looks complicated and has many features, but it isn’t hard to run servo motors from it. Moto:bit allows you to run more powerful motors than the tiny micro-motor that you can run from the micro:bit alone.
Supplies
- moto:bit
- bbc micro:bit
- servo motor
- power supply with a barrel jack plug (a/c adapter, but you can also use a battery pack)
Step 1: Set Up the Moto:bit
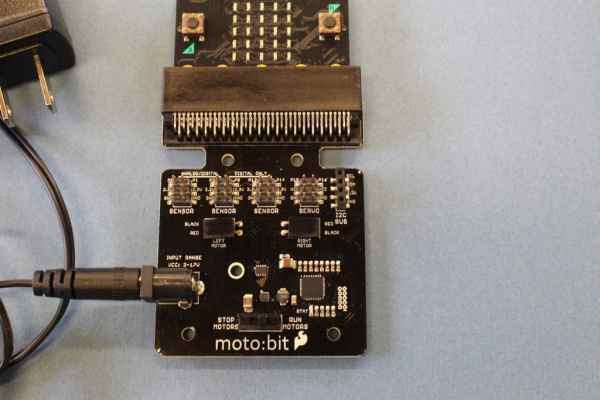
Let’s take a look at the moto:bit. There is a long slot at the top, where you insert the micro:bit. Be sure that the micro:bit is inserted snugly, with the LEDs facing upwards.
There is a power jack on the side of the moto:bit. You can plug in a variety of different power sources. Do not use more than 11V (note that the tiny words on some of the boards say 3-17V, but according to SparkFun, that is a misprint which will be corrected on their next batch of boards). You can use a 4-AA battery pack, a single 9V battery pack, or an AC adapter that outputs no more than 11V.
Step 2: Plug a Servo Motor Into the Moto:bit
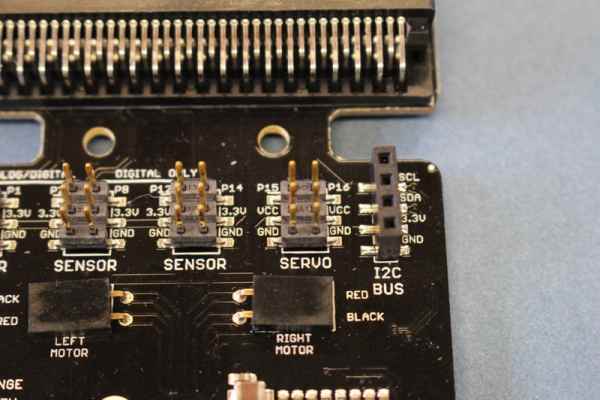
Look closely at the moto:bit. You will see a group of pins labeled “SERVO”. This is where we will plug in a servo motor. The pins on the left side of the SERVO area say, “P15, VCC, GND”, and the ones to the right say “P16, VCC, GND”.
In this example, we are going to plug a servo motor into the pins on the left.
A servo motor comes with three colored wires, usually connected with a socket. The wires are usually black, red, and then a third color. Black almost always stands for “ground” (and will plug into GND on the moto:bit); red carries “power” (and will plug into VCC on the moto:bit), and the white wire on this motor is what carries the data (and will plug into P15 on the moto:bit).
Plug the motor into the “P15, VCC, GND” column, making sure to match the white wire with P15, the red to VCC, and the black to GND.
Step 3: Program the Micro:bit to Run a Servo Motor
Now we need some code to have the micro:bit run the motor we have connected to the moto:bit board.
Open MakeCode and start a new project. (We are assuming that you have worked through the first few MakeCode tutorials).
We are going to tell our servo motor to move back and forth 4 times when we press button A on the micro:bit.
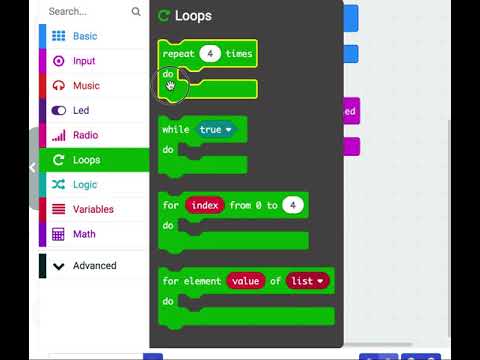
Drag the block “On Button A pressed” from the “Input menu”.
Next, add a loop. Drag a green “repeat” block from the “Loops” menu and snap it into the purple “on button A pressed” block. So when we press button A, we’re going to do something 4 times …
Step 4: Run the Servo Motor
We need to add some blocks to run our motor.
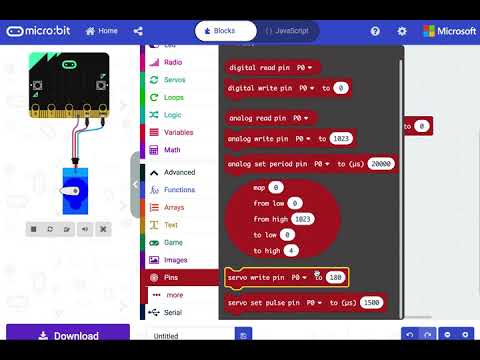
- Clicked on the “Advanced” option at the bottom of the menu items.
- Select the item that says “Pins”. Drag the red block that says “servo write pin … to …” and snap it into the repeat block. Our servo is plugged into Pin 15 (P15), so select P15, and change the degree setting to 0.
- Add a light blue “pause” block (found in the Basic menu) and change it to 500 ms (milliseconds).
- Then add another red servo block, select P15, and move the servo to position 180 degrees.
- Add another pause block.
- Looking at the complete code, it reads, “when I press button A, do this 4 times: move the servo to position 0 degrees, wait 500 milliseconds, move the servo to position 180, wait 500 milliseconds.”
- Click on Button A on the simulated micro:bit to see the servo move.
Step 5: Download the Code to Your Micro:bit.
Plug the micro:bit into your computer using a USB cable. Click the download button, and drag the .hex file to the micro:bit.
[If you don’t know how to do this, see the MakeCode quick guide.]
When you press button A on the micro:bit, your servo should run!
Experiment by changing your code to use different settings for the servo positions, different numbers in the repeat loop, and different pause times.
Step 6: Add Another Motor!
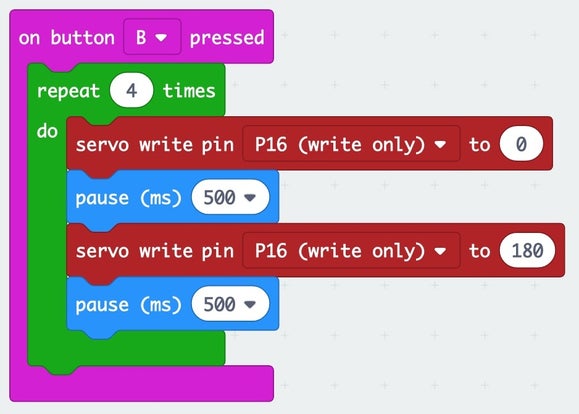
You can do the very same thing to a motor plugged into P16 (Pin 16).
If you add these code blocks (and download to your micro:bit), you can run the motor on P15 when you press button A, and the motor on P16 when you press button B.
Step 7: Run Something Cool With Your Motors!
We use our motors to run paper machines from our Paper Mechatronics projects. Check out the website to build your own machines and then hook them up to your servo motors. Have fun!
This material is based upon work supported by the National Science Foundation under Grant No. IIS-1735836. Any opinions, findings, and conclusions or recommendations expressed in this material are those of the author(s) and do not necessarily reflect the views of the National Science Foundation.
This project is a collaboration between The Concord Consortium, University of Colorado, Boulder, and Georgia Tech University.
Source: How to Run Servo Motors Using Moto:bit With Micro:bit
- How do I connect the servo motor wires?
Plug the black wire into GND, the red wire into VCC, and the white data wire into P15. - What is the maximum voltage allowed for the power supply?
You should not use more than 11V, despite some boards having a misprint suggesting up to 17V. - Can I use a battery pack instead of an AC adapter?
Yes, you can use a 4-AA battery pack or a single 9V battery pack. - Which pin should I select in the code for the first motor?
Select P15 if you plugged the motor into the left SERVO area pins. - How many times will the motor move when button A is pressed?
The example code moves the motor back and forth 4 times. - How long does the pause last between movements?
The pause block is set to 500 milliseconds. - Can I control a second motor on the same board?
Yes, you can add another motor to P16 and program it to run when button B is pressed. - Where can I find instructions for downloading the code?
Refer to the MakeCode quick guide if you do not know how to download the .hex file.