Summary of IN-12 Nixie Clock
This article details an open-source, single-board Nixie tube clock designed as a retro Christmas gift. The project utilizes IN-12 tubes for digits and INS-1 neon lamps for the colon, featuring a minimalist design with no LEDs. Time setting is achieved via micro-switches integrated beneath the colon lamps. The author recommends purchasing extra tubes to account for Soviet-era manufacturing imperfections and emphasizes a compact form factor suitable for HH:MM display.
Parts used in the Nixie Tube Clock:
- IN-12 type Nixie tubes
- INS-1 Neon lamps
- Micro-switches
- Single board circuitry
A time has come for me to say ‘hello’ to the mid-XX century technology of Neon numerical displays, also known as Nixie tubes. Despite being quite hard to obtain and utilize I’ve decided to make a nice looking clock which (hopefully) would make a perfect Christmas present, and since the Christmas is all about sharing I thought It would be nice to go Open Source about it.
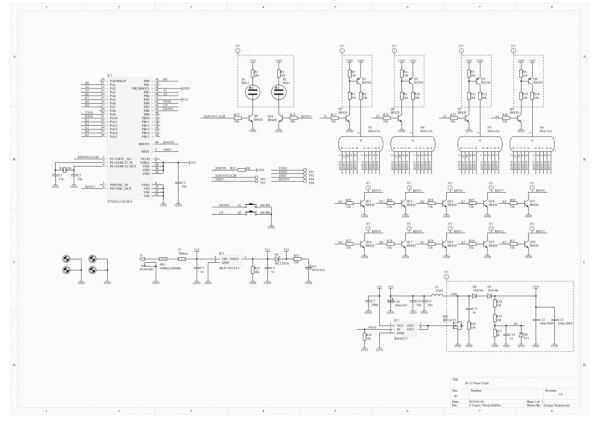
After few weeks of work I’ve ended up with neat single board design that makes the whole thing cheaper and easier to manufacture than the usual double board solutions (separate board for nixie lamps/divers, and another for microcontroller, power supply, high voltage dc/dc conversion, etc.). All of the circuitry is laid out on the back of the clock so it does not interfere with the old-school look of the Nixie displays.
Not a single LED was involved in that project, as I find those to be a disgrace when mixed up with neon indicators. (Geez, this is like, ‘your opinion’, man! ![]() )
)
The ‘Ne’ part
I wanted to keep the clock’s form factor as small as possible, so I chose it to be a standard HH:MM clock (without ‘seconds’ display) which requires only four Nixie tubes and two neon lamps for the separating colon.
I’ve decided to use IN-12 type Nixies as those are very popular here in Eastern Europe, but can also be easily bought on ebay and shipped worldwide. Those lamps are actually pretty cheap, mostly because they were manufactured in really large quantities back in the day. One thing that’s worth mentioning: since those Nixies come straight from Soviet Union, where almost no one paid any attention to the quality of whatever they’ve been producing, it will be wise to buy, let’s say a 150% of lamps that you need for your project. This gives the possibility to compensate for all imperfections (and believe me, these can get ugly like: digits being tilted, pins not being centered, ‘funny’ frontal grid color, etc.) which can easily degrade the overall look of your Nixie clock.
As for the separating colon I went for INS-1 Neon lamp, which has the advantage of being similar in height as the glassy part of IN-12, so it will make a perfect separator.
Every clock needs a way of setting the time, and the simplest way of achieving this is to embed buttons (like micro-switches). Since I’m aiming towards keeping the overall look to be as minimalistic as it is possible (well, Nixies don’t necessarily present themselves as ‘minimalistic’ to begin with.. ) I came up with a neat idea of placing the two buttons just under the INS-1 lamps, so when colon dots are pushed they, in fact, press the micro switches and, since the switches have the ‘springy’ action they move the colon lamps back to their original position as soon as user stops pushing.
For more detail: IN-12 Nixie Clock
- Why does the author recommend buying more Nixie tubes than needed?
Purchasing 150% of the required lamps compensates for imperfections like tilted digits or uncentered pins common in Soviet-era production. - What specific types of tubes are used for the digits and the colon?
The project uses IN-12 type Nixies for digits and INS-1 Neon lamps for the separating colon. - How is the time set on this clock without visible buttons?
Time is set by pressing the INS-1 colon lamps, which act as springy micro-switches located underneath them. - Does the project include any LED indicators?
No, the author explicitly states that not a single LED was involved in the project. - What is the display format of the clock?
The clock features a standard HH:MM format without a seconds display. - Where is the circuitry located on the device?
All circuitry is laid out on the back of the clock to avoid interfering with the front display. - Is this project available for others to build?
Yes, the project is open source to allow sharing and manufacturing.