Contents
hide
Summary of Interfacing 4-wire Resistive Touchscreen with ATMega16 Microcontroller
This article explains the advantages of touch screens over keypads and details a project to interface a 4-wire resistive touch screen with an ATmega16 microcontroller. It addresses the challenge of missing connectors by guiding users on creating a custom breakout board through soldering, while listing necessary components for the setup.
Parts used in the Interfacing 4-wire Resistive Touchscreen with ATMega16 Microcontroller:
- ATMega16 development board
- UART to USB converter or UART to RS-232 converter plus RS-232 to USB converter
- Touch Screen with connector
- Few female to female jumper wires
- Breadboard
- 4 x 10k Resistors
Touch screens are two dimensional input devices. Nowadays most of the electronic gadgets use them. Laptops, smart phones, tablets and even some home appliances like washing machines & microwave ovens also use a touch screen nowadays.
Why Touch screens?
Touch screens are preferred over keypads because they need very little or no pressure to operate whereas the Keypads/ buttons need a minimum pressure to operate and our hands start aching after some time of continuous usage.
And one more great advantage in using a touch screens is that it enables us to make more room for the screen itself instead of wasting the space on the permanent keypad. And that’s the reason for our smart phone’s screens to become big enough to browse web pages also and still fit in our pockets.
Touch screens are of various types like Resistive, Capacitive, Surface Acoustic Wave (SAW), Infrared Grid, Optical Imaging, etc.
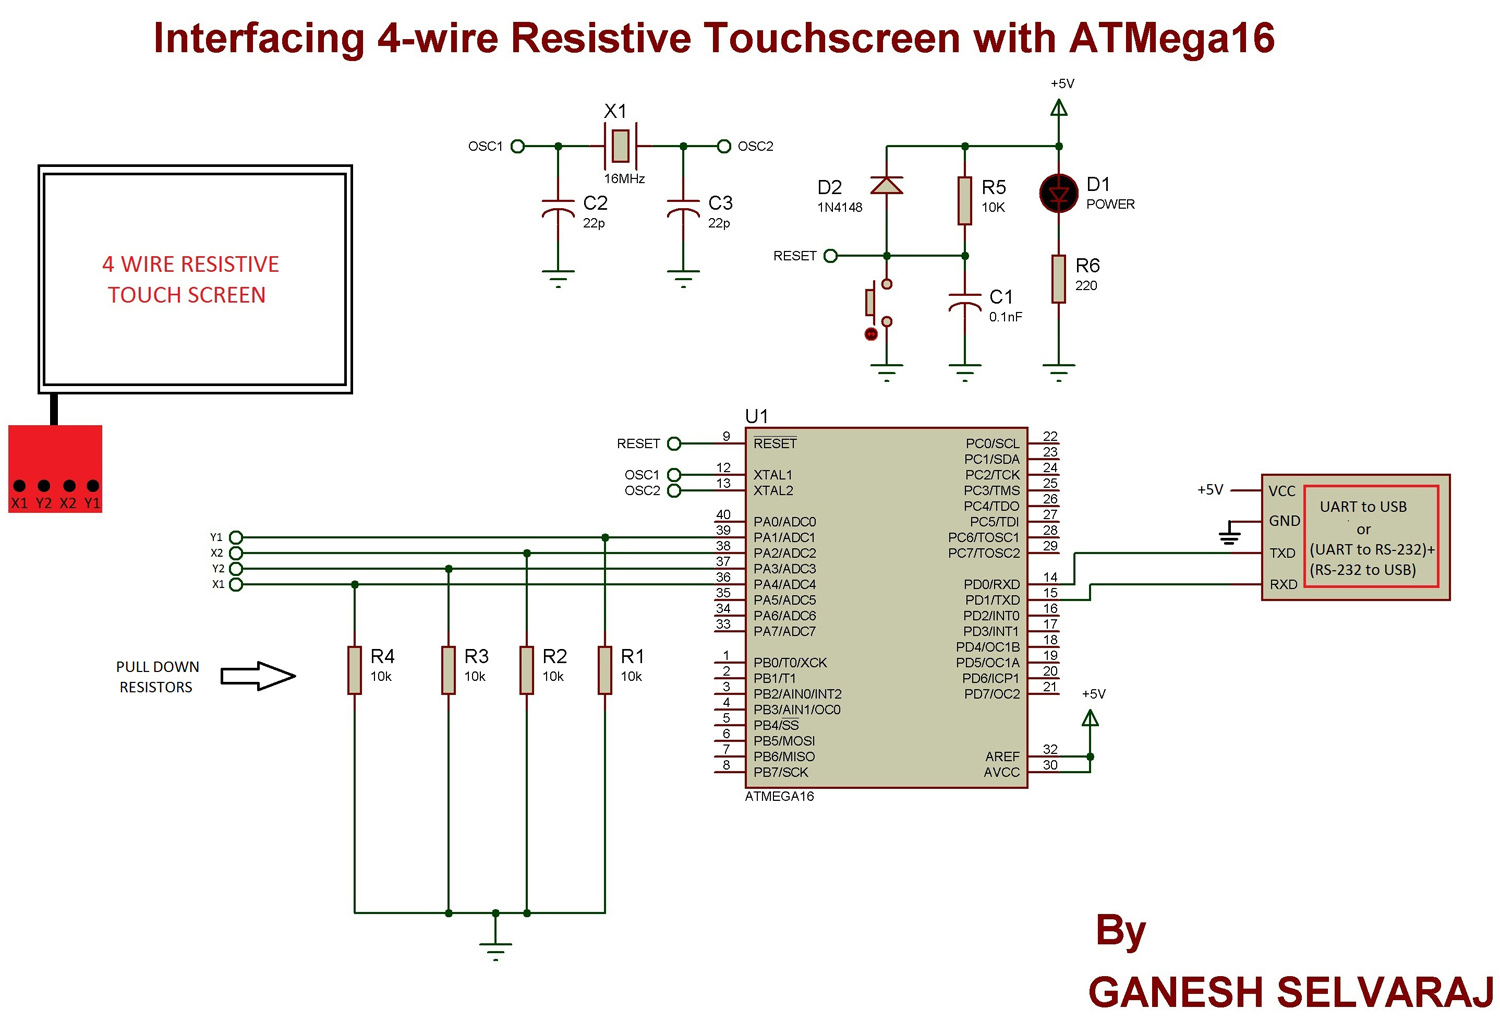
In this tutorial we’ll learn how to interface a 4-wire Resistive touch screen with ATmega16 microcontroller
Components Required
1. ATMega16 development board
2. UART to USB converter or (UART to RS-232 converter + RS-232 to USB converter)
3. Touch Screen with connector
4. Few female to female jumper wires
5. Breadboard
6. 4 x 10k Resistors
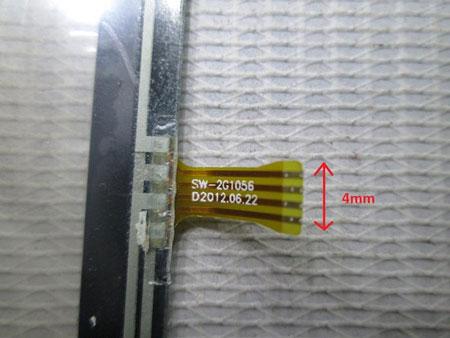
Making a Connector
Before learning how to interface a touch screen we need to look into a problem. One of the biggest drawbacks of using a cheap touch screen is that they usually don’t come with the connector which is very much required to interface them with any kind of microcontroller development board. You can buy connectors online but in some cases they cost more than the touch screen itself. So I’ll show how to make break out board by soldering tiny wires onto the strip emerging from the touch screen.
Caution: Do the following procedure with your own risk. It does require some good soldering skills (not expert level but if this is your first time soldering then I advice not to do this by your own) since the strip emerging from the touch screen is very narrow.
- Why are touch screens preferred over keypads?
They need very little or no pressure to operate, preventing hand ache during continuous use. - What advantage do touch screens offer regarding screen size?
They enable more room for the screen itself instead of wasting space on permanent keypads. - Which types of touch screens are mentioned in the text?
Resistive, Capacitive, Surface Acoustic Wave (SAW), Infrared Grid, and Optical Imaging. - How do you connect a cheap touch screen if it lacks a connector?
You can make a break out board by soldering tiny wires onto the strip emerging from the touch screen. - What is required before learning how to interface the touch screen?
Creating a connector or breakout board because cheap screens usually do not come with one. - What skills are needed to solder the tiny wires onto the touch screen strip?
Good soldering skills are required, though expert level is not necessary. - What caution should be taken when making the connector?
The procedure should be done at your own risk as the strip emerging from the screen is very narrow. - Can you buy connectors online for this project?
Yes, but they sometimes cost more than the touch screen itself.