Summary of Magnetic Plinko Game With Makey Makey
This article details the construction of a magnetic Plinko game using Makey Makey, laser-cut MDF and acrylic components, and magnetic reed switches. The project integrates physical assembly with Scratch programming to detect falling magnets and trigger corresponding scores or sounds, serving as an interactive educational tool for teaching electronics, logic, and probability in classrooms.
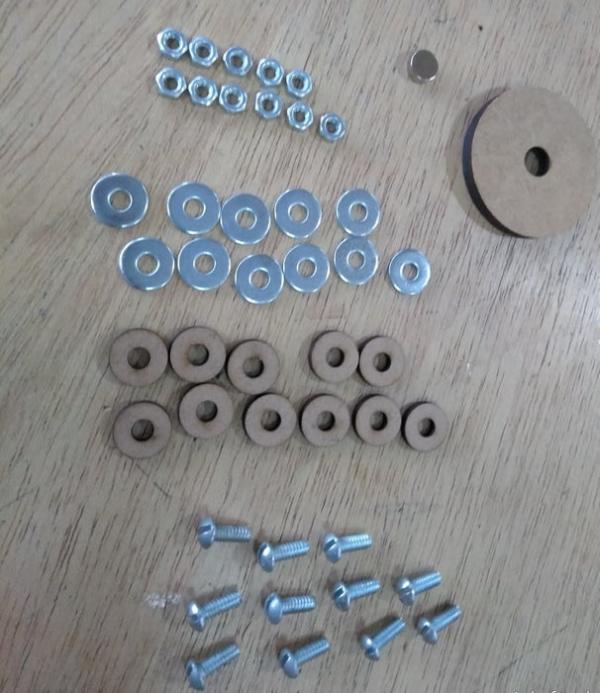
Parts used in the Magnetic Plinko Game:
- MDF plates (900x600x6mm)
- Acrylic plate (900x600x3mm)
- MDF spacers (3mm pieces)
- Pegs (8mm diameter, 30mm length)
- Slotted screws (3/16 x ½)
- Plain washers (3/16)
- Hexagon nuts (3/16-24)
- Adhesive vinyl or colored paper
- Magnetic Reed Switch Sensors (6 units)
- Neodymium magnet
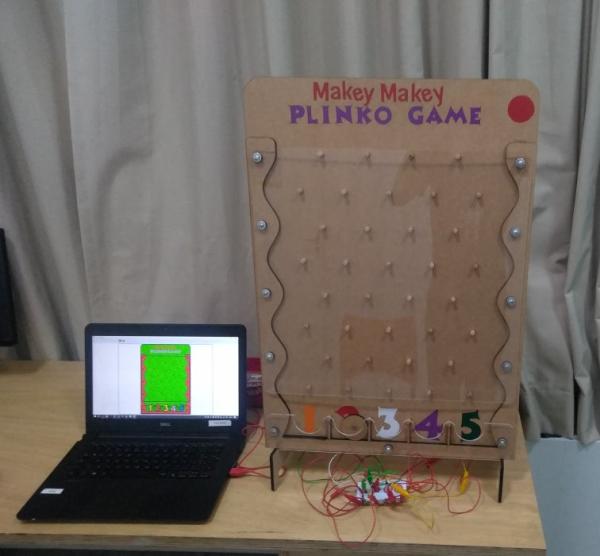
Olá, em seguida, mostrarei como criar um jogo magnético de Plinko com Makey Makey.
O título do projeto foi estendido para ser auto-explicativo: um jogo no estilo Plinko, que usa sensores magnéticos, ímãs e Makey Makey.
Para a construção do painel, fui inspirado por este projeto: https: //www.instructables.com/id/Laser-Cut-Plinko …
Também usei o corte a laser como eles, mas acredito que pode ser feito sem usá-lo, como mostrado aqui:
Vou disponibilizar os arquivos para corte a laser, bem como o projeto em Scratch, que não coloquei no título para não estender mais.
Step 1: Materials and Tools
Tools:
- Laser cutting machine
- Screwdriver
- Cutting pliers
- Hammer
- Super glue or wood glue
- Computer
- Makey Makey – https://makeymakey.com/
- Scratch 3.0 online or offline – https://scratch.mit.edu/ or https://scratch.mit.edu/
Materials:
- 2 – MDF plates of 900x600x6mm – for board construction
- 1 – Acrylic Plate 900x600x3mm – for construction of the board cover
- 3mm MDF peaces, to create the spacers
- 40 – 8mm diameter pegs with 30mm length, can be shorter or cut at installation
- 11 – 3/16 x ½ slotted screws – https://www.ccpvirtual.com.br/parafuso-lentilha-c…
- 11 – 3/16 plain washers – https://www.ccpvirtual.com.br/arruela-lisa-3-16-z…
- 11 – hexagon nuts 3 / 16-24 – https://www.ccpvirtual.com.br/porca-sextavada-g-2…
- Adhesive vinyl in different colors, can be colored paper – for making the numbers and logo.
- 6 – Magnetic Reed Switch Sensors
- 1 – Neodymium magnet
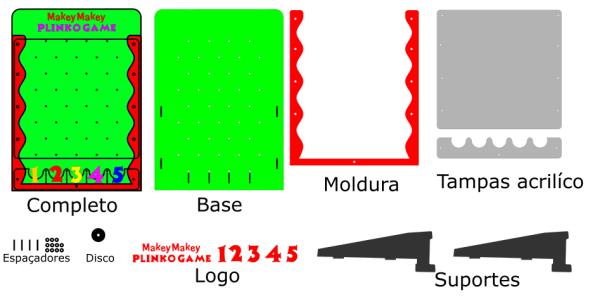
Step 2: Design
I recommend doing some tests before cutting the entire project on the laser, as the holes for fitting the dowels, nuts and the magnet may differ depending on the type of material and configuration of the laser machine. I left the holes tight for a tight fit.
Measures:
Complete set 476x668x18mm (WxHxD) – Assembled without the supports, with the supports it is added about 80mm in height.
Disc with magnet: 50mm diameter with 9.8mm diameter hole where the magnet fits
Bolt holes: 7.95mm
Step 3: Assembly
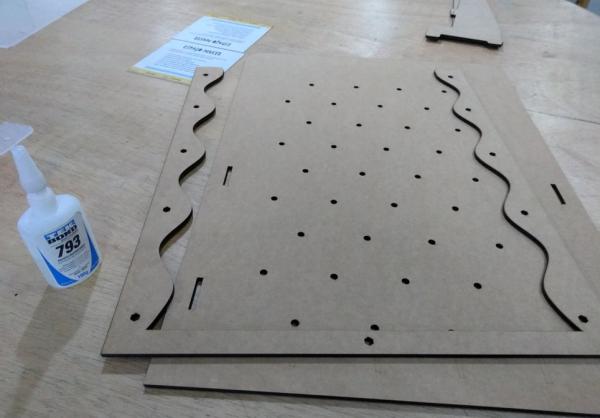
The physical assembly of the project is very intuitive. Includes the photos of the steps and a brief description follows:
1 °- Using glue, fix the frame to the base. Be careful to keep the edges well aligned
2 °- In the frame there is space in the shape of the nuts, fit them so that they are secured, perhaps the use of a hammer is necessary.
3 °- Insert the dowels into the holes in the base. Leave about 9mm out. This can be adjusted better after there will be a large part of the bolt left at the back of the base. I kept it there.
4 °- Paste the dividers of the houses that will be numbered. Note: At this point we can paste the stickers and decorate the plate according to preference.
5 °- We will now need washers, laser-cut wooden spacers and screws. We will fix the acrylic covers.
6 °- Paste the stickers and finish the decoration
7 °- Fit the supports on the base, from the bottom and rear.
8 °- Mounting the disk: Insert the magnet in the center of the disc.
9 °- Check if it will be necessary to adjust bolts and screws and its done!
Step 4: Circuit
1 – Basic explanation:
The circuit works based on the Reed Switch Magnetic Sensor together with the Makey Makey.
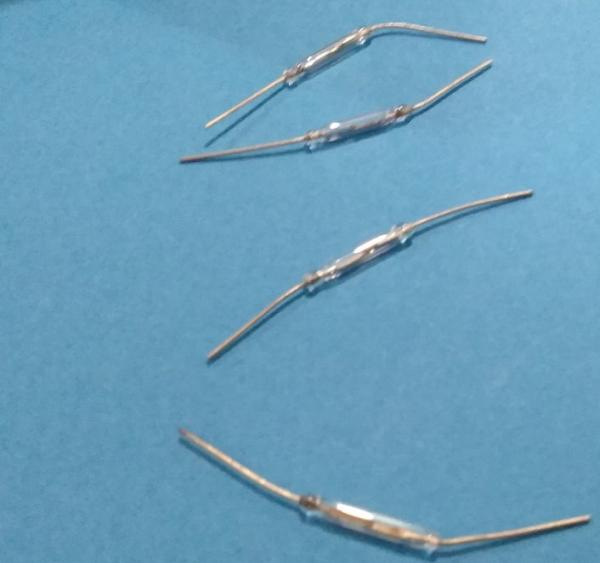
Reed Switch Magnetic Sensor is a small component that is used to detect the presence of a magnetic field. Its operation is very simple, when it is exposed to a magnetic field the two iron threads inside the glass ampoule are attracted together and the contact closes, and when the magnetic field is removed, the threads separate again and the contact opens.
- More details about the sensor: http://blog.first4magnets.com/what-is-a-reed-swit…
Makey Makey: It is a small board that allows you to connect any objects to the computer and use them as a data entry method.
Basically it controls some keys and interacts in the most diverse ways with the computer. This happens when we close the circuit connected to Makey Makey.
- More details about Makey Makey: https://makeymakey.com/
This is how our Plinko will work: When the disk containing the magnet falls into the numbered box, the magnetic sensor key closes, activating a key corresponding to the one connected to the Makey Makey. A simple game created in Scratch displays a message and sound informing you which square was drawn.
- About Scratch: https://scratch.mit.edu/about
2 – Circuit:
We will need 5 magnetic sensors and each sensor will be connected to a Makey Makey key, related to the numerical compartments of the game, like this:
- Up arrow: Compartment 1
- Down arrow: Compartment 2
- Left arrow: Compartment 3
- Right arrow: Compartment 4
- Letter A: Compartment 5
- Space key: Restart the game
3 – Connections:
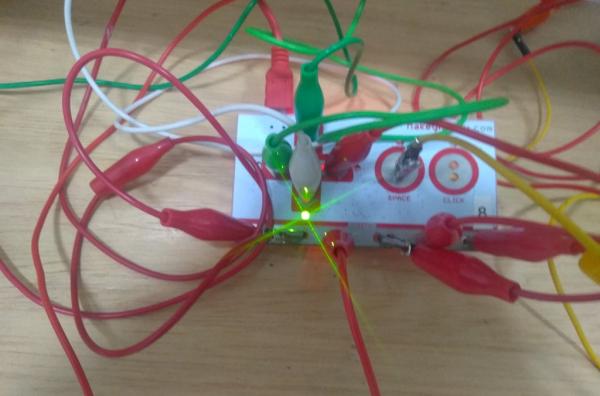
As the magnetic sensor has no polarity, choose one end and connect an alligator clip.
In the photos I used the red alligator clip to connect to Makey Makey’s ground. At the other end of the magnetic sensor, connect another alligator clip.
This cable will be connected to the Makey Makey, the key corresponds to the compartment number, as previously mentioned. Make these connections to all keys.
Connect the Makey Makey Makey to the computer, using the USB cable and test with a magnet. If everything is working, the led corresponding to the key should light up, whenever the magnet is approached to the sensor.
4 – Fixing the sensor to the base:
This project is a prototype and I intend to make changes in the future (using Arduino, for example) I will not weld or fix anything definitively, since I also intend to leave the construction part of the circuits to the students.
So I will use a kind of adhesive clay to attach the sensor to the back of the base, aligned to the numerical compartment where the wooden circle with the magnet will drop. It can be secured with tape or other material. Be careful when handling the magnetic sensor, which is very fragile.
I positioned the button related to the space key (restart the game) at the top right of the game base. I added a red sticker on the front.
The electronics are ready!
Step 5: Programming:
We will use Scratch to create the game’s schedule. At that moment, I opted for something very simple, which in the future can be improved or totally changed, depending on the project proposal.
Game operation:
The game has the function of informing the number of the compartment where the disk with the image fell.That simple! This event occurs through an audible warning and the display of an image on the screen.
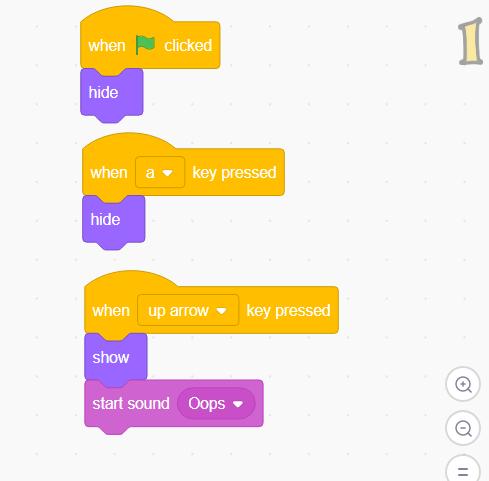
This occurs every time the circuit is closed, each key is programmed with the same sets of blocks, as shown in the images.
I will leave the link to the game where it can be remixed. It can be downloaded for use in the offline version of Scratch 3.0.
Step 6: Classroom Use
A idéia é implementar esse projeto em sala de aula, onde alunos e professores podem, desde a construção do projeto até seu uso durante as aulas. Além disso, pode ser usado para apresentações em shows culturais, nos corredores da escola, como uma forma interativa de ensino.
Durante a aplicação deste projeto, publicarei atualizações nas implementações.
- Ensino de circuito elétrico – Serial e paralelo: https: //phet.colorado.edu/sims/html/circuit-const …
- Eletromagnetismo: https: //learning-center.homesciencetools.com/artic …
- Lógica de programação e programação de blocos: https://studio.code.org/courses
- Probabilidade: https://www.mathdemos.org/mathdemos/plinko/
Source: Magnetic Plinko Game With Makey Makey
- What is the primary function of the magnetic sensors?
The sensors detect the presence of a magnetic field when the disk falls into a numbered box, closing the circuit to activate a specific key on the Makey Makey. - How does the game determine which compartment was hit?
Each compartment has a dedicated magnetic sensor connected to a specific Makey Makey key that triggers a message and sound in the Scratch program. - Can this project be built without a laser cutting machine?
Yes, while the author used laser cutting, the article notes that the board can be constructed without it by following alternative designs. - Which software is used to create the game logic?
The game is programmed using Scratch 3.0, either online or offline, to handle the inputs from the Makey Makey. - How are the magnetic sensors connected to the computer?
Sensors are connected to the Makey Makey via alligator clips, with one end attached to ground and the other to the specific input key corresponding to a number. - What is the purpose of the space key in the game setup?
The space key is assigned to restart the game when activated by its corresponding sensor. - How should the sensors be secured during assembly?
The author suggests using adhesive clay, tape, or similar materials to attach the fragile sensors to the back of the base aligned with the compartments. - What educational topics does this project help teach?
The project supports learning about electric circuits, electromagnetism, block-based programming logic, and probability.