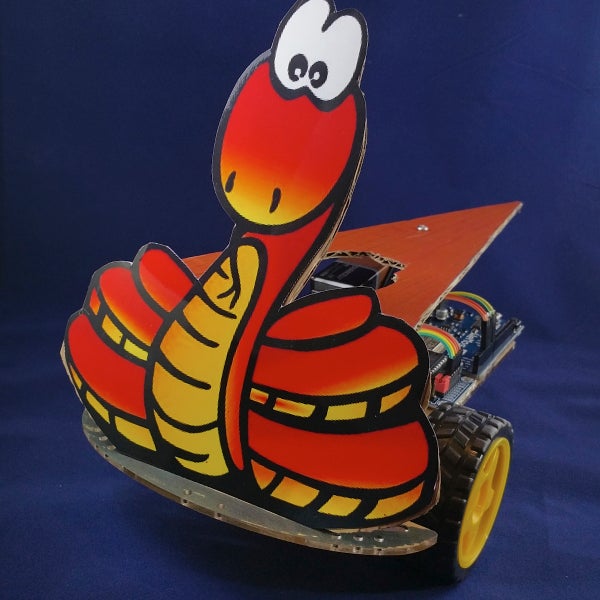
Summary of MicroPython IoT Rover Based on WEMOS D1 (ESP-8266EX)
This article outlines a cost-effective IoT project for robotics workshops, using MicroPython on a WEMOS D1 (ESP8266) to control a 2WD car via a web browser. It highlights the benefits of MicroPython over Arduino and Raspberry Pi for kids, offering WiFi capability with Python programming. The guide details hardware assembly, wiring, MicroPython installation, network setup, and uploading the main control program to enable real-time car navigation.
Parts used in the MicroPython IoT Rover:
- Wemos D1 board
- L293D Motor shield
- Battery holders for 4 x AA batteries
- 9V Battery holder
- 2WD car chassis
- Dupont cables
- Soldering iron
- Screw driver
- Glue gun
** Update: I posted a new video for v2 with a lance **
I host Robotics workshops for young kids and I’m always looking for economical platforms to build intriguing projects. While Arduino clones are cheap, it uses the C/C++ language that kids are not familiar with. Also, it doesn’t have a built-in WiFi which is a must for IoT projects. On the other hand, while Raspberry Pi has WIFI and kids can program it using Python, it is still an expensive platform to just control few GPIO ports to turn devices on and off. I need something in between that has both WIFI and Python capabilities. It appears that I found my answer in MicroPython flashed onto a cheap ESP8266-based board.
What is Micropython?
According to its website, MicroPython is a lean and efficient implementation of the Python 3 programming languages that includes a small subset of the Python standard library and it is optimized to run on microcontrollers and in constrained environment (such as ESP8266). It’s essentially Python IDE on a chip. One major benefit is that you can create code and change it on the fly using a web-browser client called Webrepl. (Try to do that in Arduino.) You can also see sensor data in real-time on Webrepl instead of rely on data logging or an LED screen in Arduino.
What is ESP8266?
In short, think of it as an Arduino with built-in network capability. You can use the Arduino IDE to program ESP8266 boards in C/C++ or you can flash it with NodeMCU or MicroPython. In this project, I’ll be flashing MicroPython onto an ESP8266 board.
I decided to get a WEMOS D1 which is based on ESP8266-12EX for this simple project where I’ll be navigating a 2WD car using a web browser. There are other boards that are designed for MicroPython but I wanted something cheap that I could throw away if it didn’t meet my criteria. As expected, it met all my requirements and most likely I’ll be incorporating WeMos and Micropython into future projects.
Step 1: Parts

- Wemos D1 or any ESP8266 based boards
- Motor shield (I’m using a cheap L293D from AliExpress)
- Battery holders for 4 x AA and 9V (4 x AA batteries are for motors and 9V is for the Wemos board)
- 2WD car chassis
- Dupont cables
May need a soldering iron, a screw driver and a glue gun to put everything together.
Step 2: Hardware Assembly

First, assemble the chassis according to the instruction.
Then, hot glue other components as shown.
Motor wires should be soldered to the motor terminals and use hot glue to reinforce the terminal joints.
Affixed a small switch to the 4AA battery holder. This will turn on/off power to the motor shield.
Step 3: Wiring
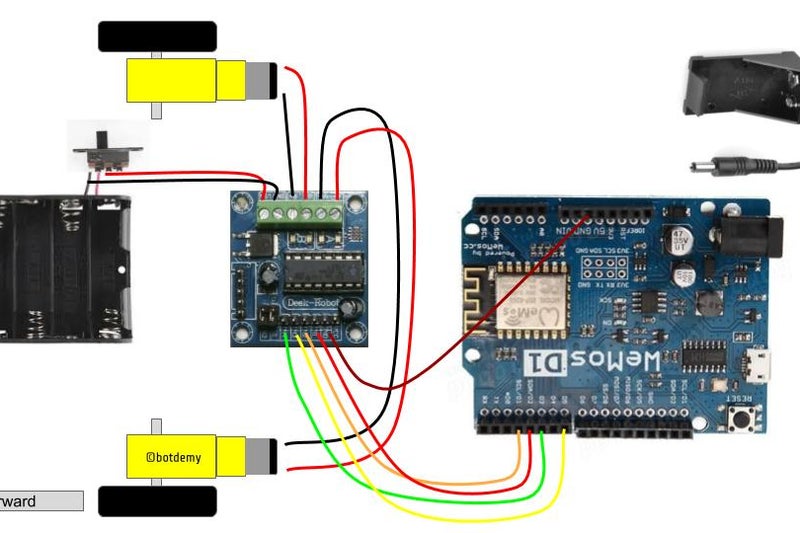
Follow my wiring diagram as shown.
Wemos to Motor Shield:
D1 --> IN2

D2 --> IN1

D3 --> IN4

**skip D4

D5 --> IN3

GND -> GND
Motor Shield to Motor/Power:
A terminal -> Left Motor

B terminal -> Right Motor

VCC ->Battery (+)

GND -> Battery (-)
Step 4: MicroPython Installation
First, Wemos has a serial/USB chip based on CH304G. This is the same chip found in cheap Arduino-clones and you must install a proper driver for Mac or PC. Follow the instructions on this site to install the driver.
Connect Wemos to your computer and confirm that your computer could detect Wemos. On Mac, run the following command and you will see a device called /dev/tty.wchusbserial640.
$ ls -lt /dev/tty* | head

crw-rw-rw-  1 root      wheel   17,   4 Mar  2 23:31 /dev/tty.wchusbserial640
If you are on PC, you may use this Instructable as a reference.
Next, you’ll need to setup Python 2 or 3 on your computer since the flash tool, esptool.py, is based on Python. While the MicroPython guide may state that the tool only works with Python 2.7, I was able to run that in Python 3 without any issues. Download latest Python from https://www.python.org and follow the installation instructions for your PC or Mac.
Lastly, you will need to install MicroPython on Wemos. MicroPython site has an excellent tutorial on how to setup MicroPython on ESP8266. Just follow the installation instructions in Getting started with MicroPython on the ESP8266.
Below are commands I used:
$ esptool.py --port /dev/tty.wchusbserial640 erase_flash

esptool.py v1.3

Connecting....

Running Cesanta flasher stub...

Erasing flash (this may take a while)...

Erase took 10.5 second
$ esptool.py --port /dev/tty.wchusbserial640 write_flash -fm dio -fs 32m -ff 40m 0x00000 esp8266-20170108-v1.8.7.bin

esptool.py v1.3

Connecting....

Running Cesanta flasher stub...

Flash params set to 0x0240

Wrote 589824 bytes at 0x0 in 50.8 seconds (92.8 kbit/s)...

Leaving...
MicroPython is now installed on your board!
Step 5: Setup Network
While MicroPython is now installed on your Wemos, it is not connected to your network yet. You’ll need to first enable network. On Mac, execute the SCREEN command to start the serial terminal session to Wemos.
$ screen /dev/tty.wchusbserial640 115200
When you see a blank screen, hit RETURN to see a prompt:
>>>
(Note: To exit, type CTRL-A CTRL-\)
Now, let’s enable webclient access. Type “import webrepl_setup” to run the setup program. Enter E to enable WebREPL and then set password. Reboot to activate changes.
>>>import webrepl_setup

WebREPL daemon auto-start status: disabled

Would you like to (E)nable or (D)isable it running on boot?

(Empty line to quit)

> E
To enable WebREPL, you must set password for it

New password: xxxxx

Confirm password: xxxxx

Changes will be activated after reboot

Would you like to reboot now? (y/n) y
Lastly, download the Webrepl client to your machine. This is optional but the client comes with other useful tools that you may want to to use later on. For example, webrepl_cli.py is a command to copy files to Wemos in scp-like syntax. Use git to download the client. (Install the git tool if you don’t have it yet.)
git clone https://github.com/micropython/webrepl.git
Open your web browser and on the URL field, enter the location of your downloaded webrepl client file location such as:
file:///Users/xxxxx/wemos/webrepl/webrepl.html
This should display the webrepl client on your browser. Before you can connect to it, you have to first connect to its WIFi Access Point. If you look at available WIFI for your computer, you’ll see a network starts with MicroPython-xxxx. Connect to that network. (Warning: Once you connect to that network, you’ll lose your Internet access.)
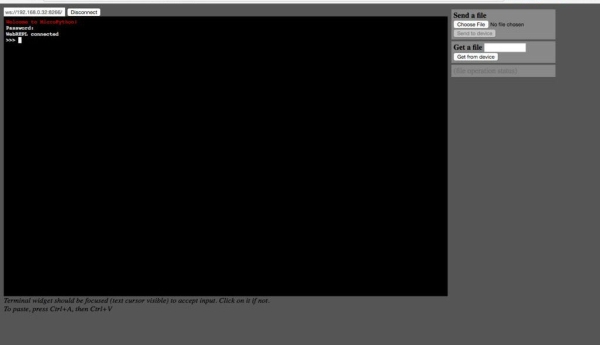
Go back to your webrepl client and click on Connect. It should prompt for password. Enter your Wemos password and you should connect.
Welcome to MicroPython!

Password:
WebREPL connected
>>>
Your Wemos is still running in AccessPoint Mode. While this is OK, I prefer it to run in Station Mode where it connects to my home WIFI so that my computer could access it through home WIFI and still has Internet access. To do that, you’ll have to create a file called boot.py with network configuration and upload it to Wemos.
Here is a sample boot.py. Change the ssid and password to your home WIFI network. Also, I want to give it a static IP of 192.168.0.32. Change it to your home WIFI’s available IP address.
boot.py (you may download it from below)
import gc

import webrepl

def do_connect():

  import network

  sta_if = network.WLAN(network.STA_IF)

  if not sta_if.isconnected():

    print('connecting to network...')

    sta_if.active(True)

    sta_if.ifconfig(('192.168.0.32','255.255.255.0','192.168.0.1','192.168.0.1'))

    sta_if.connect('<YOUR SSID>','<YOUR PASSWORD>')

    while not sta_if.isconnected():

      pass

  print('network config:', sta_if.ifconfig())

do_connect()

webrepl.start()

gc.collect()
Use Webrepl client’s “Send a File” form to send your boot.py file to your Wemos. Press reset button to reboot. If you’re still connected through USB using the SCREEN command, you’ll see:
...

connecting to network...

network config: ('192.168.0.32', '255.255.255.0', '192.168.0.1', '192.168.0.1')

WebREPL daemon started on ws://192.168.4.1:8266

WebREPL daemon started on ws://192.168.0.32:8266

Started webrepl in normal mode

could not open file 'main.py' for reading

MicroPython v1.8.7-7-gb5a1a20a3 on 2017-01-09; ESP module with ESP8266

Type "help()" for more information.

>>>
This validates that your Wemos is connected to your home WIFI using the ipaddress of 192.168.0.32.
You may ping that IP address to validate.
$ ping 192.168.0.32
PING 192.168.0.32 (192.168.0.32): 56 data bytes

64 bytes from 192.168.0.32: icmp_seq=0 ttl=255 time=9.334 ms

64 bytes from 192.168.0.32: icmp_seq=1 ttl=255 time=11.071 ms

..
Step 6: Install Main Program
Lastly, you’ll need to install the main program that will continue to run on your Wemos.
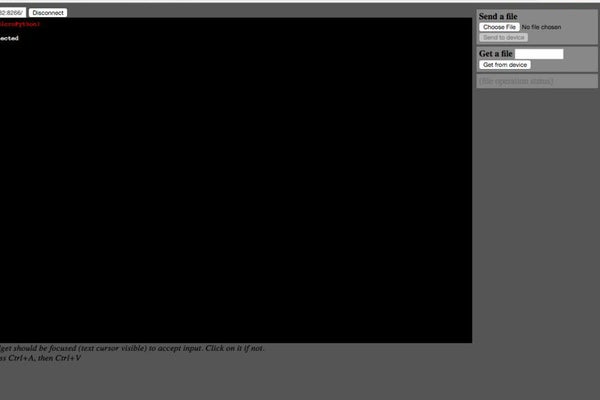
Go back to your web browser and run the webrepl client program. Change the ip address to your Wemos’ IP address. In my case, it is now 192.168.0.32. Enter your Wemos password and you should now be connected to Wemos.
Let’s upload the attached main.py program. Download the attached file to your computer. Click on Choose File to choose the downloaded main.py and and click on Sent to device.
You’ll need to press the Rest button to load the main.py program. After pressing the Reset button, you’ll see:
connecting to network...<br>
network config: ('192.168.0.32', '255.255.255.0', '192.168.0.1', '192.168.0.1')

WebREPL daemon started on ws://192.168.4.1:8266

WebREPL daemon started on ws://192.168.0.32:8266

Started webrepl in normal mode

Listening, connect your browser to ...
This means your main.py program is activated and listing to port 80.
To test, open your web browser and enter http://
This should display the car control screen as shown in the video. If your wires are connected properly, control buttons will send proper signals to your GPIO ports to move the car.
Step 7: Future Improvements
The following to-do items are on my v2 list:
- Use PWM to control motor speed
- Improve web interface. Perhaps use aREST framework. I don’t believe aREST lib is available on MicroPython at this moment so I may have to hack it.
Thank you for reading this Instructable. Follow me on Facebook, Youtube, and Instructables for more projects in the future.
Source: MicroPython IoT Rover Based on WEMOS D1 (ESP-8266EX)
- Why choose MicroPython on ESP8266 over Arduino or Raspberry Pi for kids?
MicroPython offers built-in WiFi and Python programming capabilities at a lower cost than Raspberry Pi, while being more accessible than Arduino's C/C++ language. - What is the primary benefit of using Webrepl with MicroPython?
Webrepl allows users to create and change code on the fly using a web-browser client and view sensor data in real-time without relying on data logging or LED screens. - Which specific board was selected for this project and why?
The Wemos D1 based on ESP8266-12EX was chosen because it is cheap and met all requirements for a simple web-controlled project. - How do you connect the Wemos D1 pins to the L293D motor shield?
Connect D1 to IN2, D2 to IN1, D3 to IN4, D5 to IN3, and GND to GND, while skipping D4. - What command is used to erase the flash memory before installing MicroPython?
The command esptool.py --port /dev/tty.wchusbserial640 erase_flash is used to clear the existing flash. - How can you enable WebREPL access on the Wemos board?
Run the import webrepl_setup command in the serial terminal, enter E to enable it, set a password, and reboot the device. - What file must be created and uploaded to switch the Wemos from AccessPoint to Station Mode?
A file named boot.py containing network configuration code must be uploaded to connect to a home WIFI network. - How do you verify that the Wemos board is connected to the home WIFI network?
You can ping the assigned static IP address, such as 192.168.0.32, from your computer to validate the connection. - What steps are required to make the car control interface accessible via a web browser?
Upload the main.py program to the device, press the Reset button, and then open a web browser to the device's IP address. - What future improvements are planned for the v2 version of this rover?
Planned improvements include using PWM to control motor speed and improving the web interface, potentially using the aREST framework.