
Summary of MQTT Based Fire Detection System
This article details a low-cost, networked fire detection system using NodeMCU and Raspberry Pi. The system monitors five locations (one HQ and four sister institutions) via infrared sensors, transmitting data over the Internet using the MQTT protocol. The Raspberry Pi acts as an MQTT broker at the headquarters, while NodeMCUs serve as nodes at all locations. Visual alerts are provided through LEDs in control rooms when fires are detected.
Parts used in the Low-Cost Fire Detection System:
- LEDs x 20
- Resistor x 5
- NodeMCU x 4
- Raspberry Pi 2 x 1
- Ethernet Cable x 1
- Network Router with Internet Connectivity x 1
- Breadboards x 9
- Infrared Sensors x 4
- Micro USB Cable x 5
- Wires (Male to Male, Male to Female)
In recent days, automatic fire detection and control is becoming very essential to reduce the fire in a building or an industry. It provides real-time surveillance, monitoring and automatic alarm. A key aspect of such systems is to identify a developing fire emergency in a timely manner, and to alert the building’s occupants and nearby fire stations.
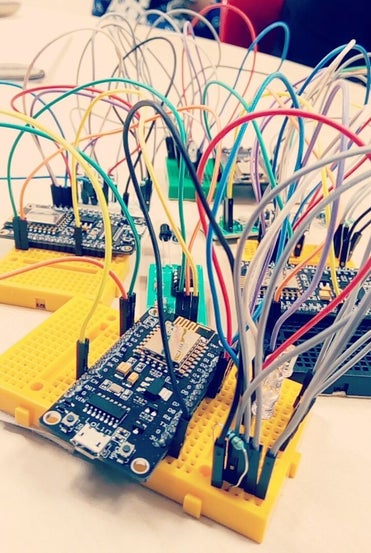
In this Instructable, we will learn how to create a low cost fire detection system in which different subsystems communicates with each other over the Internet. This project is a combination of electronic circuits, programming and networking mechanisms working together to detect the presence of fire and provides an alert through a visual medium. Furthermore, the usage of light weight MQTT protocol aids in (almost) real-time execution and parsing of the critical data.
In this project, we consider an example of an organization which has one headquarters(HQ) and four sister institutions. All five firms of the organization has a control room each to monitor the fire status of the sister institutions. All control rooms receive the fire status of the four sister institutions and visually alerts the control room personnel by the glowing of respective LED (for eg., if there is a fire emergency in Institution 1, then LED 1 in all the control rooms glows). At the sister institutions, fire is detected using infrared sensors (Note: Hot objects emit Infrared Rays). The communication between the control rooms are performed using the MQTT protocol. The control room at the sister institutions are based on NodeMCU and acts as a node in the network. On the other hand, the control room at the HQ is equipped with a Raspberry Pi and acts as a broker. To display the fire status, another instance of a node is created at the Raspberry Pi.
This project brushes over the following topics:
- SSH Raspberry Pi
- Raspberry Pi as an MQTT broker
- Port Forwarding
- NodeMCU as publisher and subscriber
- Raspberry Pi as a subscriber
- File transfer over IP address (SFTP)
Step 1: Materials Required
- LEDs x 20
- Resistor x 5
- NodeMCU x 4
- Raspberry PI 2 x 1
- Ethernet Cable x 1
- Network Router with Internet Connectivity x 1
- Breadboards x 9
- Infrared Sensors x 4
- Micro USB Cable x 5
- Wires (Male to Male, Male to Female)
Step 2: Enable SSH on Raspberry Pi
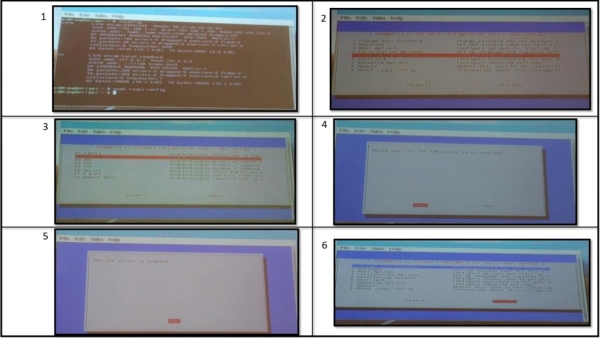
Communicating with Pi using SSH has the following advantages:
- Connecting peripherals like keyboard and mouse on Pi can be avoided.
- We can work on Pi remotely.
By default, SSH service on Raspberry Pi is turned off. To enable this service, the following steps are done:
1. Type the following command on the terminal
$ sudo raspi-config
(Note: You may enter $ sudo -i to enable root access for the user)
2. Select ‘Interfacing Options‘ (#5) on the window that pops up.
3. Select ‘SSH‘ (#2)
4. Click ‘Yes‘ to enable the service.
5. Click ‘OK‘
6. Click ‘Finish‘
Step 3: Access Pi Through Putty
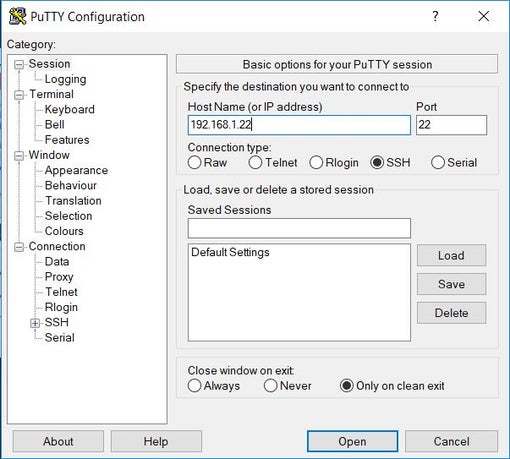
Putty is a terminal emulator.
1. Connect Raspberry Pi to a network router via an Ethernet cable
2. Enter the following command in the Pi’s terminal to know the local IP address of the Raspberry Pi.
$ ifconfig
3. Note down the IP address that is written after “inet addr:”
4. Download and Install Putty on your computer from www.putty.org (Make sure that your computer is connected to the same network as the Raspberry Pi)
5. Open Putty, Select ‘SSH’ and type in the IP address that was noted down earlier.
6. Enter the log in credentials of Raspberry Pi in the terminal window that opens up.
Step 4: Understanding MQTT
MQTT is a light weight messaging protocol that stands for MQ Telemetry Transport. In an MQTT system, several clients or nodes may be connected to a broker(/server). The clients publish certain data as a message under a specific topic. Any other client which is interested in receiving that data, subscribes to the respective topic. All the data transfer is performed via the broker.
The following link would provide a deeper insight to the theory of MQTT: http://internetofthingsagenda.techtarget.com/defin…
Source: MQTT Based Fire Detection System
-
What is the primary function of this project?
The project creates a low-cost fire detection system where subsystems communicate over the Internet to detect fire and provide visual alerts. -
How does the system detect the presence of fire?
Fire is detected at sister institutions using infrared sensors because hot objects emit infrared rays. -
Which protocol is used for communication between control rooms?
The lightweight MQTT protocol is used to perform real-time execution and parsing of critical data between nodes and the broker. -
What role does the Raspberry Pi play in this network?
The Raspberry Pi at the headquarters acts as the MQTT broker and hosts another instance of a node to display fire status. -
How do the NodeMCUs function within the system?
NodeMCUs are based at the sister institution control rooms and act as nodes in the network that publish and subscribe to data. -
How are visual alerts triggered for control room personnel?
If a fire emergency occurs in one institution, the respective LED glows in all control rooms to alert the personnel. -
Why is SSH enabled on the Raspberry Pi?
SSH allows users to work on the Pi remotely without connecting peripherals like keyboards and mice directly to the device. -
What software is recommended to access the Raspberry Pi terminal remotely?
Putty is a terminal emulator recommended to connect to the Raspberry Pi via SSH using its local IP address.
