Summary of Totally Useless Coffee Dispenser…
The article describes a DIY freeze-dried coffee dispenser project using a Microbit v2 microcontroller, stepper motors, and 3D printed parts. The creator designed and assembled custom components, incorporated a microphone-triggered stepper motor mechanism, and used a cup-activated microswitch to start dispensing. Despite initial success, the project faced mechanical tightness and hardware failures. The project highlights an engaging learning process with microcontrollers and prototyping.
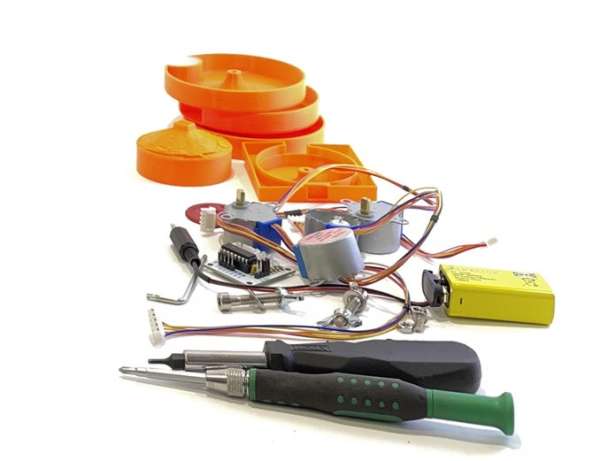
Parts used in the Freeze-Dried Coffee Dispenser:
- Stepper motor with driver
- Plexiglas (for front cover)
- Microbit v2
- Microswitch
- USB charger
- Wood scraps (for the base)
- Metal backdrop (steel plate)
- 3D printed parts (coffee powder holder, portioning wheel, trigger plate, Microbit holder)
So I have yet again over-engineered a task, this time, a freeze-dried coffee dispenser.
Why you ask, well the obvious first, it’s super fun and second, it’s the best way to learn new skills.
I’m a real noob when it comes to the inner workings of microcontrollers but I really want to know how I can use them in my projects. So far I have used the Microbits for my very personal Arc Reactor and controlling a Handheld Slide Projector.
I see some great potential in the new Microbit version 2. It has so many built-in outputs and inputs. I gave the new microphone a go this time:-)
You probably see I’m a big fan of Simone Giertz, she’s a great inspiration in doing these types of projects.
If you’re shaking with caffeine jittersand need to know if this really worked out, I can recommend scrolling down to step 6!
Cheers
Supplies:
Stepper motor w/driver
Plexiglas for the front cover
Microbit v2
Microswitch
USB charger
Wood scraps for the base
A metal backdrop
3D printed parts
Step 1: Sketches…
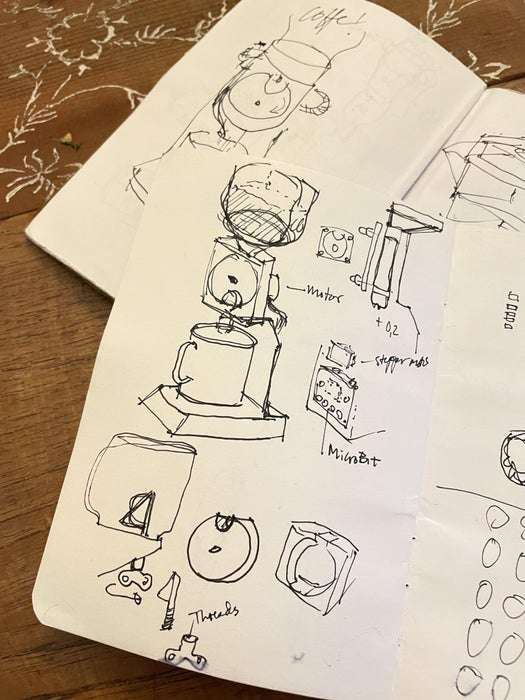
Just a very basic idea sketched up before heading into the Java lab. I really benefit from taking the time to visualize what I want to make. And it becomes a record of my idea stream, where some ideas dry out and others like the Coffee Machine Dispenser thrives:-)
From here I know what I need to get started and I can see the first challenges.
Step 2: 3D Files

These are the files I designed to hold the coffee powder, the portioning wheel, a trigger plate for the coffee cup, and a holder for the Microbit breadboard.
I also included all parts as one STL file, which should be able to print without support.
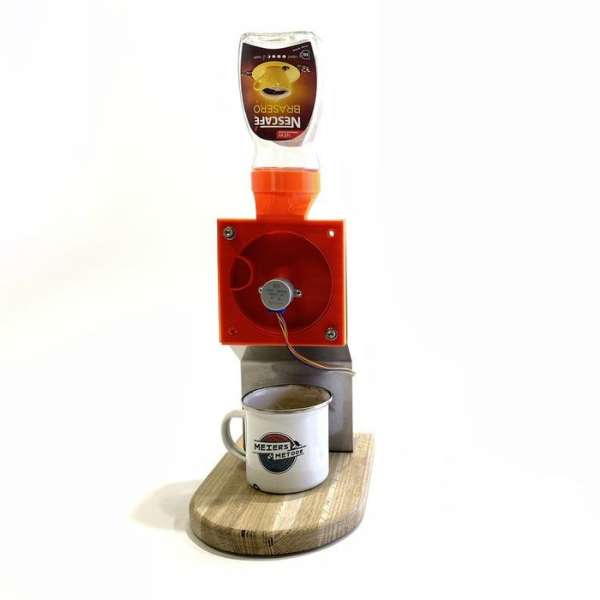
Step 3: All Comes Together…
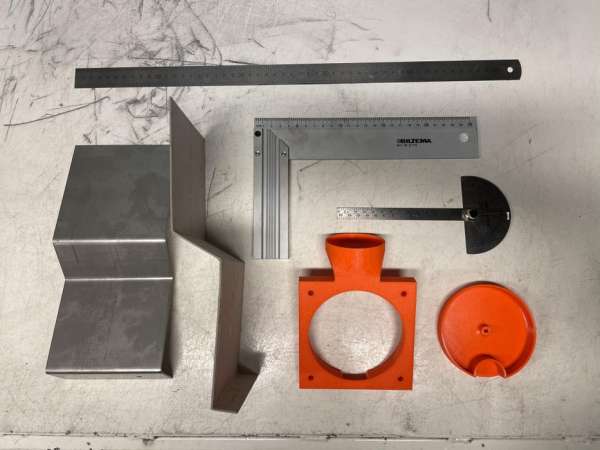
In this project, I got to do many of the things I love. Pretty much the first stop was the metal workshop. I knew I wanted a solid base for the parts and I bent a steel plate (went overboard already at this stage) so I would angle it to fit the cup and position the dispenser wheel.
From here I started designing the 3D parts as the central components:
- Wheel to dispense the coffee
- A frame to hold the wheel and coffee powder
- Holder for the Microbit
- And a plate to activate the switch for the microcontroller to turn on and perform its code.
During these preparations, I found a piece of leftover wood that would be a super nice plate for holding everything. I rounded the edges before I continued.
And finally wiring up and program the Microbit.
Step 4: The Cup As the Trigger
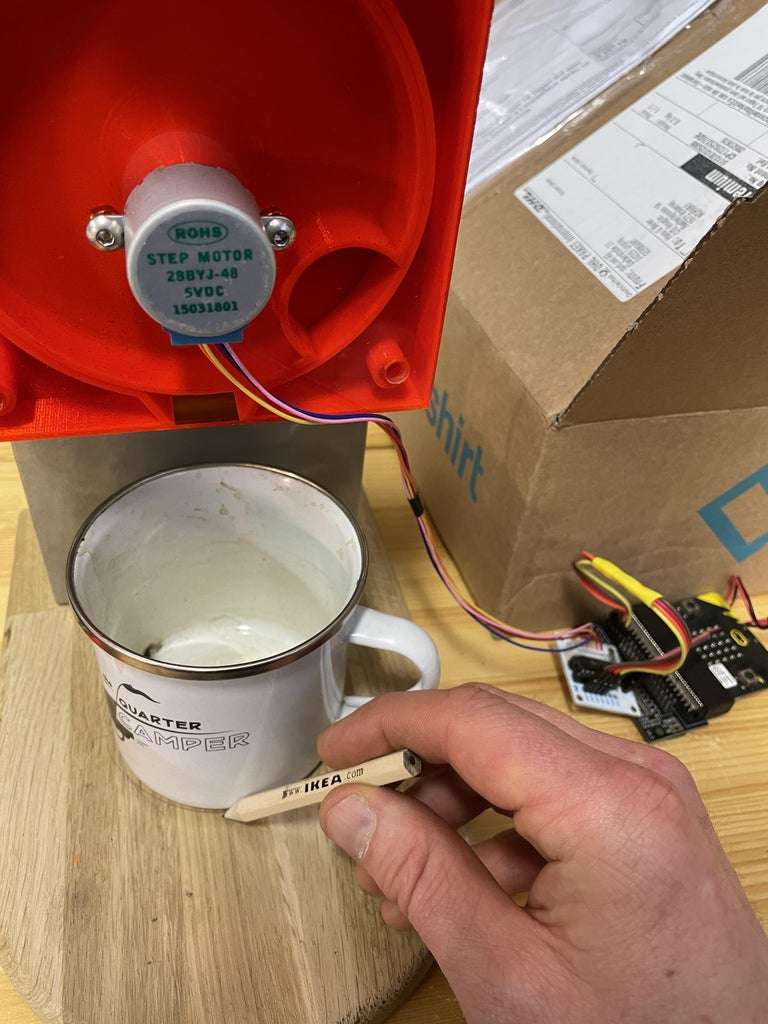
I wanted the ON-switch to be triggered by the cup being placed under the coffee dispenser. I had a small push switch I placed underneath the plate. Now I made a grove on top where the orange switch could rest.
Step 5: I’m a Programmer Now… Block Programmer!
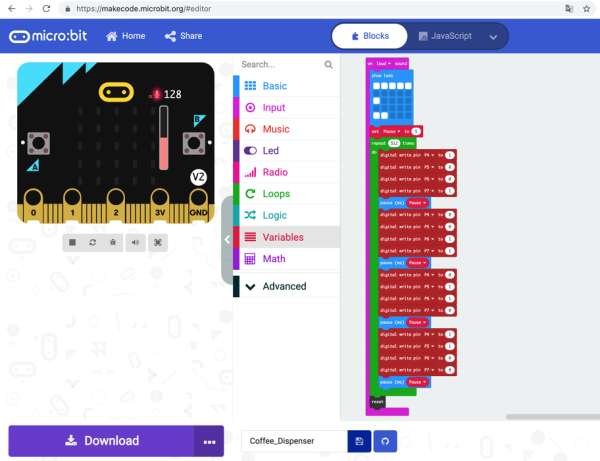
In my hay days as a website designer I never got around to writing any code, but I got pretty good at copy and pasting code. So getting started with Microbit is a pretty smooth intro to programming a microcontroller. And let’s be clear this is block code, meaning I don’t write code I place code blocks in sequence. So don’t ask me any trick questions:-)
Don’t be fooled by the simplicity, I have friends programming Microbit drones!
The code here tells the Microbit to stay idle until a high sound is made, then it tells the stepper-motor driver to do its steps/turn, I’ve set it to do one full round, and then reset and wait for a new high sound, like a clap. (I’ve set the “screen” to show pixels according to how many steps are run, 512 for one full turn)
This is a new feature in Microbit version 2, it comes with a speaker and a microphone!!!
Step 6: Proof of Concept…
Will it work? You never know do you, for sure. This time I was really unsure. So many parts and I’m not used to this level of complexity. I also had an issue where the wheel and frame was really too tight. I tried sanding the 3D parts and some smoothness helped.
Ok so lets test this thing!!!
And what do you know it worked, IT WORKED… I T W O R K E D ! ! !
Step 7: All Good Things Must End…
After a few test runs and one nice and perfectly dispensed freeze-dried coffee things started to fail. The stepper motor had its own driver and the Microbit served as a controller, I had set what should trigger the motor and how many steps (turns) the motor would do. But what ended up happening was that the motors (4 in total) broke down. I also had a run-in with smoke coming out of the Microbit, when experimenting with increasing the power.
Source: Totally Useless Coffee Dispenser…