
Summary of VHF-UHF RF Sniffer
This article introduces an ultra-simple RF sniffer circuit designed to visualize transmitter oscillation, relative power output via LED brightness, and oscillator frequency using a ruler at 433MHz. It emphasizes that UHF circuits require specific construction techniques, such as avoiding solderless breadboards due to parasitic effects and utilizing a common ground plane on double-sided PCBs to prevent crosstalk. The text highlights that components like inductors and antennas are small and economical at this frequency.
Parts used in the RF Sniffer Circuit:
- RF sniffer circuit
- LED
- Copper wire
- School ruler
- Double sided PCB
- Air-core inductors
- 1/4 wave antenna
This is a multi-chapter instructable. I will be describing the making of a short/medium range RF remote-control using the UHF 433Mhz frequency. It´s impossible to setup & adjust a RF transmit-receive link if you are not sure the transmitter is working properly.At 433MHz, your multimeter or even a regular oscilloscope are totally useless.

In this chapter (1) I will show you this ultra-simple RF sniffer circuit with which you can visualize with an LED:
(1) if the transmitter is oscillating.
(2) its relative power output by the brightness of LED.
(3) check the frequency of the oscillator with a simple school ruler by measuring the distance between nodes (as did Ernst Lecher 120 years ago ) https://en.wikipedia.org/wiki/Lecher_lines .At 433MHz, distance between nodes (0-crossing points) is 323mm on copper wire (half wavelength).
UHF comprises frequencies between 300Mhz and 3Ghz. At these frequencies the physical layout of the components is crucial; the same circuit may work or not depending on how it´s built. A single millimeter of wire or component lead is an inductor and affects the circuit. You cannot use a solderless breadboard because it´s plagued with parasitic capacitances and inductances which at UHF frequencies (and VHF) behave as actual components. To avoid crosstalk between traces & ground loops UHF circuit must share a common ground plane (eg:,double sided PCB) to which all ground points are connected ( https://en.wikipedia.org/wiki/Ground_plane ).
On the good side, UHFinductors are of low values and are usually air-core and made with few turns of wire or even printed on the PCB. The same applies for antennas: at 433Mhz a 1/4 wave antenna is only 17cm long. Capacitor values are also very low. All these properties translate into a very small & economical circuit.
For more detail: VHF-UHF RF Sniffer
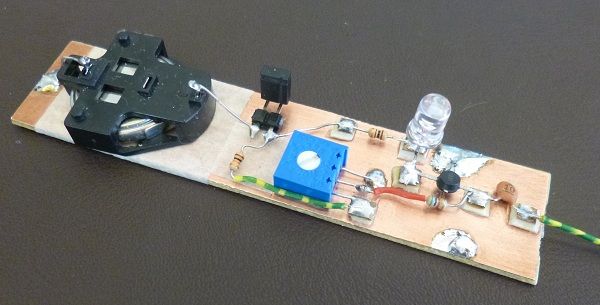
In this chapter (1) I will show you this ultra-simple RF sniffer circuit with which you can visualize with an LED:
(1) if the transmitter is oscillating.
(2) its relative power output by the brightness of LED.
(3) check the frequency of the oscillator with a simple school ruler by measuring the distance between nodes (as did Ernst Lecher 120 years ago ) https://en.wikipedia.org/wiki/Lecher_lines .At 433MHz, distance between nodes (0-crossing points) is 323mm on copper wire (half wavelength).
UHF comprises frequencies between 300Mhz and 3Ghz. At these frequencies the physical layout of the components is crucial; the same circuit may work or not depending on how it´s built. A single millimeter of wire or component lead is an inductor and affects the circuit. You cannot use a solderless breadboard because it´s plagued with parasitic capacitances and inductances which at UHF frequencies (and VHF) behave as actual components. To avoid crosstalk between traces & ground loops UHF circuit must share a common ground plane (eg:,double sided PCB) to which all ground points are connected ( https://en.wikipedia.org/wiki/Ground_plane ).
On the good side, UHFinductors are of low values and are usually air-core and made with few turns of wire or even printed on the PCB. The same applies for antennas: at 433Mhz a 1/4 wave antenna is only 17cm long. Capacitor values are also very low. All these properties translate into a very small & economical circuit.
For more detail: VHF-UHF RF Sniffer
- How can I verify if a 433MHz transmitter is working?
You can use an ultra-simple RF sniffer circuit with an LED to visualize if the transmitter is oscillating. - Can a multimeter or oscilloscope measure signals at 433MHz?
No, at 433MHz a multimeter or regular oscilloscope are totally useless for setup and adjustment. - How do I check the frequency of the oscillator?
You can check the frequency by measuring the distance between nodes with a simple school ruler. - Why can't I use a solderless breadboard for UHF circuits?
Breadboards are plagued with parasitic capacitances and inductances which behave as actual components at UHF frequencies. - What layout technique avoids crosstalk in UHF circuits?
The circuit must share a common ground plane, such as a double sided PCB, to which all ground points are connected. - Are UHF inductors large or complex to build?
UHF inductors are usually air-core, made with few turns of wire, or printed on the PCB. - What is the length of a 1/4 wave antenna at 433MHz?
At 433MHz a 1/4 wave antenna is only 17cm long. - Does physical layout matter for UHF circuits?
Yes, the physical layout is crucial because even a single millimeter of wire acts as an inductor.
