Summary of 4-key keyboard using ATtiny85
This article details an enhancement of a previous 1-key keyboard project to a 4-key keyboard using an ATTiny45/85 microcontroller. The design adds three buttons to the unused IO ports without additional hardware. The project involves creating a single-sided PCB, programming the ATTiny with custom firmware utilizing the V-USB library to emulate a standard USB keyboard, and interfacing via a USB cable. Key programming considerations include using a High Voltage Serial Programmer due to reset fuse settings. The keyboard emulates keys 1-4 and supports use with software like Adobe Flash through standard keyboard events.
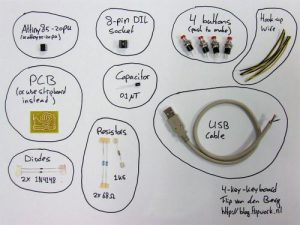
Parts used in the 4-key keyboard project:
- Atmel ATTiny45-20PU or ATTiny85-20PU microcontroller
- 8-pin DIL socket (optional)
- 2x Diodes (0.5W), e.g. 1N4148
- 2x 68 ohm resistors
- 1x 1.5K resistor
- 1x 0.1 uF capacitor (can be higher, e.g. 1uF or 4.7uF)
- 4x push-buttons
- USB cable with standard USB-A plug
- Etched single-sided circuit board (or stripboard alternative)
- Programmer for ATTiny45/ATTiny85 (preferably High Voltage Serial Programmer)
Introduction:
A good while back, I made the 1-key-keyboard project. Ever since it has always been in the back of my mind that the ATTiny microcontroller, which I used in this project, had still 3 IO ports which were unused. Only recently I’ve found the time to expand my old project in the most obvious way possible; by adding 3 more buttons to these IO ports and thereby creating a 4-key-keyboard, without having to add any other hardware than these 3 extra buttons.

Although this project can still easily be built on a stripboard, I chose this time to etch my own (single sided) PCB and to use an old USB cable to interface with the computer, instead of the makeshift USB-plug as used in my previous project.
The hardware:
1x Atmel ATTiny45-20PU or ATTiny85-20PU microcontroller
• 1x 8-pin DIL socket (optional but highly recommended)
• 2x Diodes (0.5W) (ordinary 1N4148 will do the job)
• 2x 68 ohm resistors
• 1x 1.5K resistor
• 1x 0.1 uF capacitor (note: can be higher capacity, I also used 1uF and in the example circuit from obdev they use 4u7)
• 4x push-button
• 1x usb cable with the standard usb-A plug
• 1x etched circuit board (or use stripboard as alternative)
And a programmer for the ATTiny45/ATTiny85 microcontroller. For this project a programmer supporting High Voltage Serial Programming (HVSP) is highly recommended, since we enable the ‘reset disable’ fuse. I’ll explain this in more detail later on.
The schematics:

The circuit-board:
In the .zip file of this project, there’s a .pdf which can be used for photo-chemical etching of the circuit-board. EAGLE files are also included.
The component layout on the circuit board:

The firmware:
I tried to add useful comments to the sourcecode of this project, so I suggest to have a look at it to see the precise details.
At a high-level, this project implements V-USB (previously called AVR-USB) from Objective Development, which I use to emulate a USB keyboard.
Contrary to my 1-key-keyboard project, I now used the standard report descriptor for a USB keyboard, which has a 8-byte report buffer. This may be a bit of a overkill, since I only use 4 of these bytes in this project (1 for each button) but it does allow for easy expansion of functionality in the future.
Another difference with my old project is the fact the way key-presses are emulated. in the old version, two different keys were emulated on press and release of the button. Now every button simulates just 1 key, but with its individual key-down and key-up event, which is exactly the same as a normal keyboard operates.
In the standard firmware, key presses are emulated for the keyboard-keys 1 to 4. Though this can easily be changed.
Programming the firmware:
OK, I’ll start here with a warning: If you don’t have a programmer that supports High Voltage Serial Programming (HVSP) then you can’t reprogram the ATTiny anymore after enabling the reset-disable fuse. (An Atmel STK500 programmer does support HVSP!)
If you have a programmer that only supports ISP, then you can still successfully program the 4-key-keyboard, as long as you upload the firmware before setting the reset-disable fuse.
If you want to experimenting/test this project without having a HVSP capable programmer, then I suggest to test it without the reset-disable fuse set. This will result in button 3 not working (since it’s connected to the IO pin that doubles as reset pin), but all other 3 will work. Only when you’re sure that you’re happy with the firmware, you can set the reset-disable fuse.
I have personally always used AVR Studio in combination with WinAVR to program my AVR’s (they are available at no cost) But you can use your own favorite AVR programming environment to program your ATTiny. You can find both the sourcecode and a pre-compiled .hex in the .zip file of this project.
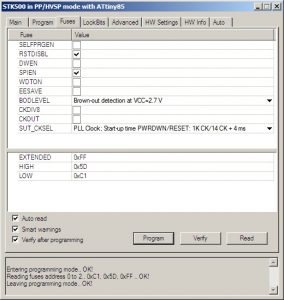
Recommended fuse-settings:
EXTENDED: 0xFF
HIGH: 0×5D (use 0xDD to test without reset-disable fuse set, as described above)
LOW: 0xC1
Testing the project
After you have built the circuit, programmed the firmware and set the fuses correctly, it’s time to test the project.
After plugging in the USB cable, the computer should recognize a new keyboard and automatically install the standard keyboard-drivers. Then it’s time to test! The easiest way is to open a text-editor, e.g. notepad, and push the buttons in the prototype. If everything is successful, keyboard-keys 1-4 are emulated by the 4 buttons on the prototype.
Interfacing with Adobe Flash
By emulating a standard keyboard, this project should be easy to integrate in any software with which you want to interface. But personally I’ve used it often in combination with Adobe Flash. Since I’ve modified the behavior of the buttons to resemble how a normal keyboard operates, there’s a slight change in the code to interface with flash, compared to the 1-key-keyboard project.
Now in flash you can create event-listeners for KeyboardEvent.KEY_DOWN and KeyboardEvent.KEY_UP for keys 1-4, just like one would interface with a normal keyboard to detect when a key is pressed and when it’s released. Flash example code is included in the project file.
Download the project files
Click here to download the complete sourcecode of this project
For more detail: 4-key keyboard using ATtiny85