For my final project I built a sous-vide immersion cooker:
Sous-vide is a method for cooking food in a temperature-controlled water environment for longer than normal cooking times, at an accurately regulated temperature. Sous-vide cookers are often used in high-end restaurants. In the past few years, however, they have become more popular in household kitchens.
An average sous-vide cooker costs $2000, with low-end cookers going for around $300. I wanted to build my own cheaper version of the device. I also wanted to be able to control it via Bluetooth, so that I could leave the device in my room and control it from anywhere on my floor.
Just want to see the food it can make? Click here
Electronics
The electronics for the cooker are fairly simple. We really are dealing with three components:
- A waterproof temperature sensor: DS18B20
- A switched AC current via a solid-state relay: SSR-25da
- Bluetooth for serial input / output: BLE Mini
I got a chance to play around with the temperature sensor and BLE mini device in week 11. I also got the solid-state relay working in week 10. This week, I brought all of the components together on a single board.
Reading Temperature
Step 1 is to read the temperature of the water. I found a handy device which could do exactly this, a DS18B20:
This is known as a “one-wire device,” because data from the sensor is transferred over a single wire. We also connect a VCC and GND wire, so there are three wires in total. In software, there is a OneWire Arduino library which lets you create a OneWire bus for data transfer. Dallas Temperature created their own library on top of the OneWire library which provides intuitive commands for reading temperature:
#include <OneWire.h>
#include <DallasTemperature.h>
// Where the temperature sensor probe is connected.
#define ONE_WIRE_BUS 14
// Setup a OneWire instance to communicate with any devices.
OneWire oneWire(ONE_WIRE_BUS);
// Pass our oneWire reference to Dallas Temperature.
DallasTemperature(&oneWire);
void setup() {
  // Start up the library.
  sensors.begin();
}
void loop() {
  sensors.requestTemperatures();
  float tempC = sensors.getTempCByIndex(0);
}
Switching AC Current
I used these guys to heat water. They’re AC powered, so we need a way to turn them on and off via a signal from our microcontroller. The most common way to do this is via a solid state relay.
The green wires are connected to a pinout and GND, and the white wire intersects a link to the heaters. When the pin is turned on, current from the wall socket can flow to the heaters.
Bluetooth
The final piece of the puzzle is Bluetooth. I used the BLE Mini device from RedBearLabs. The device is super simple to setup. Since I was using an ATMega which has hardware serial, I simply connected RX/TX to the microcontroller and powered the board. It worked on the first try.
Power
I needed an AC -> 5V power adapter. The only thing I had on hand was an iPhone charger, but any ~1A power adapter would do the trick.
Board Assembly
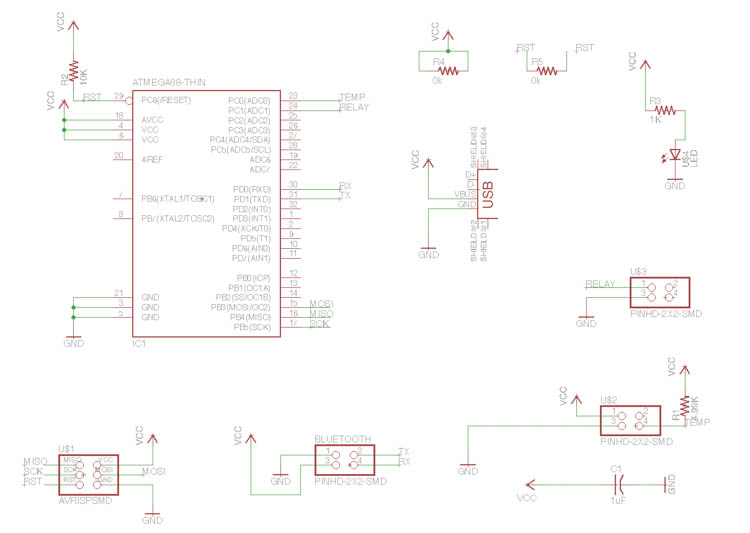
Here is the schematic for my board:
For more detail: Final Project: built a sous-vide immersion cooker


