Summary of First steps with micro controllers (ATMega8)
This article guides beginners through connecting an ATMega8 microcontroller, powering it with a 7805 regulator, creating a simple programmer for PC uploads, and running a C program to control LEDs. The author shares personal insights from their first project involving this chip.
Parts used in the ATMega8 Circuit:
- ATMega8-16PU microcontroller
- 7805 voltage regulator
- IC socket
Purpose of this article:
1) to learn how to connect the Micro controller in a simple circuit and how to power it
2) to see how to create a simple programmer (a device to connect the micro controller to a PC for uploading software)
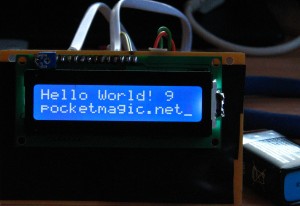
3) to present a simple software program in C that controls a series of LEDS
4) to show everything in action.
Note: its my first time when I’m working with micro controllers. The info presented here might be inexact, but not incorrect, since I will stick to my findings and to the easy path for a beginner.
All that is presented below was the result of one day of reading, soldering, testing – a good score I would say.
Short Intro and Motivation
Since I’m a C++ developer for Embedded Devices, small processing units were always a strong point of interest for me. Furthermore, building a robot for my bachelor degree, a few years ago, required getting over serious hardware limitations related to power consumption and weight. So I’m still looking for a way to perfect my robot, and to extend its functionality, and the microcontrollers look like a very interesting approach, to say the least.
For a start, I had two micro controllers at hand: the popular ATMega8-16PU and the not-so-popular PIC24FJ64GA002. The first one I’ve bought on Ebay from a very good seller in Thailand:
or this article I will be targeting the ATMega8, since it gave me excellent results, thanks to available documentation. Can’t say the same about the PIC.
So let’s start:
Our first ATMega8 circuit
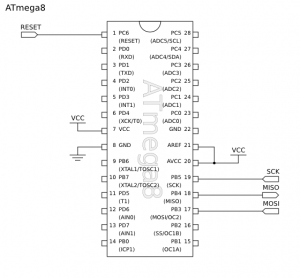
The ATMega8 is an excellent micro controller:
| 28 PINS (23 for Input/Output !!!) 8-Kbyte self-programming Flash Program Memory 1-Kbyte SRAM 512 Byte EEPROM 6 or 8 Channel 10-bit A/D-converter Up to 16 MIPS throughput at 16 Mhz 2.7 – 5.5 Volt operation Its datasheet is available hereI suggest you download the ATMega8 image to the left and print it, since you will need it often to consult the PIN layout when doing your circuit. |
The Input/Output pins are important when it comes to how many devices you want to connect/control/use. To control a simple LED you will need to use 1 PIN (for output). To control a temperature sensor, you will need another PIN (for input).
To do a simple circuit and power the micro controller, first thing you need to know is that you need a stable 5V power source. The best way to achieve this is to use a regulator like the 7905/7805. This component has constant output regardless of the input current – in regards to some given boundaries, of course.
Here is the circuit. I suggest you use sockets for the ATMega8, to easily change the chip on your board.
Read More: First steps with micro controllers (ATMega8)
- What is the main purpose of using a 7805 regulator?
To achieve a stable 5V power source for the microcontroller. - How many Input/Output pins does the ATMega8 have?
The ATMega8 has 23 pins for Input/Output out of 28 total pins. - Can I use the PIC24FJ64GA002 instead of the ATMega8?
The author targeted the ATMega8 because it provided excellent results due to available documentation compared to the PIC. - What memory specifications does the ATMega8 possess?
It features 8-Kbyte self-programming Flash Program Memory, 1-Kbyte SRAM, and 512 Byte EEPROM. - Is it recommended to solder the chip directly or use sockets?
The article suggests using sockets for the ATMega8 to easily change the chip on your board. - What throughput speed can the ATMega8 achieve?
The microcontroller offers up to 16 MIPS throughput at 16 Mhz. - Why did the author choose the ATMega8 for this project?
The author chose it because it gave excellent results thanks to available documentation. - What operating voltage range does the ATMega8 support?
The device operates within a range of 2.7 to 5.5 Volts.