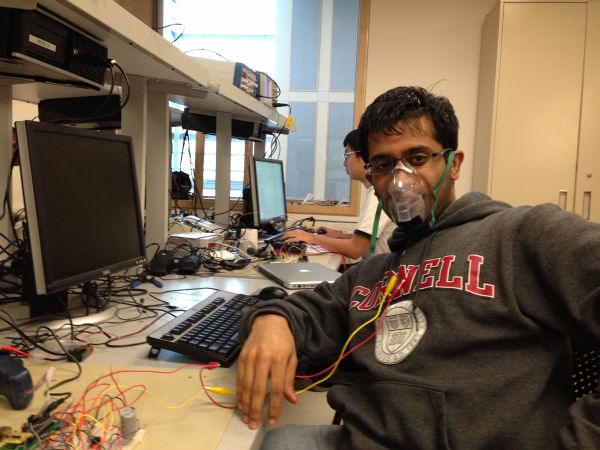
Our final project for ECE 4760 is a respiratory monitor that was designed for low-resource environments. The device calculates a patient’s breathing rate by detecting changes in temperature when the patient breathes through a mask. Features of the device include an alarm through a piezoelectric speaker which goes off when the patient stops breathing, and a low-battery indicator signal when the battery powering the device reaches a threshold voltage.
Project Overview
Motivation
For our project, we wanted to create a solution to a real-world problem. Many biomedical devices, such as commercially available respiratory monitors, are designed for the developed world and require a stable power-supply to operate. We wanted to implement a solution that is adaptable to different environments.
Our device uses several concepts we learned not only this semester in ECE 4760, but also in other classes at Cornell. We use analog-to-digital conversions to sample readings from both the thermistor and the battery, pulse-width modulation to generate a signal for the speaker, and timers to switch between tasks. Our implentation also includes various analog circuitry for voltage regulation and signal amplification. Developing a robust and accurate respiratory monitor served to be a challenging, yet rewarding experience.
Previous Work
When doing research for this project, we came across several respiratory monitors using different sensors for measuring breathing. Other methods of monitoring respiratory rate include a chest force sensor (to detect force produced by chest movement), impedance pneumograph (which uses skin electrodes to calculate transthoracic impedance), and pulse oximetry (which measures O2 saturation in blood). While commercial devices to monitor respiratory rate exist, they use motion or force sensors to determine respiration rate. These monitors tend to be better suited for developed countries where a stable power supply is not a concern. We want to design our device geared to the needs of undeveloped areas. Therefore, we aimed for our thermistor monitor to be comparatively cheaper, easier to use, as well as reliable.
We also discovered another thermistor respiratory monitor research project. The design of the device differed from ours, in that it included two thermisors; one that remains in the outside environment for reference and one that goes inside the nostril.
High-Level Block Diagram
1. Thermistor Measurements
The resistance over the thermistor drops when its surrounding temperature increases, and goes back down when the temperature decreases. The voltage also, accordingly drops when a person exhales and rises when a person inhales. We use an operational amplifier to make the changes in temperature more apparent. The output of the amplifier is read into the microcontroller’s ADC channel 0.
2. Voltage Measurements
Under battery operation, our device takes a voltage sample across the battery about every minute. Since our device uses a 9V battery, a voltage divider is used to drop the voltage so that it is about 2.2V at PINA1 (ADC channel 1).
3. Power
Our device can be powered through either a standard AC power suppy or a single 9V battery.
4. Turn On Display
To conserve power, the user must hold down a button to turn on the display to read the respiration rate. This prevents the user from leaving the display on by mistake and draining the battery.
5. Output Sound
There are two different alarms for our device generated by a piezoelectric speaker. The first is higher in pitch and alarms if the patient is not breathing. The second is a signal that the device is running on low battery. While the first alarm is a continous sound, the low-battery alert is a one second long tone.
6. Respiration Rate Display
Breathing rate is measured and displayed in breaths/min on an LCD. This allows whoever is monitoring the patient to see if the patient is breathing too fast or too slowly.
7. Measurement
This task does the actual calculation of the respiration rate using samples from ADC0.
Design Decisions
Microcontroller
When choosing a microcontroller for this project, we first wanted to find the smallest microcontroller possible so that it could be mounted right onto the device’s mask. However, when identifying how many I/O ports and ADC channels would be neccessary for our project, we realized that the AtMega1284p microcontroller that we had been using all semester would be ideal.
Thermistor
During the initial stages of our project design we experimented with several thermistors and their placement on the device. Since a drastic temperature difference is not produced when a human breathes, we needed the smallest, and therefore most sensitive thermistor we could find. Larger thermistors we experimented with either could not detect a “breath” or had a very slow response time. We also thought a mask around the patient’s nose and mouth would be the least intrusive placement of the thermistor.
Display
Because we wanted to design our device to be low-powered, choosing the right display for the respiratory rate was a concern. Orignally, we planned to use two 7-segment displays which turned on when the user pressed a button. However, we decided to use an LCD screen for a nicer display. In order to reduce power usage, the LCD only receives power when the user presses the display button, which reduces the load on the battery.
Standards
As a medical device, this respiratory monitor must meet regulatory requirements outlined by governments. This includes meeting HIPPA standards which protects individuals’ medical records and other personal health information, including respiration rate. However, since we are not planning to store this information, this regulation should not be an issue. Before it can be sold commercially in the United States, the device would also need FDA approval.
Hardware Design & Implementation top
There are six different hardware components necessary to make the respiratory monitor work. The six components are listed below and are described in that order.
| 1. Thermistor Measurement |
| 2. Thermistor Amplification |
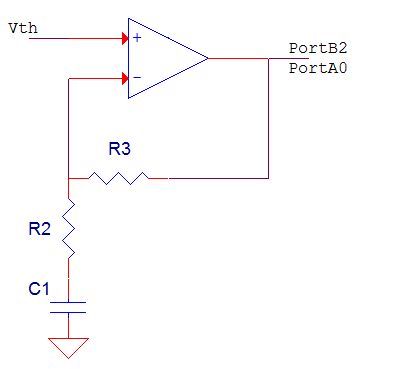
| 3. Analog Comparator |
| 4. Capacitor Charger |
| 5. LCD Display Button |
| 6. Battery Monitor |
1. Thermistor Measurement
We used a thermistor based measuring system to measure the breathing rate of the patients. The thermistor is mounted inside a mask which is worn by the patient. The mask is a standard nebulizer mask that is used by asthma patients. The thermistor is mounted inside the mask so that it is directly in front of the patient’s mouth. As the patient breaths the hot air from the patient’s breath changes the resistance (Rth) of the thermistor. As a result, the voltage across the thermistor (Vth) will also change proportionally to how the patient breaths. We can therefore use Vth as an indirect measurement of how the patient is breathing.
Parts List:
| Category | Item | Vendor | Unit Cost | Quantity | Total Cost | |
|---|---|---|---|---|---|---|
| Electronics | White Board | ECE 4760 Lab | $6.00 | 2 | $12.00 | |
| AtMega1284p Target Board | ECE 4760 Lab | $12.00 | 1 | $12.00 | ||
| 9V Battery | Anywhere | $2.00 | 1 | $2.00 | ||
| LCD | Varitronix | $8.00 | 1 | $8.00 | ||
| Nebulizer Mask | justnebulizers | $5.00 | 1 | $5.00 | ||
| NTC Thermistor SMD 402 | ECE 4760 Lab | $0.00 | 1 | $0.00 | ||
| 10K Trimpot | ECE 4760 Lab | $0.00 | 1 | $0.00 | ||
| Piezo Electric Speaker | ECE 4760 Lab | $0.00 | 1 | $0.00 | ||
| Wire | ECE 4760 Lab | $0.00 | N.A. | $0.00 | ||
| Button | ECE 4760 Lab | $0.00 | 1 | $0.00 | ||
| Op Amp LF353N | ECE 4760 Lab | $0.00 | 1 | $0.00 | ||
| Resistors and Capacitors | Through-Hole 330Ω Resistor | ECE 4760 Lab | $0.00 | 4 | $0.00 | |
| Through-Hole 1kΩ Resistor | ECE 4760 Lab | $0.00 | 2 | $0.00 | ||
| Through-Hole 3kΩ Resistor | ECE 4760 Lab | $0.00 | 1 | $0.00 | ||
| Through-Hole 10kΩ Resistor | ECE 4760 Lab | $0.00 | 1 | $0.00 | ||
| Through-Hole 30kΩ Resistor | ECE 4760 Lab | $0.00 | 1 | $0.00 | ||
| Through-Hole 100kΩ Resistor | ECE 4760 Lab | $0.00 | 1 | $0.00 | ||
| Through Hole 220µF Capacitor | ECE 4760 Lab | $0.00 | 1 | $0.00 | ||
| Through Hole 2200µF Capacitor | ECE 4760 Lab | $0.00 | 1 | $0.00 | ||
| Through Hole 1nF Capacitor | ECE 4760 Lab | $0.00 | 1 | $0.00 | ||
| Total | $39.00 |
For more detail: Thermistor Respiratory Monitor Using Atmega1284