Summary of Touch Keypad Interfacing with ATmega32 Microcontroller
This tutorial explains interfacing an 8-key (4x2) capacitive touch keypad with an ATMEGA32A microcontroller. The touch keypad uses capacitive sensing where touching a metal pad triggers a high output on the corresponding pin. The example project includes connecting the keypad inputs and a 16x2 LCD to the microcontroller to display the key pressed. The LCD is connected in 8-bit mode with control lines to specific microcontroller pins. The guide highlights hardware connections and software tools needed to program and communicate with the keypad and display.
Parts used in the Touch Keypad Interfacing with ATmega32 Microcontroller:
- ATMEGA32 microcontroller
- 4x2 (8 key) Touch keypad module
- JHD_162ALCD (16x2 LCD)
- 100uF capacitor
- 100nF capacitor
- 1KΩ resistor (2 pieces)
- Power supply (5V)
- AVR-ISP Programmer
- Atmel Studio 6.1 or 6.2 (software)
- ProgISP or Flash Magic (software)
In this tutorial we are going to interface a 4×2 (8 key) touch keypad with ATMEGA32A microcontroller. We all know keypad is one of the most important input devices used in electronics engineering. This module does not have actual keys, but have specially designed capacitive metal pads, and these pads are very sensitive. So when a person gets in contact with one of the pads, there will a capacitive change in the corresponding loop, and this change will be sensed by the control electronic in the module. As a response to the touch the corresponding pad output pin goes high.
For a eight key touch pad we will have eight outputs. Although there are other features with this module, we are not going to discuss them here.
Components Required
Hardware: ATMEGA32 microcontroller, power supply (5v), AVR-ISP PROGRAMMER, JHD_162ALCD (16x2LCD), 100uF capacitor, 100nF capacitor, 1KΩ resistor (2 pieces), Touch keypad module.
Software: Atmel studio 6.1 or Atmel studio 6.2, progisp or flash magic.
Circuit Diagram and Working Explanation
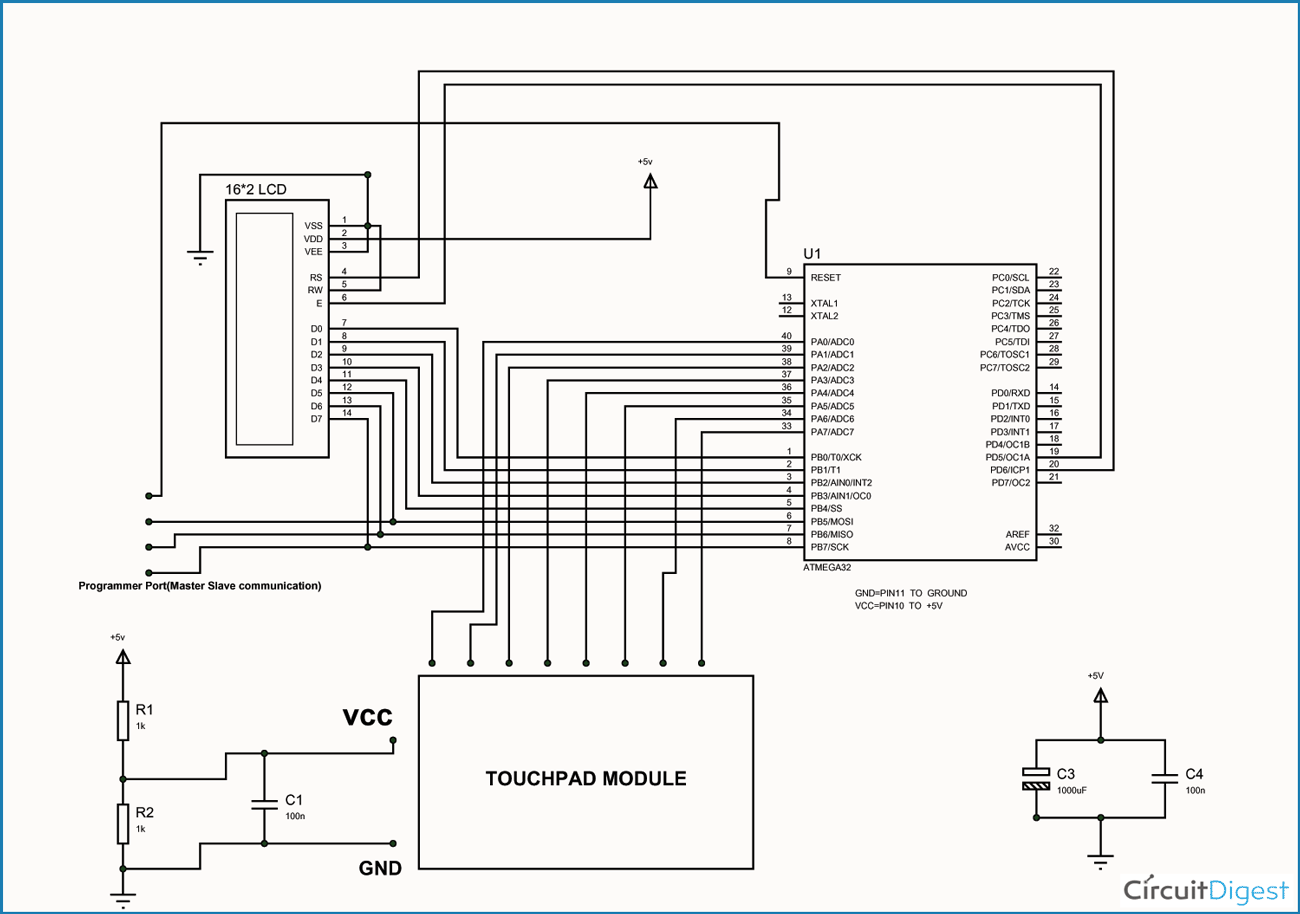
In circuit PORTB of ATMEGA32 is connected to data port LCD. Here one should remember to disable the JTAG communication in PORTC to ATMEGA by changing the fuse bytes, if one wants to use the PORTC as a normal communication port. In 16×2 LCD there are 16 pins over all if there is a back light, if there is no back light there will be 14 pins. One can power or leave the back light pins. Now in the 14 pins there are 8 data pins (7-14 or D0-D7), 2 power supply pins (1&2 or VSS&VDD or gnd&+5v), 3rd pin for contrast control (VEE-controls how thick the characters should be shown), and 3 control pins (RS&RW&E)
In the circuit, you can observe that I have only took two control pins, this give the flexibility of better understanding, the contrast bit and READ/WRITE are not often used so they can be shorted to ground. This puts LCD in highest contrast and read mode. We just need to control ENABLE and RS pins to send characters and data accordingly.
The connections which are done for LCD are given below:
PIN1 or VSS to ground
PIN2 or VDD or VCC to +5v power
PIN3 or VEE to ground (gives maximum contrast best for a beginner)
PIN4 or RS (Register Selection) to PD6 of uC
PIN5 or RW (Read/Write) to ground (puts LCD in read mode eases the communication for user)
PIN6 or E (Enable) to PD5 of uC
PIN7 or D0 to PB0 of uC
PIN8 or D1 to PB1 of uC
PIN9 or D2 to PB2 of uC
PIN10 or D3 to PB3 of uC
PIN11 or D4 to PB4 of uC
PIN12 or D5 to PB5 of uC
PIN13 or D6 to PB6 of uC
PIN14 or D7 to PB7 of uC
In the circuit you can see we have used 8bit communication (D0-D7) however this is not a compulsory, we can use 4bit communication (D4-D7) but with 4 bit communication program becomes a bit complex.
So by observing the above table we are connecting 10 pins of LCD to controller in which 8 pins are data pins and 2 pins for control.
For more detail: Touch Keypad Interfacing with ATmega32 Microcontroller