Summary of A Bluetooth ESP32 TFT + Touch Macro Keypad)
FreeTouchDeck is a DIY Bluetooth macro keypad using an ESP32 and 3.5" ILI9488 TFT with XPT2046 touch. It sends keystrokes/macros to Windows, macOS, or Linux, is customizable via a web-hosted configurator on the ESP32, and costs about $20. The guide covers wiring, required Arduino libraries, TFT_eSPI setup, uploading SPIFFS data and the sketch, optional PCB combiner, and an optional 3D-printable press-fit case.
Parts used in the FreeTouchDeck:
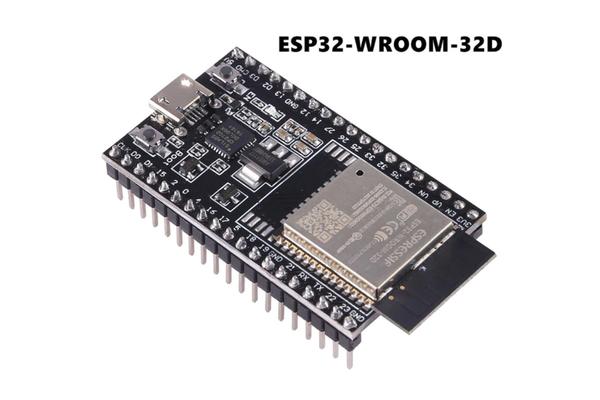
- 38-pin ESP32-WROOM-32 Development Board (ESP32 DevKitC)
- ILI9488 TFT screen with XPT2046 touch controller (3.5")
- Optional ESP32 + TFT Combiner PCB (Gerber files available)
- Solder and soldering iron
- Wire strippers
- Flush cutter
- USB cable to program ESP32
- 3D printed case (optional, Thingiverse design)
Controlling your computer by using hotkeys and macros is a great way of speeding up your workflow. Unfortunately a device dedicated to doing that (for example Elgato’s Stream Deck) will cost you about $120.
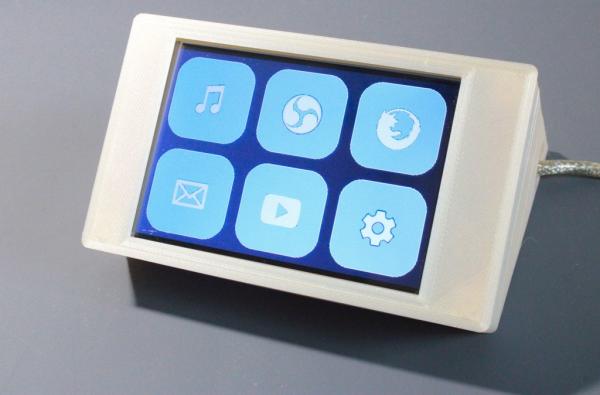
That is why I designed FreeTouchDeck. FreeTouchDeck will cost you about $20 (including shipping!) to make. It uses an ESP32 and a 3.5″ touch screen. Keystrokes and macros are send via Bluetooth to your Windows, MacOS, or Linux computer.
You can customize your FreeTouchDeck by using the configurator. The configurator is a webpage that is hosted on the ESP32 itself. You can customize menus, buttons, logos and colours. You can also create your own button logos and upload them.
This is a really simple build and will take up less then an hour of your time + a few cups of coffee. I designed it so it can be build using parts that can be easily found on AliExpress and Banggood but can also be found locally if you do not want to wait a while before the postman comes.
Supplies:
- A 38-pin ESP32-WROOM-32 Development Board AliExpress
- An ILI9488 TFT screen with XPT2046 touch controller AliExpress
- An optional ESP32 + TFT Combiner PCB
Tools:
- A soldering iron and solder.
- Wire strippers (if you are not using the PCB).
- Flush cutter.
Step 1: Learn More About FreeTouchDeck
Before you start this project it might be a good idea to watch the video I made. The video in itself isn’t a how-to, but more of an introduction to what FreeTouchDeck is and what it can do for you!
Watched the video? Let’s get the parts you’ll need!
Step 2: Get the Parts You’ll Need
If you do not already have an ESP32 and an ILI9488 TFT + Touchscreen lying around. You can find them pretty cheap on AliExpress. I used these parts:
– A 38-pin ESP32-WROOM-32D Development Board from AliExpress*
– An ILI9488 TFT screen with XPT2046 touch controller from AliExpress*
– An optional ESP32 + TFT Combiner PCB (Gerber file)
Not all ILI9488 TFT screens are created equally. It is important to make sure you have selected a screen with touch!
*Full disclosure: these are affiliate links
Step 3: Hardware: Connect the TFT Screen to the ESP32
The wiring may seem a bit daunting at first. But don’t let all the wires scare you. It is pretty straight forward. The images above will help you when you wire your TFT + Touchscreen to your ESP32. This is also decision making time. There are few options when it comes to connecting the two together. You can use a breadboard, you can use prototyping board or you can order a PCB specifically to connect the ILI9488 + touch to the 38-pin ESP32 DevKitC. I’d like to point out that the breadboard option is only an option for testing your connections and screen. It is not very practical to have on your desk and loose connections can cause problems.
It is important to know that these screens run at 3.3V. Connecting them to 5V can cause damage!
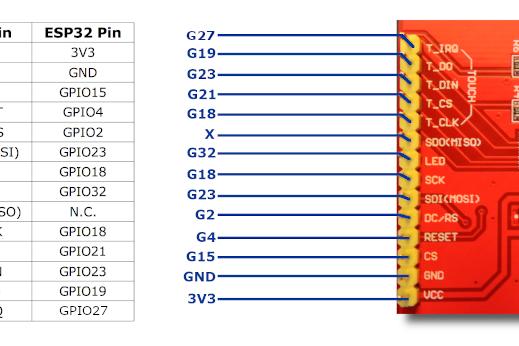
These are the connections you need to make from the ESP32 -> ILI9488:
3.3V -> VCC
GND -> GND
GPIO15 -> CS
GPIO4 -> RESET
GPIO2 – > DC/RS
GPIO23 -> SDI(MOSI) and T_DIN
GPIO18 -> SCK and T_CLK
GPIO32 -> LED
GPIO21 -> T_CS
GPIO19 -> T_DO
GPIO27 -> T_IRQ
SDO(MOSI) is not used for the TFT screen, so you are left with one unconnected pin on the TFT module. That’s ok!
If you like to order a PCB designed to make it easy to connect the ESP32 to the TFT screen, you can download the gerber files here: https://github.com/DustinWatts/ESP32_TFT_Combiner
You can also order them directly from PCBWay where I had mine made:
https://www.pcbway.com/project/shareproject/ESP32_TFT_Combiner_V1.html
Step 4: Software: Installing Arduino IDE Libraries
Installing the Arduino IDE ESP32 core.
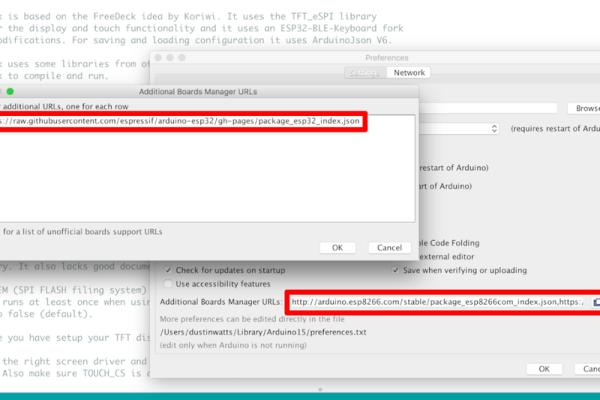
Go to Arduino -> Preferences and click on the icon behind the input field for Additional Board Managers URLs.
Next, copy and paste the following link (without quotes) in the popup box:
“https://raw.githubusercontent.com/espressif/arduino-esp32/gh-pages/package_esp32_index.json”
Click OK and OK.
Next, go to Tools -> Board: -> Board Manager and search for “ESP32”. Install the latest version and click “Close”.
Installing the necessary libraries.
FreeTouchDeckuses a few (some might call 6 more than a few) libraries. Three of these libraries can be installed though the the Library Manager. Go to Sketch -> Include Library -> Manage Libraries and search for, and install the following libraries:
- Adafruit-GFX-Library
- TFT_eSPI
- ArduinoJson
The other three libraries need to be downloaded manually. For each of them the process is the same so I’ll describe just one of them.
Go to “https://github.com/DustinWatts/ESP32-BLE-Keyboard”, click on “Code” and “Download .ZIP“. In the Arduino IDE, go to Sketch -> Include Library -> Add .ZIP library
Repeat for the following libraries:
- “https://github.com/me-no-dev/ESPAsyncWebServer”
- “https://github.com/me-no-dev/AsyncTCP”
Step 5: TFT Screen Configuration
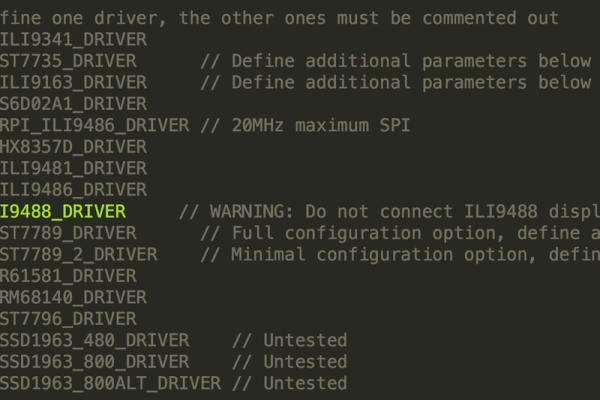
Before compiling and uploading the FreeTouchDeck.ino sketch, you will have to edit the user_setup.h file included with the TFT_eSPI library. This can be found in your Arduino sketchbook folder under “libraries“. If you have not renamed the TFT_eSPI library folder, the file user_setup.h can be found in TFT_eSPI-master. Here you will have to uncomment the lines that apply to your hardware configuration.
To make things easier, you can find the user_setup.h file you will need for this project in the downloaded repository in the “user_setup.h Examples” folder. Copy the file “ESP32_Dev_Kit_V1_ILI9488_Resistive.h” to “/TFT_eSPI-master/“. Rename the “User_Setup.h” that is already there to “User_Setup.old” (this way you keep the original in case something goes wrong). Now rename “ESP32_Dev_Kit_V1_ILI9488_Resistive.h” to “User_Setup.h“. (<- CASE sensitive!) Save and close the file.
Step 6: Download FreeTouchDeck.ino and Upload to the ESP32
ESP Sketch Data Upload Tool
FreeTouchDeck uses the SPIFFS (ESP32 flash memory) to store configuration and images that are used. You’ll need to upload these to the ESP32 before you upload the sketch to the ESP32. For this you’ll need the ESP32 Sketch Data Upload tool. You can download this from Github: “https://github.com/me-no-dev/arduino-esp32fs-plugin”. Follow the instructions on the Github to install the tool:
- Download the tool archive from releases page.
- In your Arduino sketchbook directory, create tools directory if it doesn’t exist yet.
- Unpack the tool into tools directory (the path will look like /Arduino/tools/ESP32FS/tool/esp32fs.jar).
- Restart Arduino IDE.
(On MacOS create the tools directory in ~/Documents/Arduino/ and unpack the files there).
FreeTouchDeck.ino
On Github you can find the full source code for FreeTouchDeck. Go to the FreeTouchDeck Github repository and click “Code” and “Download .ZIP”: https://github.com/DustinWatts/FreeTouchDeck
Extract and rename the extracted folder to “FreeTouchDeck”. Open the FreeTouchDeck.ino sketch in the Arduino IDE. This will also open a few other header (.h) files. You do not need to touch (pun intended) these.
Set your WiFi Settings
Once you have the FreeTouchDeck.ino sketch open go to the folder you have the FreeTouchDeck.ino sketch in, open “/data/config/wificonfig.json”. This is where you can enter you’re WiFi SSID and Password so you can connect to your FreeTouchDeck to configure it
- change “YOUR_WIFI_SSID” to the WiFi SSID you want FreeTouchDeck to connect to.
- change “YOUR_WIFI_PASSWORD” to the Password that WiFi network uses.
Upload the data folder
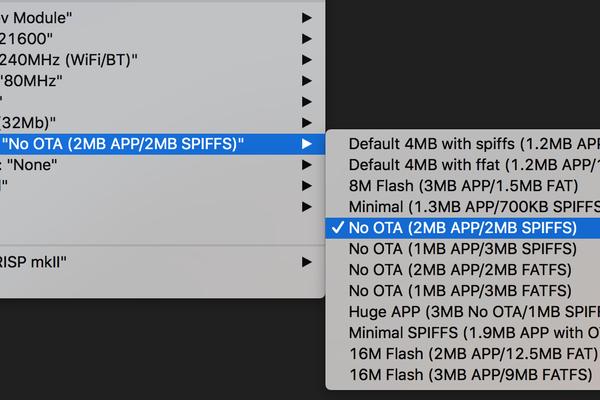
Before you upload the data folder to the ESP32, you’ll first have to select the right partitioning scheme.
- Go to Tools -> Board and select ESP32 Dev Module.
- Still under Tools, select Partition Scheme. -> “No OTA (2MB APP/ 2MB SPIFFS)”.
- Plug in the ESP32.
- Click on Tools and select “ESP Sketch Data Upload”.
Tip!: If the data upload fails, chances are you have the serial monitor open. If this happens, close the serial monitor and try again.
Upload the sketch to the ESP32
After the data folder is successfully uploaded, you can go ahead and upload the FreeTouchDeck.ino sketch to the ESP32. The settings under tools besides the Partition Scheme can be left to the default.
Go to “Sketch” and select “Upload“. This may take a while because it is a large sketch.
Step 7: Printing a Case (optional)
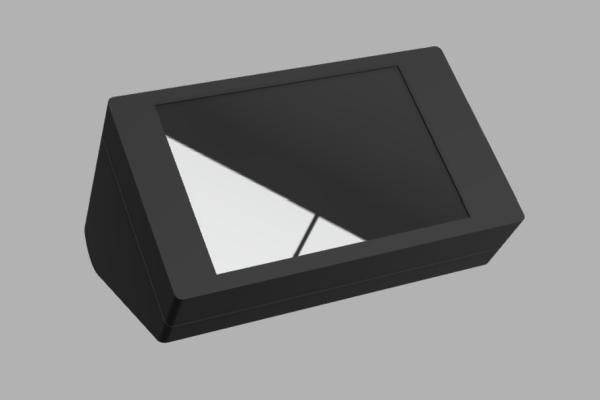
Off course not necessary, but when you have built your FreeTouchDeck you can print a case for your FreeTouchDeck. This design will fit the screen and ESP32 with or without the combiner PCB.
The case is designed to be a press-fit. You could however add a touch of CA glue (crazy glue) to keep the top firmly attached to the bottom.
You can find the case on Thingiverse: https://www.thingiverse.com/thing:4661069
I printed it in PLA with a 0.2 mm layer height. The top doesn’t need support if you print it face down. The bottom needs some minimal support if you print it with the opening down.
If you like to modify the case to your liking, you can find the Fusion 360 files on Github: https://github.com/DustinWatts/FreeTouchDeck/tree/master/case/ESP32_TFT_Combiner_Case
I’ve included some images of my slicer.
Source: A Bluetooth ESP32 TFT + Touch Macro Keypad)
- What does FreeTouchDeck use to send keystrokes to a computer?
FreeTouchDeck sends keystrokes and macros via Bluetooth using the ESP32. - What screen and touch controller are required?
An ILI9488 TFT screen with XPT2046 touch controller is used. - Which Arduino core and libraries are needed?
You must install the ESP32 Arduino core plus libraries: Adafruit-GFX-Library, TFT_eSPI, ArduinoJson, ESP32-BLE-Keyboard, ESPAsyncWebServer, and AsyncTCP. - How do you configure the TFT_eSPI library for the screen?
Replace User_Setup.h with the provided ESP32_Dev_Kit_V1_ILI9488_Resistive.h from the project and rename it to User_Setup.h. - How are configuration files and images uploaded to the ESP32?
Use the ESP32 Sketch Data Upload tool to upload the data folder (SPIFFS) before uploading the sketch. - What GPIO connections are required between ESP32 and the ILI9488?
Connections include 3.3V->VCC, GND->GND, GPIO15->CS, GPIO4->RESET, GPIO2->DC/RS, GPIO23->SDI(MOSI) and T_DIN, GPIO18->SCK and T_CLK, GPIO32->LED, GPIO21->T_CS, GPIO19->T_DO, GPIO27->T_IRQ. - Can I print a case for FreeTouchDeck?
Yes, a press-fit 3D printable case is available on Thingiverse and Fusion 360 files are on the project Github. - What partition scheme should be selected before uploading data?
Select No OTA (2MB APP/ 2MB SPIFFS) as the partition scheme in the Arduino IDE.