Summary of Arduboy on ATMega4809
This article details porting Arduboy to the ATMega4809 microcontroller using an Arduino Nano Every. The project involves designing a custom PCB with battery charging and voltage boosting, supporting both SSD1306 and SH1106 OLED displays, and utilizing PlatformIO for game development.
Parts used in the ARDUBOY4809 Project:
- Arduino Nano Every
- ATMega4809 Microcontroller
- Custom PCB (Gerber files)
- MCP7383 Battery Charging Chip
- MCP1640 Boost Converter
- Lithium-Ion or Lithium Polymer Battery
- SSD1306 or SH1106 OLED Display
- Piezo Speaker
- LEDs and Buttons
- MT3608 Module (for breadboard version)
Porting Arduboy to the ATMega4809 and making it run on a Arduino Nano Every.
Story
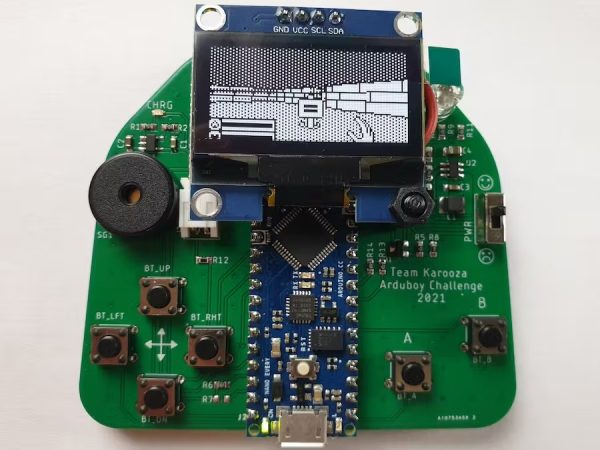
After learning about the Arduboy on ATMega4809 challenge, we decided to join in the fun and port Arduboy to a new microcontroller. In the spirit of staying with true 8 bit gaming we chose the ATMega4809. This relatively new microcontroller is also used in the Arduino Nano Every, making it available to the average maker. For this very reason we also chose the Nano Every as our initial target. Then we designed a PCB which handles battery charging, boosting to 5V and breaking out the buttons, LEDs and piezo speaker. Using slightly off-center pads the Nano (with headers) can plug into the breakout board without needing to solder it (a cool idea we borrowed from the Curiosity Nano board).
The ATMega4809
The ATMega4809 sports 50% more flash memory and more than double the RAM of the original ATMega32u4. These extra resources could be used to write larger games or add additional system features like interfacing a flash chip (think along the lines of ArduboyFX) or SD card.
ARDUBOY4809 Port
As a starting point for our Arduboy4809 port we forked SLIMBOY. SLIMBOY is an Arduboy port which uses the original Arduino Nano board (based on the ATMega328p) and an I2C enabled SSD1306 OLED display. Having the Nano pin-out in common, it seemed like a good place to start from.
Additionally we also ported ArduboyTones to work with ARDUBOY4809. This gave us some more sound capabilities and support for more games.
OLED Display
Another nice feature of the ATMega4809 is that it supports Fast Mode Plus I2C, meaning it can clock the I2C bus at up to 1MHz. We utilized this mode to squeeze out some additional frames per second.
Furthermore we noticed that most SSD1306 I2C displays typically came in 0.96″ size but also wanted to enjoy Arduboy games on the larger 1.3″ displays. So we also added support for the SH1106 based displays which was much easier to find in 1.3″ size.
Building your own
If you are interested in giving ARDUBOY4809 a go the easiest option would be to first build it on a breadboard. The more adventurous builders could use our Gerber files to have the PCB manufactured and solder the components (which is mostly surface mount).
Breadboard:
Since we derived ARDUBOY4809 from SLIMBOY you could use the same breadboard layout that it uses with only one small change. Instead of using pins D9 and D11 for the piezo speaker, use pins D9 and D10. With the breadboard version you can decide how you want to manage powering the board. You could just use the USB power or add a separate battery and boost it to 5V.

PCB:
If you build the custom PCB version the battery charging (MCP7383) and boost converter (MCP1640) functions are nicely integrated. We used PCBgogo to manufacture the boards and they came out very nice. PCBgogo can also supply you with a stencil to apply the solder paste. In our case we just used a syringe and gently applied the paste to the pads. The surface mount components where then placed using some tweezers. Soldering of the components was done with a hot air rework station. Below are some photos taken during the build:

The board is powered up by moving the power switch to the happy face. In this mode the battery voltage is boosted to 5V and supplied to the 5V pin of the Nano Every and the OLED display. While switched on the battery charging circuit is disabled. To charge the battery you need to switch the power switch to the unhappy face and connect through the Nano Every USB to a power source (e.g computer, power bank, etc.). The “CHRG” LED will light up while charging and goes out when charging is done.
NOTE: double check the polarity of the battery connector before connecting it for the first time!
When using a 0.96″ display the four holes can be used to secure the display. Since we later decided to use a 1.3″ display we repurposed the holes to secure the battery with cable ties.
The slightly off-centered through hole pads for the Nano Every works okay but if you want it bullet proof then you should consider soldering it.
Using a battery:
If you use a battery (like Lithium-Ion or Lithium Polymer) you should also think about charging it and protecting it against over charging/discharging. The easiest way to handle protection of the battery is by just using one which already has protection build into it. It typically comes as a small PCB which acts as a kind of BMS (Battery Management System) and shrink wrapped with the battery.
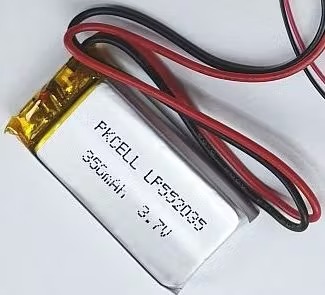
As for charging, the PCB version uses the MCP7383 chip to charge a single cell Lithium Ion battery. If you built the breadboard version you could also use a separate charger (there are cheap one available on ebay). When using a Lithium Ion battery the fully charged voltage sits at 4.2V and can quickly drop down to 3.7V during operation. As we want 5V at the Nano a small boost converter is needed. The PCB version uses MCP1640 chip to boost the battery voltage to 5V. On the breadboard version you could use whatever you have laying around. We tested with a MT3608 module which worked pretty well.
How to build games for ARDUBOY4809
Once your hardware is ready you would surely want to try out some games on it, right. So let’s go through the steps needed to do so while using the Shadow Runner game as an example. As we are using a different microcontroller we need to build the game code specifically for our hardware. So far the approach which worked the best for us was to use PlatformIO running on top of Visual Studio Code to build the game source code. So the first thing to do is to install Visual Studio Code and then add the PlatformIO extension. If you have it running already you can skip the step below.
Installing Visual Studio Code & PlatformIO
Visual Studio Code is a very powerful code editor (not to be confused with Visual Studio, the “Code” part makes the difference) which you can download and install free from here. Once installed run it and on the menu bar click View -> Extensions. In the extensions search field type “platformio ide” and install it.
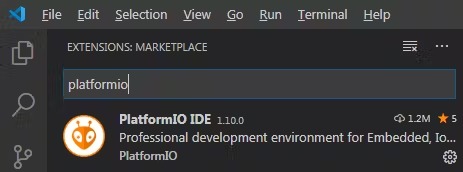
As you can see PlatformIO is an extension that runs on top of Visual Studio Code. It is a great tool for embedded development and also supports the Arduino framework. It provides a more enjoyable programming experience with advanced features like auto code completion and syntax highlighting.
Create a new project
Next you have to create a new project in PlatformIO which will be used to build the game code. If you have VS Code running then click the PlatformIO icon (looks like an ants head) in the vertical bar on the left of the window.
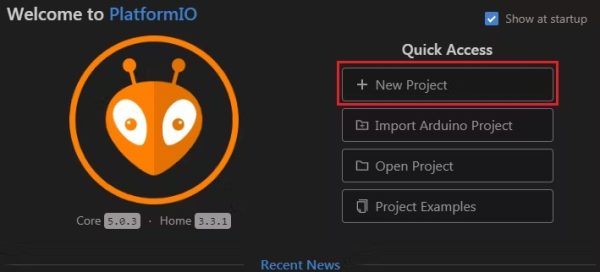
A menu should appear and under “PIO Home” click “Open” which will bring up the PlatformIO welcome screen.
On the right of the welcome screen are some “Quick Access” buttons, select “New Project”.
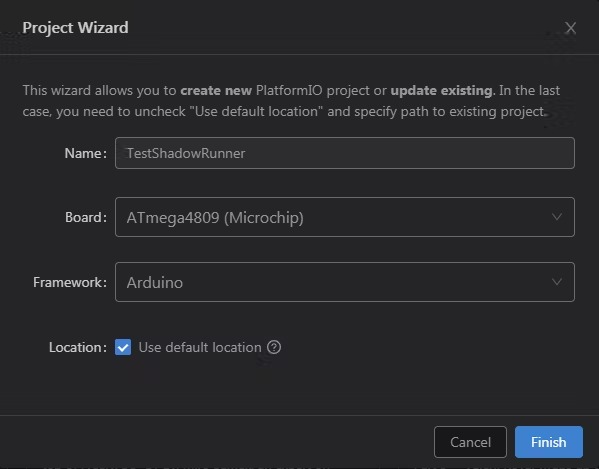
Now give the project a name, I used “TestShadowRunner”. Then select “ATmega4809 (Microchip)” as board and “Arduino” as framework. If you don’t want to use the default project folder (..\Documents\PlatformIO\Projects) then uncheck the location box and specify your own folder. When you are ready click “Finish” to start the creation of the project. The very first time you do this it might take some time as PlatformIO downloads some dependencies.
When the new project is created you should see the project folders in the Explorer view on the left side of the screen. Click the “src” folder and inside it you should see “main.cpp” which was automatically created.

Since we don’t need this file you can right click it and select “Delete”.
Add game source code to project
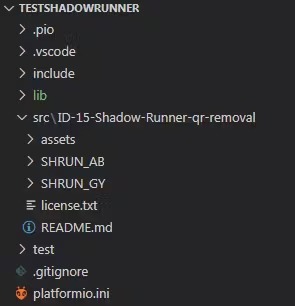
Next we need to add the source code of our game to the “src” folder. Since we are using Shadow Runner in this example, download the source and extract it to the “src” folder. It should look something like this:
Add libraries to project
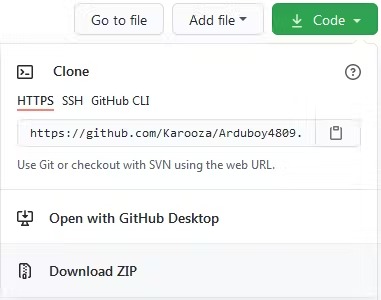
Now we need to add the ARDUBOY4809 libraries to the project. For Shadow Runner you will need both the Arduboy4809 and ArduboyTones libraries. Download the library source code to the “lib” folder of your project. The easiest way is to just download the zip file (using the Code button as shown below) and extract it to the “lib” folder.
After you have extract the zip files the folder structure should look something like this:
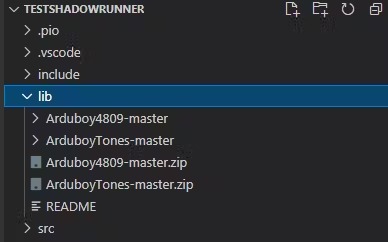
Notice that we have downloaded and extracted both Arduboy4809 and ArduboyTones. At this point you don’t need the zip files anymore and could remove them if you like.
Build configuration
The next step is to configure the “platformio.ini” file and we start by pointing to the source files which PlatformIO should use by adding:
[platformio]
src_dir = src\ID-15-Shadow-Runner-qr-removal\SHRUN_AB
Then we add the build flags which makes sure that we build the Arduboy4809 version of the code with:
build_flags = -D ARDUBOY4809
-D OLED_SH1106
If you are using a SSD1306 display then remove the second line (-D OLED_SH1106).
Putting everything together it should look something like this:
[platformio]
src_dir = src\ID-15-Shadow-Runner-qr-removal\SHRUN_AB

[env:ATmega4809]
platform = atmelmegaavr
board = ATmega4809
framework = arduino

build_flags = -D ARDUBOY4809
-D OLED_SH1106
Source: Arduboy on ATMega4809
- Why was the ATMega4809 chosen for this project?
It offers 50% more flash memory and double the RAM of the original ATMega32u4. - Can I use a 1.3-inch display instead of the standard 0.96-inch one?
Yes, the project adds support for SH1106 based displays which are commonly available in 1.3-inch sizes. - What is the easiest way to build this project initially?
The easiest option is to first build it on a breadboard using the SLIMBOY layout with minor pin changes. - How do I charge the battery on the custom PCB version?
You must switch the power switch to the unhappy face position and connect via USB to a power source. - Which software tools are recommended for building games?
Visual Studio Code with the PlatformIO extension is the best approach for embedded development. - Do I need to solder the Nano Every onto the PCB?
No, off-center pads allow the Nano to plug in without soldering, though soldering makes it more secure. - What happens if I am using an SSD1306 display instead of SH1106?
You should remove the -D OLED_SH1106 flag from your platformio.ini build configuration. - How does the boost converter function during operation?
The MCP1640 chip boosts the battery voltage up to 5V when the power switch is set to the happy face.