
Summary of Arduino atmega644/1284 clone
This article details a DIY project to build an Arduino-compatible board using ATmega644P or ATmega1284P microcontrollers for expanded I/O capabilities. The process involves bootloading the chips with Sanguino software, utilizing an existing Arduino Uno as an ISP programmer, and configuring specific pin mappings that differ from standard boards.
Parts used in the DIY Arduino Clone:
- ATMEGA644P microcontroller
- ATMEGA1284P microcontroller
- Arduino Uno board
- Sanguino bootloader library
- 10K resistor
- 16 MHz oscillator
- Two 22 pF capacitors
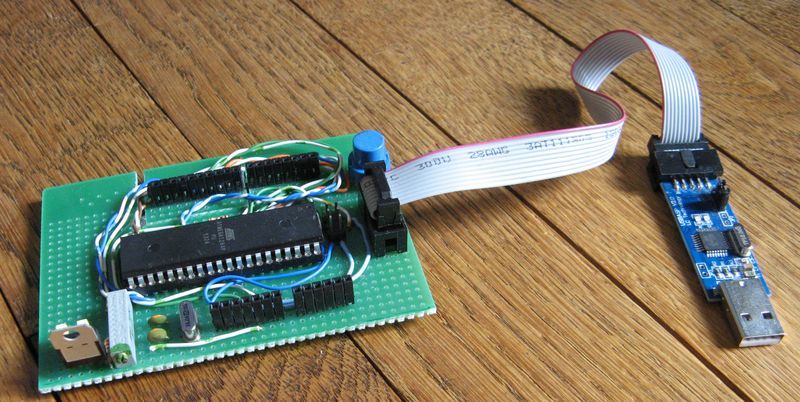
This project is about to DIY an Arduino board wth an ATMEGA644P or 1284P to have more INPUTS/OUTPUTS than on the atmega328P. You can buy an arduino mega but it’s more expensive.
The microcontrollers will be bootloaded with Sanguino and the project seems to be like another one called CALUNIUM.
On this clone you will be able to connect every existing shields. Personally I use the ethernet shield to communicate with an android or a vb.net application on another project.
I use currently the clone on both atmega: the difference is only about the flash memory capacity more important on the ATMEGA1284P.

——————————————————————————————————————————————————-
Ce projet va permettre de fabriquer un board Arduino à base d’un atmega 644P ou 1284P afin de bénéficier d’un peu plus d’entrées/sorties qu’avec un atmega328P. Les atmegas seront “bootloadés” avec Sanguino et le projet s’inspire,au niveau du pin mapping, d’un autre projet CALUNIUM.
(noter que le plancher en chêne sur la photo est très bien entretenu)
Ce clone permettra également d’adapter le shield ethernet Arduino et le faire communiquer avec une application android ou visual basic qui fera l’objet d’un autre projet.
Actuellement le projet fonctionne parfaitement sous Atmega1284p, je n’ai pas essayé le 644p mais je pense ne pas avoir de mauvaises surprises et je ne dis pas ça pour me la péter.
The microcontrollers will be bootloaded with Sanguino and the project seems to be like another one called CALUNIUM.
On this clone you will be able to connect every existing shields. Personally I use the ethernet shield to communicate with an android or a vb.net application on another project.
I use currently the clone on both atmega: the difference is only about the flash memory capacity more important on the ATMEGA1284P.
——————————————————————————————————————————————————-
Ce projet va permettre de fabriquer un board Arduino à base d’un atmega 644P ou 1284P afin de bénéficier d’un peu plus d’entrées/sorties qu’avec un atmega328P. Les atmegas seront “bootloadés” avec Sanguino et le projet s’inspire,au niveau du pin mapping, d’un autre projet CALUNIUM.
(noter que le plancher en chêne sur la photo est très bien entretenu)
Ce clone permettra également d’adapter le shield ethernet Arduino et le faire communiquer avec une application android ou visual basic qui fera l’objet d’un autre projet.
Actuellement le projet fonctionne parfaitement sous Atmega1284p, je n’ai pas essayé le 644p mais je pense ne pas avoir de mauvaises surprises et je ne dis pas ça pour me la péter.
Step 1: Connection and bootloading/Utiliser arduino 1.0.5 : Charger le bootload avec ATMEGA 328P sur la platine Arduino
You need nevertheless an arduino board to ignite the project. Here are the different connections and links beetween the arduino board and the ATMEGA644P/1284P (function and arduino pin number — atmega pin)
pin 9 (RESET) with 10K resistor — yellow pin 10 (SS)
pin 6 (MOSI) — green pin 11 (MOSI)
pin 7 (MISO) — purple pin 12 (MISO)
pin 8 (SCK) — orange pin 13 (SCK)
pin 10 (Vcc) — 5V
pin 30 (AVCC) — 5V
pin 32 (AREF) — 5V
pin 11 (GND) — 0 V
Oscillator 16 mHz, 2 capacitors 22 pF
——————————————————————————————————————————————————
Il faut tout de même pour initier le projet une platine Arduino Uno.
Voici les différentes connexions entre la platine Arduino Uno et la cible atmega1284p ou 644p (numéro des pins atmega644/1284, fonction et numéro des bornes Arduino) :
borne 9 (RESET) avec résistance de 10K , jaune borne 10 (SS)
borne 6 (MOSI), vert borne 11 (MOSI)
borne 7 (MISO), violet borne 12 (MISO)
borne 8 (SCK), orange borne 13 (SCK)
borne 10 (Vcc), 5V
borne 30 (AVCC), 5V
borne 32 (AREF), 5V
borne 11 (GND), 0 V
Quartz 16 mHz, 2 condensateurs 22 pF
pin 9 (RESET) with 10K resistor — yellow pin 10 (SS)
pin 6 (MOSI) — green pin 11 (MOSI)
pin 7 (MISO) — purple pin 12 (MISO)
pin 8 (SCK) — orange pin 13 (SCK)
pin 10 (Vcc) — 5V
pin 30 (AVCC) — 5V
pin 32 (AREF) — 5V
pin 11 (GND) — 0 V
Oscillator 16 mHz, 2 capacitors 22 pF
——————————————————————————————————————————————————
Il faut tout de même pour initier le projet une platine Arduino Uno.
Voici les différentes connexions entre la platine Arduino Uno et la cible atmega1284p ou 644p (numéro des pins atmega644/1284, fonction et numéro des bornes Arduino) :
borne 9 (RESET) avec résistance de 10K , jaune borne 10 (SS)
borne 6 (MOSI), vert borne 11 (MOSI)
borne 7 (MISO), violet borne 12 (MISO)
borne 8 (SCK), orange borne 13 (SCK)
borne 10 (Vcc), 5V
borne 30 (AVCC), 5V
borne 32 (AREF), 5V
borne 11 (GND), 0 V
Quartz 16 mHz, 2 condensateurs 22 pF
Step 2: Bootloading ATMEGA644P-1284P with Sanguino / Transfert du bootload Sanguino
Once the microcontroller connected, link the arduino board on USB cable and use arduino 1.0.5 WITHOUT Sanguino inside. Launch arduino1.0.5:
1 – Select File->Sketchbook->examples->Basics->Arduino ISP
2 – Select the good serial port.
3 – Select the first board: Tools->Board->Arduino uno
4 – Compile and transfert “Arduino ISP” to l’Arduino Uno
5 – Use arduino 1.0.5 with Sanguino inside (you have to dezip the supplied Sanguino archive in arduino 1.0.5 /hardware/arduino/ ).
6 – Select the good microcontroller, in my case atmega644p or 1284p in Tools->Board-> Sanguino W/Atmega 1284 16Mhz
7 – Now “arduino as ISP”, burn the Bootload. A few time later, a message is displayed: “Done burning bootloader”.
Your atmega 644p or1284p is bootloaded and you can use arduino 1.0.5 with Sanguino inside.
———————————————————————————————————————————————————
Une fois le circuit intégré connecté, relier l’USB à la platine Arduino et ouvrir le logiciel:
1 – Sélectionner File->Sketchbook->examples->Basics->Arduino ISP
2 – Sélectionner le port série.
3 – Selectionner le type de carte Tools->Board->Arduino uno
4 – Compiler et charger l’exemple “Arduino ISP” vers l’Arduino Uno
5 – Utiliser arduino 1.0.5 avec SANGUINO intégré (librairie à télécharger sur le site fourni à la fin)
6 – Sélectionner tla cible à programmer. Dans notre cas atmega644p ou 1284p in Tools->Board-> Sanguino W/Atmega 1284 16Mhz
7 – menu programmateur/arduino as ISP, graver la séquence d’initialisation (Burn Bootloader).
Après un certain temps il devrait s’afficher le message: “Done burning bootloader”.
A ce niveau vos atmega 644p ou 1284p sont bootloadés et peuvent désormais fonctionner avec le logiel arduino 1.0.5.
1 – Select File->Sketchbook->examples->Basics->Arduino ISP
2 – Select the good serial port.
3 – Select the first board: Tools->Board->Arduino uno
4 – Compile and transfert “Arduino ISP” to l’Arduino Uno
5 – Use arduino 1.0.5 with Sanguino inside (you have to dezip the supplied Sanguino archive in arduino 1.0.5 /hardware/arduino/ ).
6 – Select the good microcontroller, in my case atmega644p or 1284p in Tools->Board-> Sanguino W/Atmega 1284 16Mhz
7 – Now “arduino as ISP”, burn the Bootload. A few time later, a message is displayed: “Done burning bootloader”.
Your atmega 644p or1284p is bootloaded and you can use arduino 1.0.5 with Sanguino inside.
———————————————————————————————————————————————————
Une fois le circuit intégré connecté, relier l’USB à la platine Arduino et ouvrir le logiciel:
1 – Sélectionner File->Sketchbook->examples->Basics->Arduino ISP
2 – Sélectionner le port série.
3 – Selectionner le type de carte Tools->Board->Arduino uno
4 – Compiler et charger l’exemple “Arduino ISP” vers l’Arduino Uno
5 – Utiliser arduino 1.0.5 avec SANGUINO intégré (librairie à télécharger sur le site fourni à la fin)
6 – Sélectionner tla cible à programmer. Dans notre cas atmega644p ou 1284p in Tools->Board-> Sanguino W/Atmega 1284 16Mhz
7 – menu programmateur/arduino as ISP, graver la séquence d’initialisation (Burn Bootloader).
Après un certain temps il devrait s’afficher le message: “Done burning bootloader”.
A ce niveau vos atmega 644p ou 1284p sont bootloadés et peuvent désormais fonctionner avec le logiel arduino 1.0.5.

Step 3: Pin map of the clone board / Schéma des bornes de la platine Arduino atmega 644/1284 clone
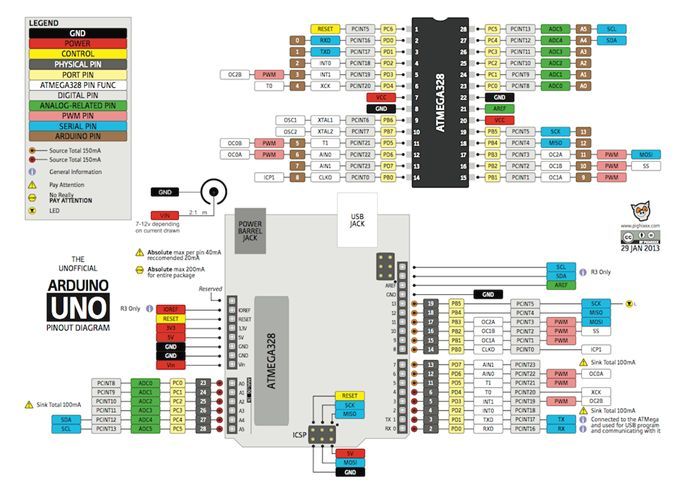
Here this the matrice of the arduino pins vs atmega pins. It seem like on the CALUNIUM project.
There is a mess beetween the real analog pins and their names to use in your program:
A0 becomes A1
A1 becomes A0
A2 becomes A7
A3 becomes A6
A4 becomes A5
A5 becomes A4
A6 becomes A3
A7 becomes A2
If you want to use pin D16 to D23 as digital I/O you need to disable JTAG in the setup zone of your program like this:
uint8_t tmp = 1<< JTD;
MCUCR = tmp; // Disable JTAG
MCUCR = tmp; // Disable JTAG
And to R/W your pins, you need to use DDRC and PORTC registers because “digitalRead()” and “digitalWrite()” don’t work properly.
—————————————————————————————————————————————————–
Plan de l’Arduino UNO board pour réaliser le clone en respectant les fonctions des bornes.
Tableau de correspondances du câblage inspiré du CALUNIUM : Arduino Uno vers atmega 644p ou 1284p Sanguino.
WARNING!!! Les correspondances des entrées analogiques sont les suivantes sous Sanguino (there is a mess!!):
A0 devient A1
A1 devient A0
A2 devient A7
A3 devient A6
A4 devient A5
A5 devient A4
A6 devient A3
A7 devient A2
There is a mess beetween the real analog pins and their names to use in your program:
A0 becomes A1
A1 becomes A0
A2 becomes A7
A3 becomes A6
A4 becomes A5
A5 becomes A4
A6 becomes A3
A7 becomes A2
If you want to use pin D16 to D23 as digital I/O you need to disable JTAG in the setup zone of your program like this:
uint8_t tmp = 1<< JTD;
MCUCR = tmp; // Disable JTAG
MCUCR = tmp; // Disable JTAG
And to R/W your pins, you need to use DDRC and PORTC registers because “digitalRead()” and “digitalWrite()” don’t work properly.
—————————————————————————————————————————————————–
Plan de l’Arduino UNO board pour réaliser le clone en respectant les fonctions des bornes.
Tableau de correspondances du câblage inspiré du CALUNIUM : Arduino Uno vers atmega 644p ou 1284p Sanguino.
WARNING!!! Les correspondances des entrées analogiques sont les suivantes sous Sanguino (there is a mess!!):
A0 devient A1
A1 devient A0
A2 devient A7
A3 devient A6
A4 devient A5
A5 devient A4
A6 devient A3
A7 devient A2
For more detail: Arduino atmega644/1284 clone
- Why build this clone instead of buying an Arduino Mega?
This project allows you to get more INPUTS/OUTPUTS than on the atmega328P while being less expensive than buying an Arduino Mega. - What software is required to bootload the microcontroller?
You must use Arduino 1.0.5 with the Sanguino library installed inside the hardware folder. - How do you connect the reset line during programming?
Pin 9 (RESET) on the Arduino connects to the yellow pin 10 (SS) on the target via a 10K resistor. - Does digitalRead work properly on this clone?
No, digitalRead and digitalWrite do not work properly; you must use DDRC and PORTC registers to read or write pins. - How can I access pins D16 to D23 as digital I/O?
You need to disable JTAG in the setup zone of your program by setting the JTD bit in MCUCR twice. - What is the pin mapping difference for analog inputs?
A0 becomes A1, A1 becomes A0, A2 becomes A7, A3 becomes A6, A4 becomes A5, and A5 becomes A4. - Can this clone connect to existing shields?
Yes, you can connect every existing shield, such as the Ethernet shield, to communicate with other applications.
