Summary of AVR Studio Simulator Introduction and Exercises
This article introduces AVR Studio and its simulator for AVR microcontroller development, outlines required downloads and setup, recommends preparatory C and AVR I/O reading, and provides step-by-step guidance for installing the tools and creating a new AVR GCC project (simcounter). It explains simulator I/O, stimulus files, project organization, and tips for saving and managing projects.
Parts used in the AVR Studio Simulator Introduction and Exercises:
- Windows PC (or Mac with VMware Fusion, or Linux with Wine)
- AVR Studio 4.18 (build 684) installation package
- AVR Studio 4.18 SP2 service pack
- WinAVR C compiler toolchain (WinAVR-20100110)
- AVR JTAG programmer/debugger (optional hardware)
- Atmel AVR ATmega microcontroller (simulated target)
- Project directory and source files (example project: simcounter)
LEARNING OBJECTIVES
• get a brief introduction to most of the major debugging features AVR Studio
• read through a refresher on C programming and an introduction to I/O on AVR microcontrollers
• gain an appreciation of what the AVR Studio simulator is and what it’s good for
• learn how to use the AVR Studio user interface to control program execution and to simulate
I/O
COMPONENTS REQUIRED
• a Windows PC (or a Mac running VMware Fusion, or Wine on Linux)
• downloaded AVR Studio installation package, “AVR Studio 4.18 (build 684)” from
http://www.atmel.com/dyn/products/tools_card.asp?tool_id=2725
• downloaded AVR Studio service pack, “AVR Studio 4.18 SP2”, also from
http://www.atmel.com/dyn/products/tools_card.asp?tool_id=2725
• downloaded AVR C compiler toolchain,
http://sourceforge.net/projects/winavr/files/WinAVR/20100110/WinAVR-20100110-
install.exe/download
PREPARATION
For both a C-language refresher as well as an introduction to the basics of programming for the Atmel
AVR ATmega microcontrollers, it is highly recommended that you take the time to go through the “C
Programming” chapter of the tutorial at
http://www2.tech.purdue.edu/ecet/courses/referencematerial/atmel/. This document provides a very,
very good foundation for almost all of the microcontroller-related material for the semester, so now’s
the time to start dealing with it. You can probably skip the final subsection on Pointers if you care to,
as you won’t really be needing them this semester. The other chapter, “References”, should be near the
top of your list of resources around about Week 5 of this course.
One issue with the aforementioned Purdue tutorial is that at the time of writing, they were using the
CodeVisionAVR C compiler, which we are not using. Features specific to that compiler, in particular
the “Single Bit Manipulations” described in the “I/O Operation” section, and the “RAM vs. Flash” in
the “Pointers” section, are not available in the compiler that we are using. However both can be done,
but use a different mechanism in WinAVR.
INTRODUCTION
It is often believed that without target hardware it is difficult, if not impossible, to develop and test
software for a microcontroller (a.k.a. MCU) project. This is often not the case as many of the
microcontroller manufacturers (or their partners) offer software simulators that exist for just this
purpose. Not only does Atmel’s free IDE (Integrated Development Environment), AVR Studio, provide
the framework for compiling programs and downloading them to the MCU, but
it also comes with the ability to simulate programs for most of their AVR microcontrollers.
This simulator has the ability to not only execute AVR instructions but also to simulate limited digital
I/O (input/output). So it’s not the case that if you don’t have an STK500 (the hardware development
board that you’ll be using this semester) in front of you that you can’t be writing and testing software
for homework, labs or final projects.
AVR Studio should feel relatively similar to other IDEs that you may have used in your introduction to
programming classes, like Microsoft Studio Express C, Eclipse, or NetBeans. IDEs all look pretty
much the same at 20,000 feet. They all give you an easy way to edit files, to describe and build
projects, and to execute and (usually) debug them. In most respects, once you’ve seen one IDE you’ve
seen them all. The trick is knowing where all of the options are hiding for the things that you need to
set, how clearly they’re organized, and how well they perform for what’s most important to you. One of
the best things that AVR Studio (and WinAVR, which actually provides the Windows version of the
compiler tools) has going for it is that it’s free and that it performs pretty well – it’s reasonably fast and
doesn’t seem to crash very often.
Although you won’t be using one this semester (unless you spring $100-250 for one yourself) AVR
Studio can also be used with a USB device called an AVR JTAG programmer/debugger to debug real
running hardware from your PC using exactly the same interface as this simulator. This AVR JTAG
device is an interface between AVR Studio, your PC’s USB port and a 6-pin (or 10-pin) connector on
your target hardware board. It allows you to view and change any piece of data inside the running
MCU, as well as to control program execution in exactly the same way that you’ll be doing in the AVR
Simulator. So by learning how to use the AVR Simulator, you’ll also be learning how in-circuit
debugging works on real hardware should you ever do that in the future.
The way that AVR Studio (and most IDEs) is organized is that one works on projects. A project is a
collection of files, their interrelationships, and configuration settings necessary to build source, header
files and libraries together into a final unit. This final unit is usually a program to be simulated or
downloaded to a chip for execution. A project is composed of a list of files to be compiled, the
compiler settings, the configuration of the chip being developed for, as well as the layout and contents
of the various windows on the screen, etc. Just as changes to files need to be saved to disk, any
changes to a project also need to be saved, otherwise all of this (meta)information is lost and will have
to be entered again. So don’t forget to save project settings as well as your source files (assuming you
don’t really want to discard project settings) when exiting AVR Studio.
On shared lab computers it is additionally helpful to give your project a more unique name than
“Lab2”, like “Lab2Fri”, so that you can more easily identify it. That way you can differentiate your
project from others’ “Lab2”. There’s nothing funnier than watching a lab group make change after
change to their code, recompile and re-run it over-and-over again, and always have it behave exactly
the same way. It’s because they keep downloading someone else’s old lab code with the same name to
their chip. Priceless! 🙂
Don’t forget to copy your entire project directory off to a flash stick or email them off the machine
when you’re done. It’s not really recommended to work right on the flash drive because they’re
considerably slower than the internal hard disk. The lab machines do get periodically wiped-clean, so
what’s there one week may not be there the next.
About the simulator in particular, it should be fairly obvious that it’s not possible to directly hook-up
hardware like switches, LEDs, or motors and the like as there’s no physical hook-ups to the simulator.
However, one is able to look at a representation of the digital portion of the (virtual) physical interface
to the chip with the simulator. For example, you can look at a physical output line on the controller to
see that an LED would/wouldn’t be lit if one were connected. Similarly for input, one can direct the
simulator to behave as though a given digital pin were high/low as if a switch were currently
open/closed.
Microcontroller programs produce outputs dependent on the program’s current state and inputs. A
simulated stream of inputs can be provided for every general-purpose digital input pin on the MCU
being simulated. This is done by providing what is called a stimulus file, which is really just a timeline containing the state of some or all of the inputs at every point in time. This feature will be
presented in a later section.
PROCEDURES
Installing and Running
First, download and install the software (as administrator) in the order listed in the COMPONENTS
section above onto your PC. Reboot the PC afterward if you’re prompted to do so for the installation to
complete properly.
Once you have the software loaded on your machine, you should be able to go ahead and run AVR
Studio. If it didn’t create a desktop icon when it was installed, you’ll just have to rough it and find it in
the Windows Start menu.
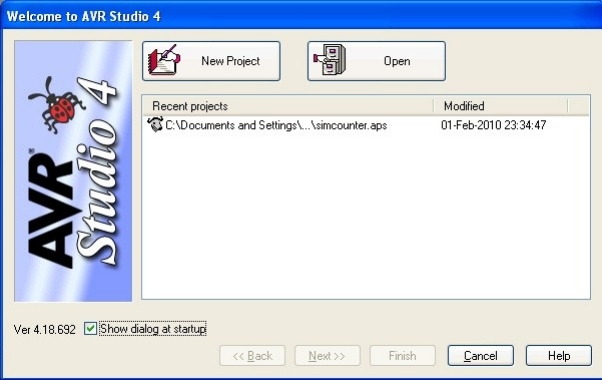
Creating a Project
Once AVR Studio is running you should be prompted for a project to work with, either by creating a
new one, or by using an existing project. In this case, click New Project.
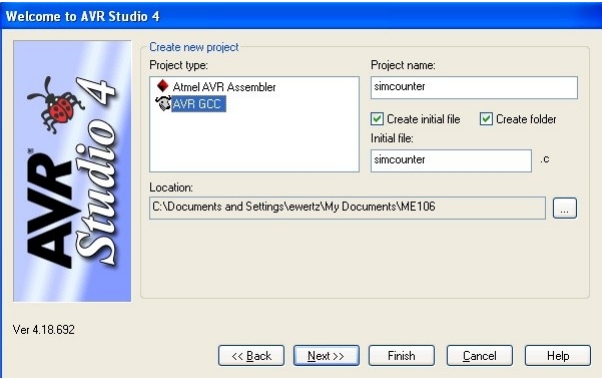
Select Project type AVR GCC, enter Project name simcounter, select both Create initial file
and Create folder and select (and remember the location of !) a directory in which to put the new
simcounter project directory, then click Next.
Select Project type AVR GCC, enter Project name simcounter, select both Create initial file
and Create folder and select (and remember the location of !) a directory in which to put the new
simcounter project directory, then click Next.
Source: AVR Studio Simulator Introduction and Exercises
- What is the purpose of the AVR Studio simulator?
The simulator lets you execute AVR instructions and simulate limited digital I/O without target hardware. - Can I develop AVR code without the STK500 hardware?
Yes; the AVR Studio simulator allows writing and testing software without the STK500. - What software components are required to use AVR Studio as described?
You need AVR Studio 4.18, AVR Studio 4.18 SP2, and the WinAVR C compiler toolchain, plus a compatible PC environment. - How do I start a new project in AVR Studio?
Run AVR Studio, choose New Project, select AVR GCC, name the project (example simcounter), select Create initial file and Create folder, and choose a directory. - Does the simulator support simulating input signals over time?
Yes; you can provide a stimulus file, a timeline of input states, to simulate streams of inputs on digital pins. - Is AVR Studio similar to other IDEs?
Yes; AVR Studio resembles other IDEs in editing, project management, building, and debugging workflows. - Should I save my project settings as well as source files?
Yes; project configuration changes must be saved to avoid losing metadata like file lists and compiler settings. - Can AVR Studio debug real hardware?
Yes; with an AVR JTAG programmer/debugger you can debug real running hardware using the same interface as the simulator. - Are there recommendations for preparatory reading?
The article recommends the C Programming chapter of the Purdue Atmel tutorial for C and AVR I/O background.