
Summary of DIY 3D LED Cube Using ATmega32 Microcontroller
This article details a DIY 3D LED Cube project driven by the ATmega32 microcontroller. It explains how the device creates volumetric displays using 512 LEDs arranged in layers, leveraging persistence of vision to simulate 3D images with reduced wiring complexity. The project serves as an educational tool for enthusiasts to learn about microcontrollers, circuit design, and 3D display principles.
Parts used in the DIY 3D LED Cube:
- ATmega32 microcontroller
- 512 LEDs
- Circuit board or frame for layering
- Wiring for anodes and cathodes
The world of electronics offers a treasure trove of projects that push the boundaries of creativity and ingenuity. One such project is the captivating DIY 3D LED Cube, a marvel that utilizes the ATmega32 microcontroller to bring a splash of 3D illumination to life. This commentary delves into the core concepts behind this project, highlighting its unique features and the clever techniques employed to achieve its captivating effect.
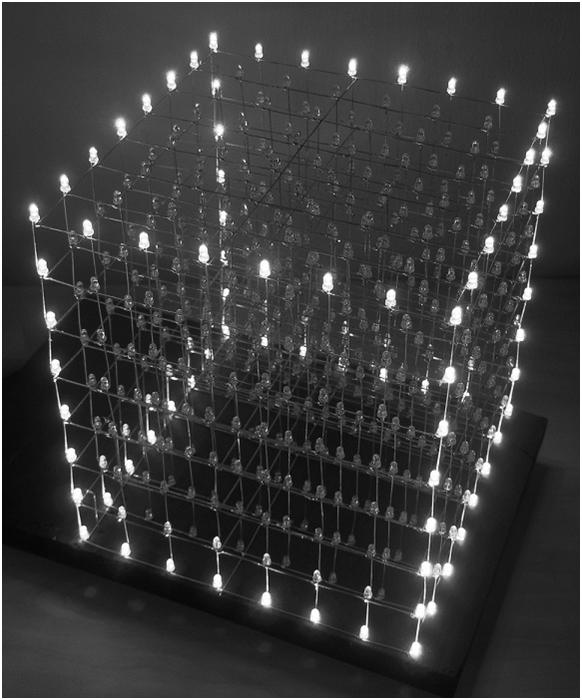
A World Beyond the Flat Screen: Embracing the Third Dimension
Imagine a regular LED screen, a familiar sight in our everyday lives. Now, take that familiarity and inject a dose of spatial magic. That’s the essence of a 3D LED cube. Unlike its flat counterpart, the cube embraces the third dimension, allowing for the creation of intricate, seemingly volumetric displays. It’s akin to stacking multiple transparent, low-resolution displays on top of each other, each displaying a single slice of the final image.
However, unlike a standard display where pixels are packed tightly together for a crisp image, the 3D LED cube presents a unique challenge. Here, the objective is to maintain a degree of transparency. This necessitates spacing between the individual LEDs, which are more aptly termed “voxels” in this 3D realm. This spacing acts as a compromise – it allows the viewer to see through the layers, creating the illusion of depth, but it also comes at the expense of voxel fidelity, meaning the displayed image won’t be as detailed as a high-resolution screen.
Conquering Complexity: Beyond the Myriad of Wires
Building a 3D LED cube might conjure up images of a daunting maze of wires. After all, with 512 LEDs, wouldn’t a dedicated control port for each be necessary? The answer is a resounding no. Imagine a microcontroller with 512 individual ports, each meticulously connected to a single LED. Not only would this be incredibly impractical, but it would also lead to a nightmarish web of wires weaving through the cube itself.
Fortunately, we can leverage a fascinating phenomenon known as persistence of vision (POV). Essentially, when an LED flashes very rapidly, the image it creates persists on our retina for a brief period even after the LED itself goes dark. By exploiting this, we can control the entire cube by rapidly cycling through each layer, turning them on and off in quick succession. This creates the illusion of a complete 3D image, even though we’re essentially viewing a series of 2D slices displayed one after another in a rapid fire sequence.
This ingenious approach significantly reduces the complexity of the wiring. Instead of 512 dedicated ports, we only need 64 for the anodes (positive terminals) of the LEDs and an additional 8 for controlling each individual layer (cathodes). This dramatically simplifies the circuit design and makes the project much more manageable.
The Magic Behind the Microcontroller: The ATmega32 Steps Up
The heart of the 3D LED cube lies in the ATmega32 microcontroller. This versatile chip acts as the brain of the operation, orchestrating the entire display process. It cleverly manages the sequence in which each layer is activated, controlling the timing of the LED flashes to create the desired 3D effects.
The ATmega32’s programming is crucial for defining what the cube displays. By meticulously crafting the software, users can control the animation sequences, displaying everything from simple patterns to mesmerizing volumetric light shows. This programmability adds another layer of intrigue to the project, allowing for endless customization and creative expression.
A Project for the Enthusiast: A Journey into Electronics and Innovation
Building a 3D LED cube using the ATmega32 microcontroller is a project that caters to electronics enthusiasts. It demands a certain level of understanding of electronic components, circuit design, and programming principles. However, for those willing to embark on this journey, the rewards are plentiful.
The project offers a practical, hands-on learning experience. It allows enthusiasts to delve into the fascinating world of microcontrollers, explore the principles of LED control, and gain valuable insights into 3D display technology. Additionally, the satisfaction of creating a mesmerizing, self-built 3D light display is an undeniable reward in itself.
Conclusion: A Glimpse into the Future of Display Technology?
While 3D LED cubes might not be mainstream display technology as of yet, they offer a glimpse into the possibilities of the future. They showcase the ingenuity of electronics enthusiasts and demonstrate the potential for innovative display methods. As technology advances, who knows? Perhaps one day, these captivating cubes might evolve into sophisticated 3D displays adorning our homes and workplaces.
Whether you’re an electronics aficionado or simply someone captivated by the allure of 3D technology, the DIY 3D LED Cube project using the ATmega32 microcontroller presents a compelling
Follow this link for complete project: DIY 3D LED Cube Using ATmega32 Microcontroller
- What is the main purpose of the ATmega32 microcontroller?
The ATmega32 acts as the brain that orchestrates the display process by managing layer activation sequences and controlling LED flash timing. - How does the cube create a 3D illusion without 512 dedicated ports?
It uses persistence of vision by rapidly cycling through each layer, turning them on and off in quick succession to form a complete image. - How many control ports are actually needed for the 512 LEDs?
The project requires only 64 ports for the anodes and 8 additional ports for controlling individual layers, totaling 72 connections. - Why are there spaces between the individual LEDs?
Spacing is necessary to maintain transparency between layers, allowing viewers to see through the cube and creating the illusion of depth. - Can users customize the animations displayed on the cube?
Yes, users can define animation sequences from simple patterns to complex light shows by crafting specific software for the microcontroller. - What skills are required to build this project?
Building the cube demands an understanding of electronic components, circuit design, and programming principles. - What term is used for the individual pixels in this 3D realm?
The individual LEDs in this context are aptly termed voxels.
