Summary of DIY Temperature Measurement Setup with LM35 Sensor, ATmega32 Microcontroller, and LCD
This guide details interfacing an LM35 temperature sensor with an ATmega32 microcontroller to display readings on a 16x2 LCD in Celsius and Fahrenheit. The process involves connecting the sensor to ADC0, programming the microcontroller via C code to convert analog values, and updating the display loop.
Parts used in the LM35 Temperature Sensor Interfacing Project:
- LM35 temperature sensor
- ATmega32 microcontroller
- 16x2 LCD
- Breadboard
- C programming language
In this instructional guide, you’ll be introduced to utilizing the LM35 temperature sensor alongside the ATmega32 microcontroller. You’ll gain insights into the process of interfacing the temperature sensor with the ATmega32 and displaying the temperature readings on an LCD screen. This tutorial covers displaying temperature values in both Celsius and Fahrenheit. Moreover, you’ll delve into the coding aspects, learning how to program the temperature sensor with the ATmega32 while also accessing the LCD. The tutorial includes provided code at its conclusion, along with a video demonstration.
Before delving further into this tutorial, you might find interest in exploring our other tutorials:
– Displaying Temperature and Humidity Using DHT11 & Arduino with Code on an LCD
– Integrating the LM35 Temperature Sensor with Arduino and LCD
To offer you a preview of what to expect in this tutorial, below is an image depicting the interfacing setup of the LM35, ATmega32 microcontroller, and LCD on a breadboard.
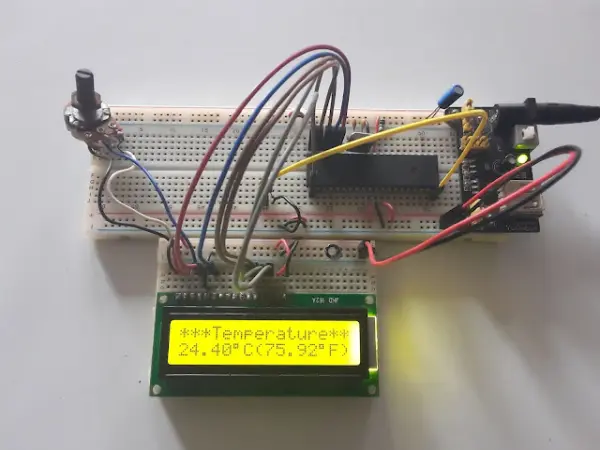
Circuit Diagram of Interfacing LM35, ATmega32 and LCD
The schematic illustrating the connection of the LM35 to the ATmega32 microcontroller and a 16×2 LCD is presented below.
![]()
The LM35 temperature sensor seamlessly interfaces with a microcontroller, requiring no additional external circuitry. It can directly link to any ADC pin of the microcontroller. Its three pins include a positive terminal (accepting 4V to 30V supply), connected here to a +5V supply. The second pin serves as the signal pin, linked to either ADC0 or pin 40 of the ATmega32 microcontroller. The third pin functions as the ground, connected to the common ground.
For the 16×2 LCD connection, it’s linked to PORTD, utilizing only 4 pins for data transfer. The R/W pin is grounded, utilizing a total of 6 pins for RS, E, and the 4 data lines connected from PD2 to PD7 pins of the microcontroller.
Working Mechanism
The temperature analog value is read by the ATmega32 through ADC0 (pin 40) and internally scaled to the appropriate range using software. Afterward, this converted temperature value is transmitted to the LCD for display.
Video Demonstration
Watch the following video to see how it works.
Programming ATmega32, LM35 temperature sensor and LCD
Below, you’ll find the C programming code for integrating LM35 and LCD with ATmega32.
#ifndef F_CPU
#define FCPU 4000000UL
#endif
#include <avr/io.h>
#include <util/delay.h>
int main()
{
lcdinit();
adcinit();
char Ctemp[10], Ftemp[10];
float c, f;
lcdstr(“***Temperature***”);
while(1){
c = (adcread(0)*4.88);
c = (c/10.00);
f = (c*9)/5 + 32;
dtostrf(c, 6, 2, Ctemp);
dtostrf(f, 5, 2, Ftemp);
lcdgoto(0,2);
lcdstr(Ctemp);
lcdchar(0xDF);
lcdstr(“C”);
lcdstr(“(“);
lcdstr(Ftemp);
lcdchar(0xDF);
lcdstr(“F)”);
}
return 0;
}
- How does the LM35 interface with the microcontroller?
The sensor interfaces directly to any ADC pin of the microcontroller without needing external circuitry. - Can the project display temperature in both units?
Yes, the tutorial covers displaying temperature values in both Celsius and Fahrenheit. - Which pins connect the signal from the sensor?
The signal pin links to either ADC0 or pin 40 of the ATmega32 microcontroller. - What voltage supply is required for the positive terminal?
The positive terminal accepts a supply between 4V and 30V, specifically connected here to +5V. - How many data lines are used for the LCD connection?
The 16x2 LCD utilizes only 4 pins for data transfer connected from PD2 to PD7. - Does the R/W pin require power?
No, the R/W pin is grounded during this setup. - Where is the analog value read within the microcontroller?
The temperature analog value is read by the ATmega32 through ADC0 (pin 40). - What format is used for the C programming code?
The provided code uses standard C headers like avr/io.h and util/delay.h. - Is a video demonstration included?
Yes, a video demonstration is available to show how the system works.