
Summary of Firefly Pickle Jar With Microbit and Neopixels
This project creates a motion-sensitive firefly jar using a Microbit and Neopixels. When moved, the LEDs brighten; when still, they twinkle softly. Inspired by UC Boulder workshops, it involves wiring hardware, securing components to a jar lid, adding tulle for diffusion, and programming the Microbit via MakeCode to respond to accelerometer data.
Parts used in the Firefly Pickle Jar:
- Microbit v1
- AA battery holder
- Two AA batteries
- Neopixel strand (approximately 50 LEDs)
- Glass jar with a lid
- Soldering equipment or screws and nuts
- Tulle or thin white cloth
- Hot glue gun
- Lighter or match
- Electrical tape
- Screwdriver
- Rubber band
A motion sensitive firefly-filled pickle-jar that gets brighter when you move it, and then settles down to just twinkle a bit when its still.
This project was inspired by a workshop led by Lila Finch and the great folks doing tinkering / creative learning at UC Boulder.
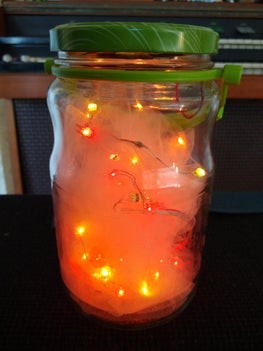
Supplies:
- A microbit, v1 will do
- AA battery holder to power Microbit, and 2 AA batteries
- Neopixel strand of about 50 or so, like this one: https://www.adafruit.com/product/4560
- A nice big glass jar, perhaps of the sort that used to hold pickles, with a lid large enough that you can hot-glue the battery pack and microbit to it.
- Solder, screws, or breakout with which to attach the three wires of your neopixels to the microbit.
- Tulle – the sort of fine netting you often see made into wedding veils, or something similar you have lying around such as thin white cloth, paper, or packing material (thin enough to let the light shine through).
Step 1: Hardware Connections: Attach Neopixels to the Microbit
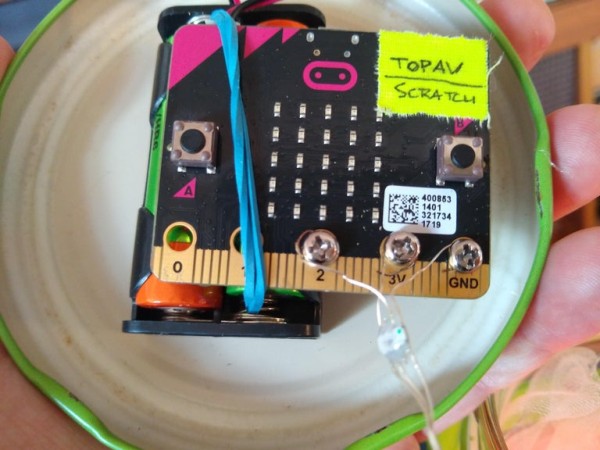
You can cut a neopixel strand to any length you like, but you need to attach the 3 the wires to your microbit. For neopixels with wires that appear to be exposed and uninsulated – like the ones recommended for this project ( https://www.adafruit.com/product/4560 ), you’ll need to burn the insulation coating off of the ends with a lighter or match before attaching them to your microbit. Just hold the lighter to the ends for a second – and try not to burn off more coating than you need to in order to attach them to the microbit (if you do, just use some electrical tape to make sure they won’t create a short circuit if they happen to touch.
Attach the neopixel wire closest to the green dot in each LED to the GND pin on the microbit. The wire on the opposite side from that to the 3V pad, and the middle wire to the 2 pin Pad. I used some small screws and nuts I had hanging around, but you can solder directly to your board or use some other means.
Step 2: Secure the Battery Holder to the Lid of Your Jar.
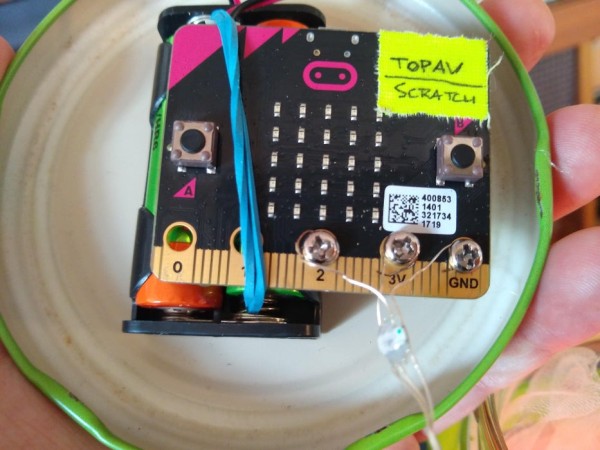
Scratch the inside of the jar lid with a screwdriver in a random pattern to provide something for the hot glue to hold onto. Hot glue the bottom side of your battery holder to the inside of the lid (so that the batteries can still be taken out and replaced as necessary). Now take a short rubber band and loop either end through the springs that connect to the negative terminals of the batteries. When you put the batteries in place, they will hold each side of the rubber band so you can then use it to hold the microbit against the battery pack.
Step 3: Put the Tulle / Neopixels Inside the Jar
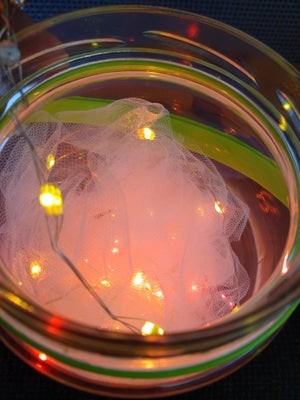
Wrap the neopixel strip up with your tulle or paper in a kind of randomly spread out pattern, and then put it into your jar. Leave enough slack in the wire at the top so that you can lay the jar lid (and microbit) on the table next to the jar, so it’s easy to plug into and program.
Step 4: Program Your Microbit
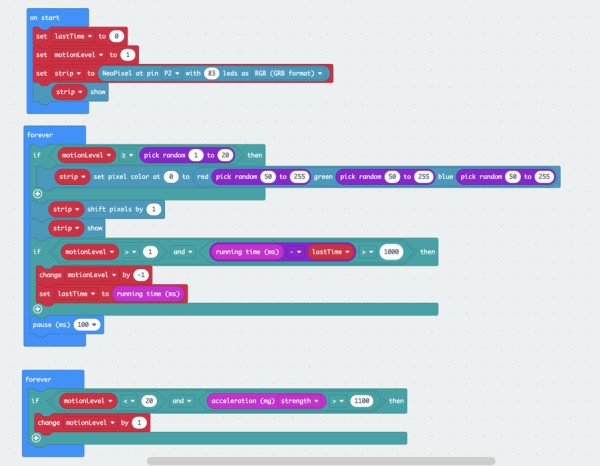
You can use MakeCode to program your microbit to control the behavior of your neopixel fireflies.
You can find sample code here.
https://github.com/lightnin/microbit-lantern2
This code lights a few LEDs now and then by random chance, and then uses “shift” to send them down the neopixel string to the end. When it detects motion in the accelerometer, the chance of the next LED lighting is increased, so that when you move the jar more LEDs begin to light up and make their way down the strand. Once the jar is still, the chances of each LED being lit slowly decrease down to the minimum, which is about 5%. So when still, there should only be a few “active fireflies”, but when shaken, there should be many more.
Explanation of sample code:
The “on start” code sets up the neopixels with the set strip command, which sets pin 2 – the one you attached the middle wire on your neopixels to – as the controlling pin. It also tells the microbit how many LEDs you have.
The first forever loop:
1. See if motionLevel is higher than a random number. MotionLevel is a variable whose value gets increased as there is more motion, and then slowly decreases when there is no motion. So the higher motionLevel is the more likely the next LED will be lit.
2. Next the code “Shifts” pixels – that just means it takes each lit pixel and moves it to the next LED in the neopixel strip. Shift is different than rotate in that once a pixel goes off the end of the strip, it’s gone – whereas “rotate” takes pixels that fall off the end of the string and puts them at the start again.
3. We need a way to make motionLevel go back down after it has been increased – otherwise, once you move the jar once most of the LEDS will stay lit. So the second ‘if statement’ checks to see if one second has elapsed since the value stored in the lastTime variable – which records the last time this was checked. If true, then motionLevel is decreased by 1 and lastTime variable is reset to the new value of milliseconds since the microbit was turned on.
The bottom, smaller forever loop:
1. This just checks the combined directional “g” forces being reported by the MicroBit accelerometer. At rest, the accelerometer reports 1 earch G, which is 1023. If a combined strength value greater than that is being reported, then the jar is being moved. So we increase the motionLevel variable. You will need to adjust these values if you are building this project on a planet other than earth.
Enjoy!
Source: Firefly Pickle Jar With Microbit and Neopixels
-
How do I prepare the Neopixel wires for connection?
You must burn the insulation coating off the ends of the exposed wires using a lighter or match before attaching them. -
Which pins on the Microbit connect to the Neopixel wires?
The wire near the green dot connects to GND, the opposite side wire connects to 3V, and the middle wire connects to pin 2. -
How can I secure the battery holder to the jar lid?
Scratch the inside of the lid with a screwdriver for grip, then hot glue the battery holder bottom-side down. -
What is the purpose of the rubber band in this project?
The rubber band loops through the battery springs to hold the Microbit firmly against the battery pack. -
How does the code change LED behavior based on movement?
Motion increases the motionLevel variable, raising the chance of LEDs lighting up until the jar is still again. -
What happens to the LEDs when the jar is completely still?
The probability of LEDs lighting decreases slowly until only about 5% are active, creating a twinkling effect. -
What tool is needed to program the Microbit?
You can use MakeCode software to program the Microbit for this project.
