Summary of Program an ATmega168/328 with codebender
This tutorial explains how to program an inexpensive ATmega168 or ATmega328p microcontroller using an existing Arduino board as an ISP programmer, eliminating the need for a costly ATMEL ISP. By utilizing Codebender software, users can easily burn the Arduino bootloader onto the standalone chip. The process involves setting up a breadboard circuit with specific passive components and connecting the Arduino to pins 10-13 before uploading the necessary sketch.
Parts used in the ATmega168/328 Programming Project:
- Breadboard
- Arduino board (e.g., Arduino UNO)
- ATmega microcontroller (ATmega 168 or 328)
- FTDI basic board or FTDI cable
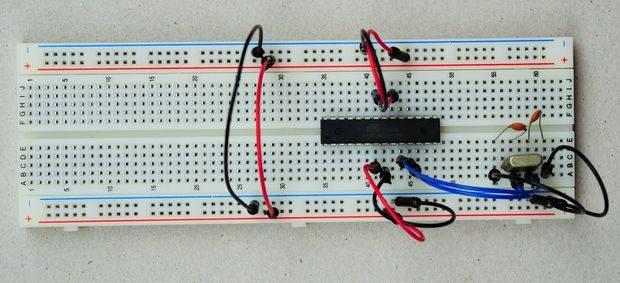
- 16MHz crystal
- 10k resistor
- Two 18 to 22 pF ceramic capacitors
- One 100 nF ceramic capacitor
If you want to use an inexpensive ATmega168 or ATmega328p for your project, but you want the simplicity of the arduino code and codebender, this tutorial will guide you through!
A brand new ATmega microcontroller does not come preconfigured to use with Arduino code. So to use one of these you normally need a high cost ATMEL ISP programmer to burn the Arduino bootloader into your ATmega. Thankfully there is an alternative way, using an existing Arduino board as an ISP.
Step 1: What you will need
-A breadboard
-An Arduino board (i.e. Arduino UNO)
-The ATmega microcontroller you want to program (ATmega 168/328)
-An FTDI basic board or FTDI cable
-A 16MHz crystal
-A 10k resistor
-Two 18 to 22 pF (ceramic) capacitors
-An 100 nF (ceramic) capacitor
The Arduino board will be needed only once, to burn the bootloader to the ATmega and the FTDI will be needed each time you want to reprogram your ATmega.
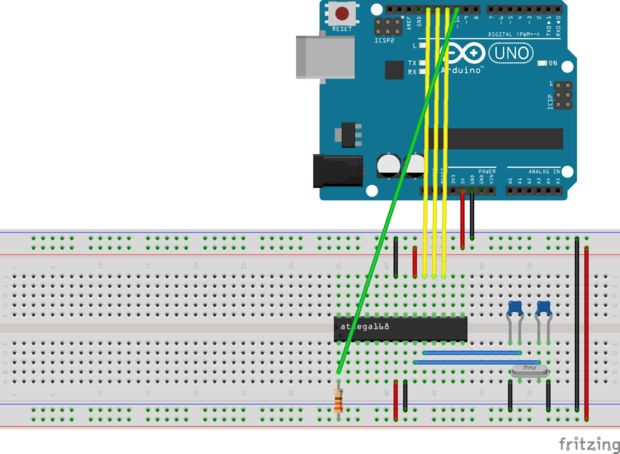
Step 2: Connecting the ATmega to the Arduino
Step 3: Program your Arduino
(If you do not have the codebender plugin in your browser, under the code below, you will see a download/install link)
For more detail: Program an ATmega168/328 with codebender
- Why is an ISP programmer usually needed for ATmega chips?
A brand new ATmega microcontroller does not come preconfigured to use with Arduino code. - What is the alternative method to burning the bootloader without a high cost programmer?
You can use an existing Arduino board as an ISP to burn the Arduino bootloader into your ATmega. - How many cables are required to connect the Arduino pins 10-13?
You need to connect 4 cables to the Arduino pins 10-13 to use it as a programmer. - Which software tool makes programming the Arduino easy in this tutorial?
Codebender is used to make the process easy by allowing you to select your device and click Run on Arduino. - When is the FTDI board or cable specifically needed?
The FTDI will be needed each time you want to reprogram your ATmega after the initial bootloader burn. - What type of capacitors are used for the standard standalone ATmega setup?
The setup uses two capacitors of 18-22pF and one 100 nF ceramic capacitor. - Can you use this method if you do not have the codebender plugin?
Yes, there is a download/install link available under the code if you do not have the plugin in your browser.