
This Instructable can be modified for any major holiday, however my students wanted to focus on something they could do for Valentine’s Day. In this design, students’ hands are the conductive material that complete the circuit when they “high-five” the two halves of the heart. When the circuit is complete, the “space” input triggers a background change, a sprite costume change, and a ‘play until finished’ message of well wishes from each classroom. This program uses a variable to keep track of the classroom in charge of the message. There are heart left and right navigation ‘buttons’ that navigate between classes.
Supplies:
- 1 Makey Makey circuit board
- 5 alligator clips
- Conductive material (tin foil)
- Red 65lb paper (or construction paper)
- Electronic device that can run Scratch and has a usb port
- Tape (Scotch/transparent, Masking or Painter’s tape)
- https://scratch.mit.edu
- Scissors

Heart Halves
Use heavy (65lb), red construction or card-stock paper to cut out a heart. Then cut the heart in half. Cut tin foil (heavy) in a shape large enough to wrap each half of the heart. One half will be the ground, and the other will connect to the space-bar input. Press flat and use tape (Scotch or masking) to secure edges.
Navigation Hearts
Trace small hearts in the middle the halves. Use scissors or a blade to cut the small heart shapes out of the tin foil. Cut a rectangular strip of red construction or card-stock paper and trim the edges into points. Fold up edges. Tape the small tin foil hearts to the front of the strip – be sure the flaps will touch the center of the heart when folded over. Use one long piece of tin foil to cover the back of the strip and to wrap around the flaps – this will become the ground. Important note: Be sure to cut out a rectangle around the area where the left and right arrow alligator clips will touch the hearts – you do not want those clips to be in contact with the ground.
Step 2: Create the Background
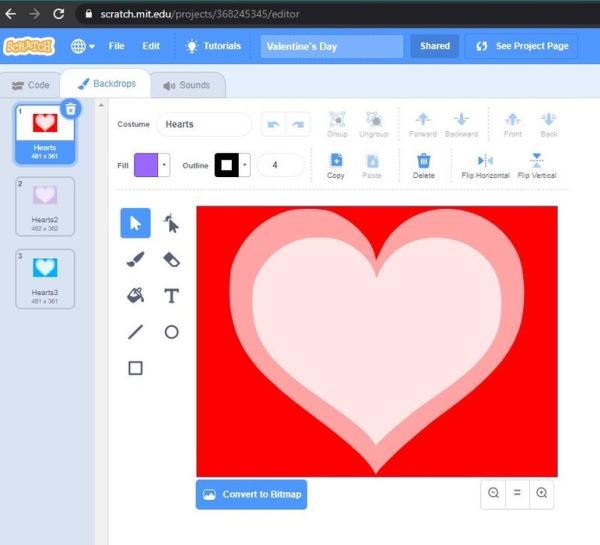
My classes chose the use the heart shaped background provided by Scratch. We decided we wanted to duplicate and edit each background so that we would have three different colors (red/pink, purple, blue) to cycle through each time the Heart Circuit (space-bar event) was activated. We used the fill tool on each duplicate to create three different color patterns. There is no code on the background images.
Step 3: Create the Code
Some like to connect the Makey Makey to the circuit (conductive materials) prior to writing the program, however I prefer students create the code first in order to understand what each event will trigger. They can debug the code prior to connecting it to the final product.
There are two areas where code is added
- The Candy Heart Sprite
- The Class Name Sprite
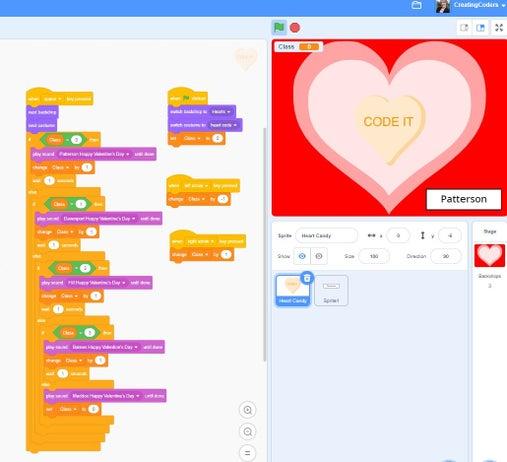
Step 4: Program the Candy Heart Sprite
The Candy Heart Sprite is where the majority of the code for this program lies. This Sprite is one found in Scratch’s Sprite Bank. The code relies on nested if, else statements to check class number the variable ‘Class’ is set to and adjust the sound it plays according to the class number. When played, the class variable is changed to the next class. This continues until the last class number, which resets the variable to 0 and starts the classes over in an endless loop.
First we want to establish what background, costume, and values our ‘Class’ variable will start on.
- When run
- change backdrop to first
- change Heart Candy Costume to first
- Set class = 0
Then we want to add the code for what will happen when we input space-bar:
- When ‘space’ event
- Change to next backdrop
- Change to next Heart Candy Costume
- IF, else (variable) ‘Class’ = 0
- Play ‘Class 0 Happy Valentine’s Day’ sound, until done
- Change ‘Class’ by 1
- Wait 1 second [this prevents activation of the code multiple times]
- ELSE
- IF, else ‘Class’ = 1
- Play ‘Class 1 Happy Valentine’s Day’ sound, until done
- Change ‘Class’ by 1
- Wait 1 second
- ELSE
- IF, else ‘Class’ = 2
- Play ‘Class 2 Valentine’s Day’ sound, until done
- Change ‘Class’ by 1
- Wait 1 second
- ELSE
- IF, else ‘Class’ = 3
- Play ‘Class 3 Valentine’s Day’ sound, until done
- Change ‘Class’ by 1
- Wait 1 second
- ELSE [This is the final nested IF, ELSE statement of our code, however you could add as many as needed]
- Play ‘Class 4 Valentine’s Day’ sound, until done
- Set ‘Class’ to 0 [this resets the program back to step one]
- IF, else ‘Class’ = 3
- IF, else ‘Class’ = 2
- IF, else ‘Class’ = 1
Step 5: Program the Class Names Sprite
Create Sprite Class Names
We created a sprite and drew a rectangular box in the middle. We then added the name of our first class inside the box. We used the new centering feature in Scratch 3.0 to make sure the text and the rectangle appeared centered. Finally, we duplicated the sprite to create 5 different costumes, editing the text inside of each costume and renaming them to reflect their classroom name.
Create the Code
In the code for this sprite, we want the buttons to listen for input for the duration of the program and freely change the ‘Class’ variable either forward by one or backward by one depending on which navigation button we press. This will allow the class name to appear whenever the variable is at a specific number and tell the Heart code which classroom sound to play.
- When run
- FOREVER
- IF ‘Class’ = 0
- switch costume ‘Class 0’
- IF ‘Class’ = 1
- switch costume ‘Class 1’
- IF ‘Class’ = 2
- switch costume ‘Class 2’
- IF ‘Class’ = 3
- switch costume ‘Class 3’
- IF ‘Class’ = 4
- switch costume ‘Class 4’
- IF ‘Class’ = 0
- FOREVER
Then add the When Left Arrow and When Right Arrow code. This code can be added in either the Class Name sprite or in the Heart Candy sprite (as pictured).
- When left arrow pressed
- change ‘Class’ by -1
- When right arrow pressed
- change ‘Class’ by 1
Step 6: Create the Open Circuits
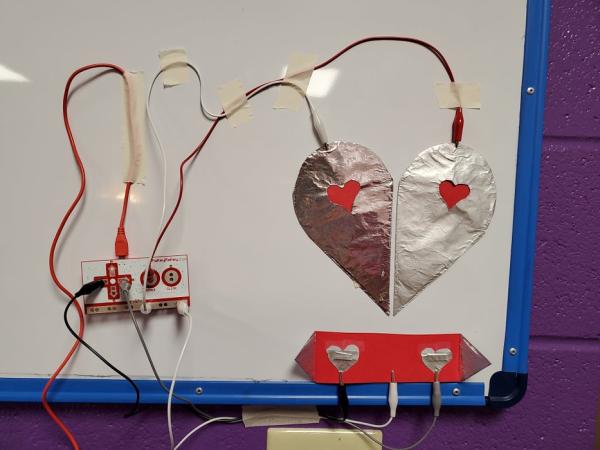
After mounting the “Broken Heart” Halves (be sure the halves do not touch) and Navigation Hearts, it’s time to attach the pieces to your Makey Makey board and create the two open circuits.
Ground 1
Attach one end of an alligator clip cable to one side of the Heart and the other end to the top-side GROUND bar.
Ground 2
Attach one end of an alligator clip cable to the middle of the navigation bar, making sure it touches the tin foil on the back of the strip which then wraps around the pointed ends, and then the other end to the top-side GROUND bar.
Space
Attach one end of an alligator clip cable to the other side of the Heart and then the other end to the top-side SPACE input.
Left
Attach one end of an alligator clip cable to the left heart on the navigation bar and then the other end to the top-side LEFT input.
Right
Attach one end of an alligator clip cable to the right heart on the navigation bar and then the other end to the top-side RIGHT input.
Plug your Makey Makey board into your device using the USB cable.
Source: Set @Holiday = Valentines_Day