Summary of Tutorial on printing image in Graphical LCD (GLCD) using Atmega32
This article introduces the 128x64 Graphical LCD (GLCD) as an interactive alternative to standard displays. It details a project using an AVR Atmega32 microcontroller to print images. The process involves resizing images to 128x64 resolution, converting them to monochrome bitmap format, and assigning pixel values to code arrays using a specific generator tool.
Parts used in the Printing Image in GLCD Project:
- 128 x 64 Graphical LCD (GLCD)
- AVR Atmega32 Microcontroller
- Graphic LCD bitmap generator tool from Mikrocelectronica
Graphical LCD’s known as GLCD are display devices which are capable of displaying graphical images, customized characters, etc. This paves way for any system to present information to the end user by means of interactive graphics such as printing image. Bored of using the old 16×2 LCD displays, then you should probably try this one to make your projects more interactive.
This tutorial focused to teach you about printing a simple picture in this GLCD using AVR ( Atmega32) Microcontroller.
PRINTING IMAGE IN 128 x 64 GLCD:
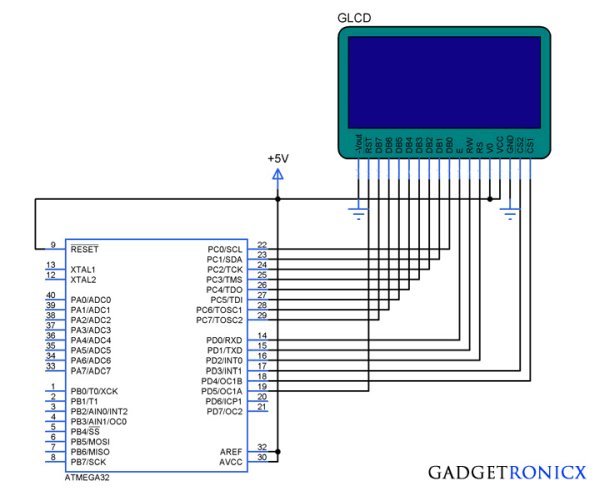
This GLCD consists of 128 columns and 64 rows in it which are divided in two equal halves. Similar to 16×2 LCD this LCD consists of 8 data pins from (DB0-DB7) and other control pins. Read the complete working of GLCD before you move into the coding section of this tutorial.
EXPLANATION:
We all know that every picture is made up of basic blocks called as pixels and we are going to use that to our desired picture in this GLCD. But this GLCD will not support any colors so we have to prepare the image before printing it into this Graphical display. Since this device only supports 128 x 64 resolution we have to resize our image into the resolution 128 x 64.
After that as i said before these LCD will not support colors, so you have to change your image have Monochrome Bitmap format and you will finally get a black and white image So your final processed image will look like the one below.
Now you have to assign the each pixel value into an array in your code which will make the image to print in your GLCD. Not to worry a tool known as “Graphic LCD bitmap generator” from Mikrocelectronica will help you to finish your job.
Read More: Tutorial on printing image in Graphical LCD (GLCD) using Atmega32
- What is the resolution of the GLCD described?
The GLCD consists of 128 columns and 64 rows. - Can this GLCD display colors?
No, this device does not support any colors and only produces black and white images. - How should an image be prepared before printing it?
You must resize the image to 128 x 64 and convert it to Monochrome Bitmap format. - Which microcontroller is used in this tutorial?
The project uses an AVR Atmega32 Microcontroller. - What tool helps assign pixel values to the code array?
The Graphic LCD bitmap generator from Mikrocelectronica assists in finishing this job. - How many data pins does this LCD have?
This LCD consists of 8 data pins labeled DB0 through DB7. - Is this display better than a standard 16x2 LCD for interactivity?
Yes, it allows for interactive graphics such as printing images, unlike old 16x2 displays. - What are the basic blocks that make up every picture?
Pictures are made up of basic blocks called pixels.