This “Get Ready For Win98” Laser Engraving Machine it’s built using an old scanner, and an old printer.
A laser engraving machine is a tool that uses lasers to engrave an object.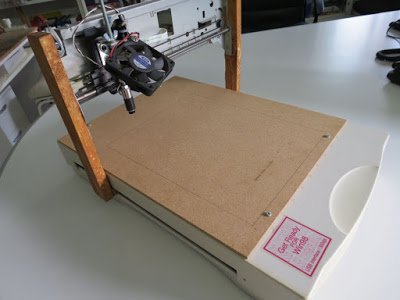
I’ve an old broken scanner and an old printer lying around. Inspired by this instructables project:
http://www.instructables.com/id/Frankenstein-Laser-Engraver/
I decide to build a bigger version of my small CD-ROM based laser engraver, you can find here:
http://davidegironi.blogspot.it/2014/07/38mm-x-38mm-laser-engraver-build-using.html
That way, the engraving area are will be almost 212mm x 274mm.
Note that some part of this post is taken from the above blog post link.
Before starting up, read my blog disclaimer and the one below:
Warning! Laser diodes drive are emitting visible and invisible laser radiation and they are extremely dangerous! Their light can permanently damage the eyes. You must never look into the working diode even without the lens or point it on a reflective surface. Laser beam can cause burns or fire. This is usually a Class IIIb laser. Everything you do at your own risk.
The Y-axis it is build using the scanner assembly, the X-axis using the printer one.
As you can see by the Get Ready For Win98 sticker, the scanner is pretty old, and this sticker was so vintage that i’ve decided to leave it on.
The base of this machine is the scanner itself.
The scanner was completely disassebled, all except the motor and the movement mechanism is removed. The same applies for the printer.
Assembling the hardware, pay attention to build it making X normal to the Y axis. The two direction has to be perpendicular, or your engraving will have distortions.
The printer mechanism it is connected to the Y-axis scanner assembly, that way, the laser moves over the part to be engraved.
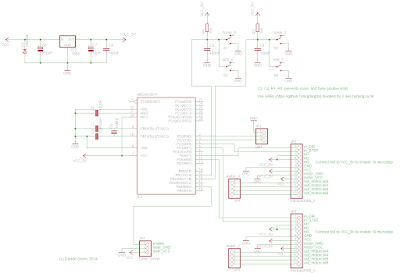
The brain of this project is an ATmega328p running at 16Mhz. loaded with grbl firmware http://github.com/grbl/grbl, which is a powerfull yet opensource g-code parser.
I’ve used an Arduino Mini board, even if the software does not use the Arduino framework.
A 7805 voltage regulator it is used as power supply for the ATmega.
Grbl 0.9 it is build for 3 axis router, to make it works on 2 axis systems like this, with hard limit and homing enabled, a custom version of the firmware it is needed. The only change to apply to version 0.9g are on config.h file.
lines
#define HOMING_CYCLE_0 (1<<Z_AXIS)
#define HOMING_CYCLE_1 ((1<<X_AXIS)|(1<<Y_AXIS))
was commented out and changed to:
#define HOMING_CYCLE_0 ((1<<X_AXIS)|(1<<Y_AXIS))
//#define HOMING_CYCLE_0 (1<<Z_AXIS)
//#define HOMING_CYCLE_1 ((1<<X_AXIS)|(1<<Y_AXIS))
Then the new grbl firmware can be compiled and used, preventing grbl 0.9 homing problem on 2 axis machines.
My custom version of grbl v0.9g compiler for ATmega328p @16Mhz, with a baudrate of 115200, can be download below.
CP2102 it is used as USB to UART board.
You just have to upload the firmware using your favorite uploader, the grbl wiki page drive you on how to do this step.
For more detail: A DIY A4 Laser Engraver made from a scanner and a printer on ATmega328
About The Author
Ibrar Ayyub
I am an experienced technical writer holding a Master's degree in computer science from BZU Multan, Pakistan University. With a background spanning various industries, particularly in home automation and engineering, I have honed my skills in crafting clear and concise content. Proficient in leveraging infographics and diagrams, I strive to simplify complex concepts for readers. My strength lies in thorough research and presenting information in a structured and logical format.
Follow Us:LinkedinTwitter