Introduction
For our ECE 4760 final project, we designed and built our own laser tag system. We included many traditional laser tag features, but then added our own 4760 twist. For the purposes of a prototype for this class, we only created enough equipment for two players. This however could be easily scaled by building more blasters in the future.
High Level Design
Motivation
Having both played standard laser tag games, we were interested in expanding the game beyond its traditional boundaries. The ultimate goal was to create a system which mirrored combat as close as possible and add new features that are normally only found in video games. We also felt laser tag would be cooler using real lasers, as opposed to using infrared light as in all commercially available systems. With this in mind, we started with the essential components, namely the laser and detector system, and expanded the game by adding an LCD screen and RF transceiver to provide score updates and configurability.
Overview
At the highest level, our system has three major components. These are the laser blaster, base station, and shot detection vest. A block diagram is shown below to depict how all of these components are interconnected.
Each player’s vest is instrumented with sensors to detect shots coming from other players. Each blaster has an RF transceiver, an LCD, a sensor, and a laser. The laser is used to fire at other players, and is only turned on when the player presses their fire button. The RF transceiver allows each player to send and receive real-time information about the game. This information, such as player health, is displayed on the blaster’s LCD. Finally, each blaster is equipped with a sensor to determine if the blaster itself has been hit by another player. The final component, which is the base station, connects to a computer via a serial connection. The base station serves as a relay point for the real-time updates, and logs the game activity. It also sets the game parameters, such as starting health and ammo, and then begins the game.
How to Play the Game
Each blaster has four buttons that control its actions. The first button fires the laser on the blaster. The second button reloads the blaster, replenishing the ammo count. The third button cycles through LCD views, and the fourth button switches weapon types.
The LCD has three different views, these are self-info, scoreboard, and weapon type. The user has the ability to scroll between these screens by pressing the change screen button. On the self-info screen, the player can view his or her own health and ammo count. By looking at the scoreboard, the player can see the health of all of the players in the game. The weapon screen tells the player if they are in single shot or automatic mode.
The objective of the game is to be the last man standing. Players can create their own custom games with their own parameters, or choose default values. Default values assign players with 100 health points, 100 rounds of ammunition for the automatic blaster, and unlimited ammunition for the pistol blaster. However, each pistol clip has only 10 shots, so the player will need to reload. When a player is hit on their vest, points are deducted from their total health. If hit in the inner ring of the vest, 10 points are deducted. If hit in the outer ring instead, only 5 points are deducted. Hitting a player on their blaster sensor will prevent them from shooting for the next five seconds and will also deduct five health.
Hardware/Software Tradeoffs
Phototransistors vs. Solar Panel
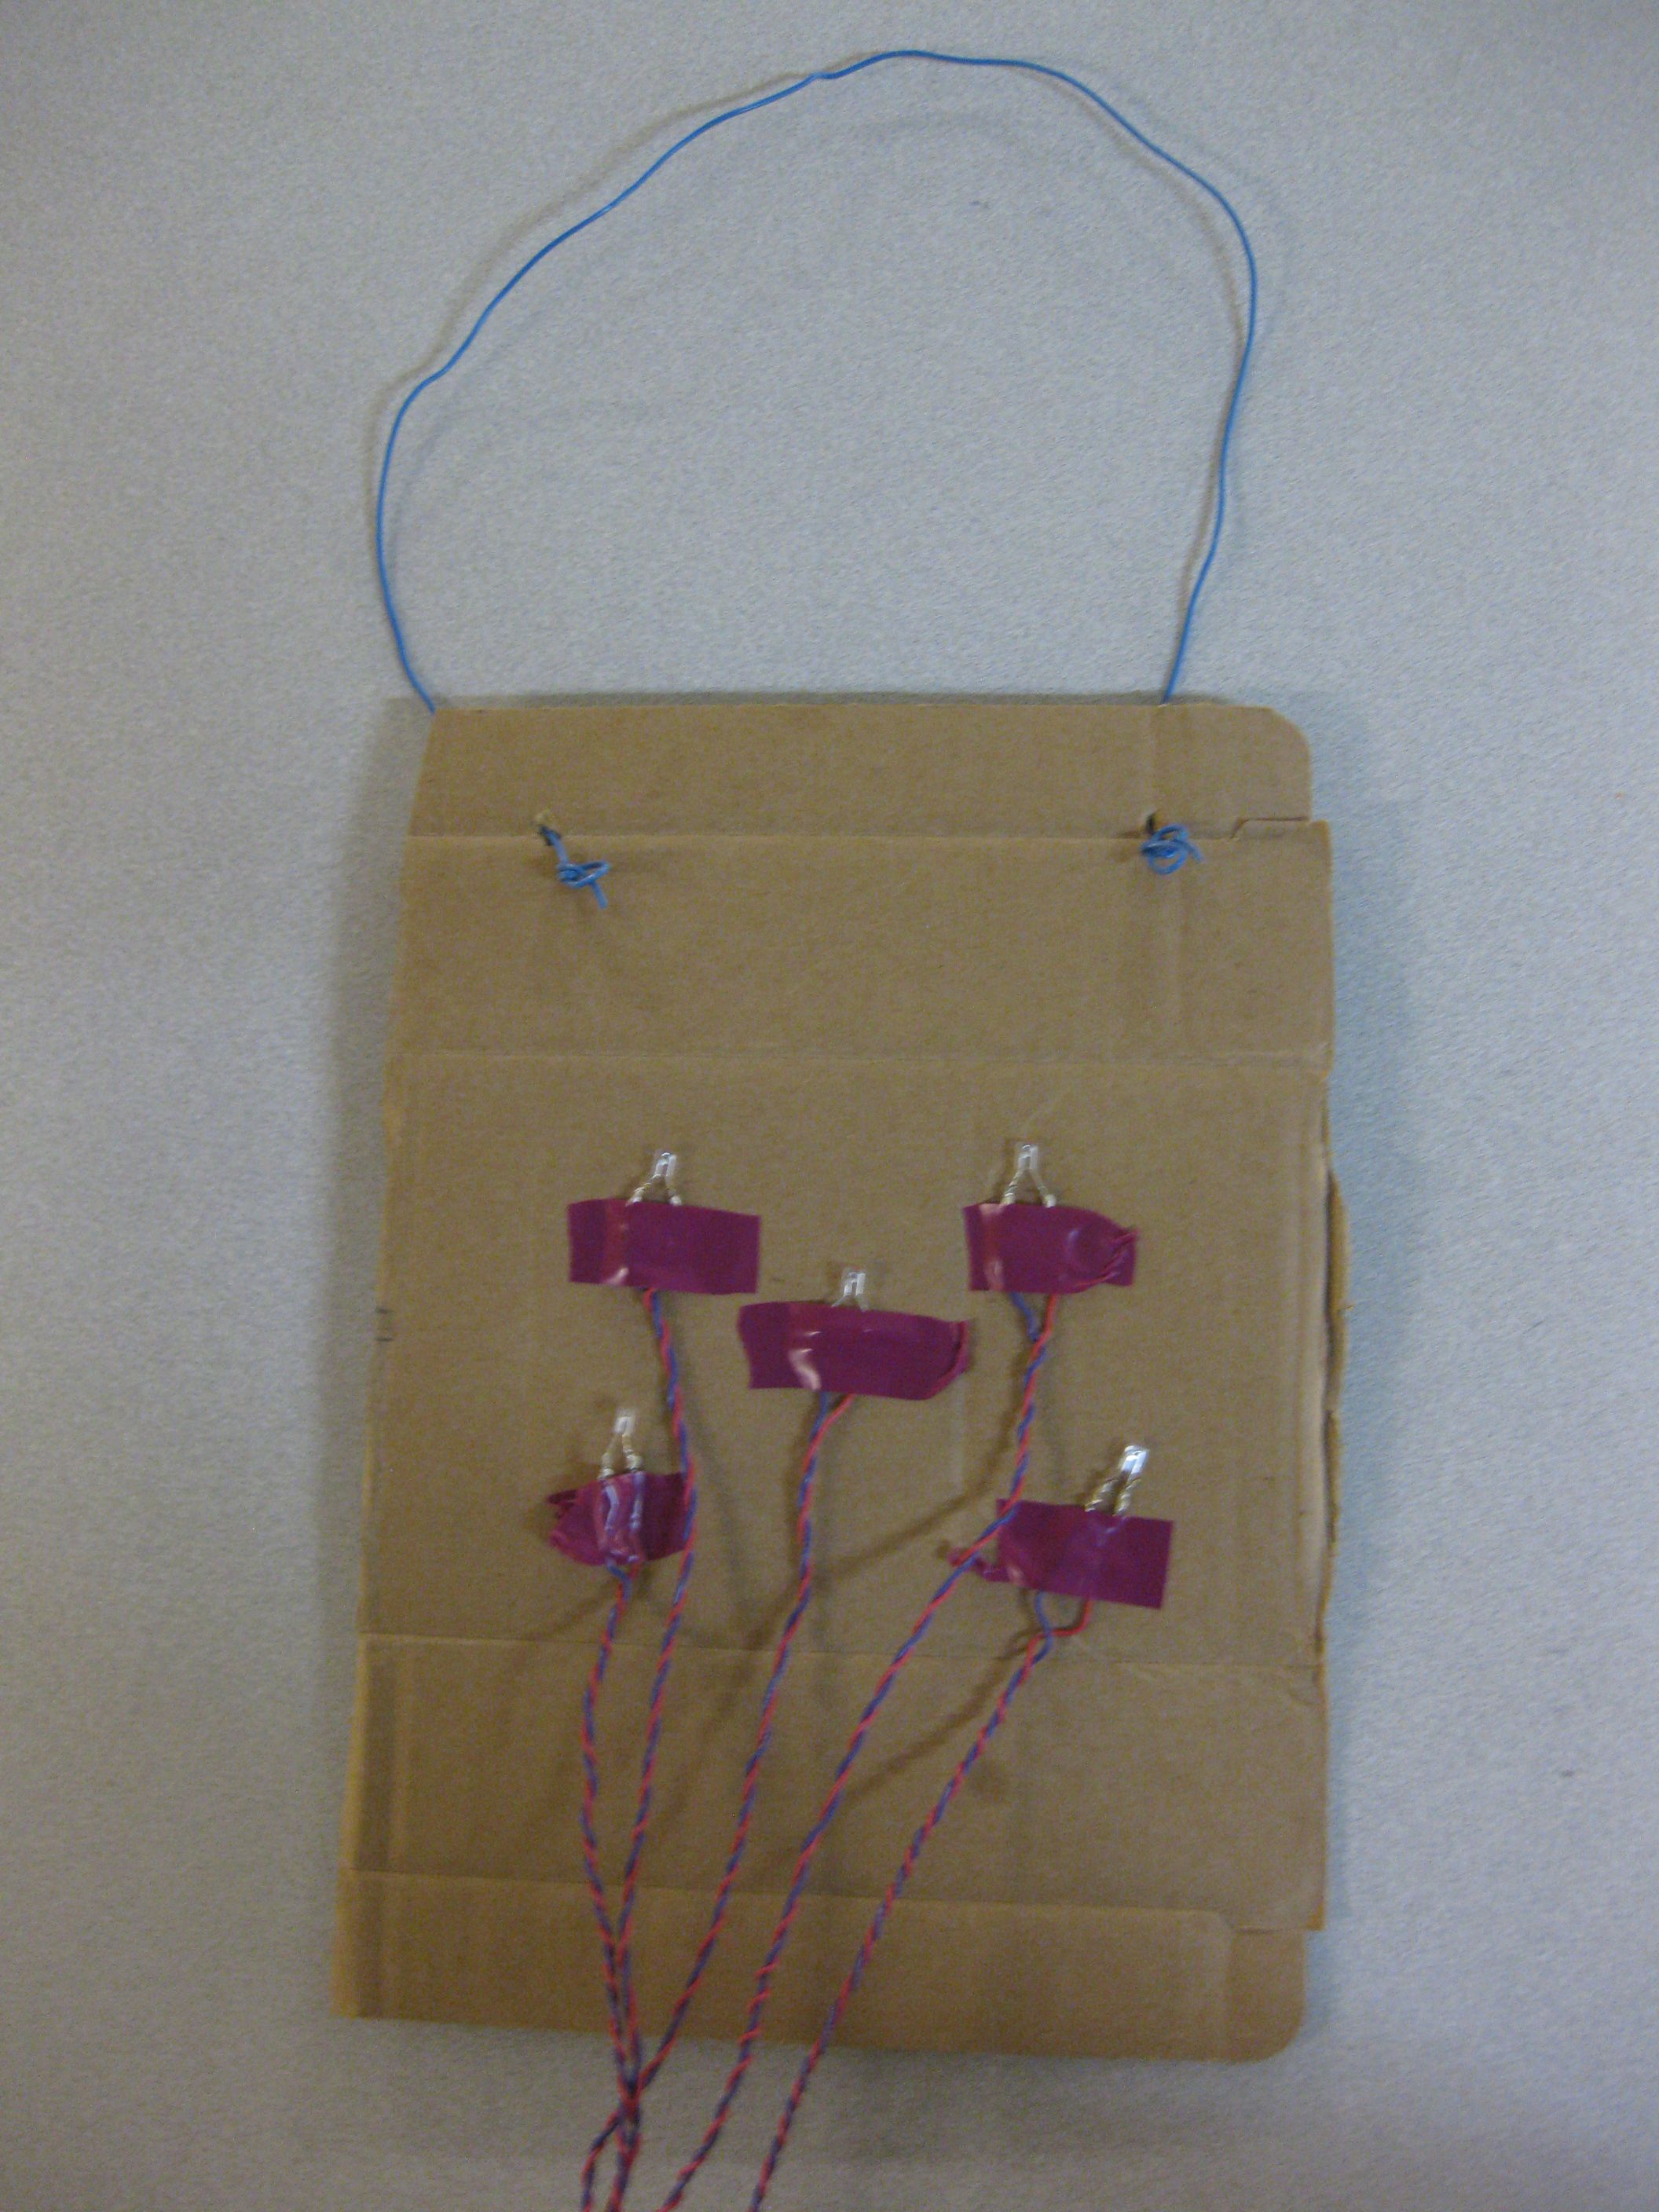
Originally, we tried using a solar panel as the sensor system. In its traditional use, current is induced on the panel when hit with sunlight, providing power to a system. We felt we could trigger the same effect with a laser flash. The panel provides a continuous surface across which the player could shoot at, and seemed like a cleaner design that having to attach many small phototransistors to a vest. However, the changes in current caused by fluctuations in ambient light relative to changes as a result of the incident laser is so large that it would be impossible to detect a laser blast by using the panel. The problem of having a continuous surface was solved by placing the phototransistors close enough together, eliminating any blind spots.
Broadcast vs. Point-to-Point Communication
The RF transceivers offer a mode which enables the receiver to automatically send back acknowledgement packets to the sender, making it easy to implement reliable point-to-point communication. Using this mode would allow the original sender to be sure that its packet reaches each destination point. However, point-to-point communication requires the sender to enter a full conversation with each receiver. This makes the software much more complicated, especially as the number of players grows. Sending out a broadcast signal that might not always reach its destination is still reliable provided the signal is broadcast enough times. Also, missed updates are acceptable since play can continue without an up-to-date scoreboard. After switching to a broadcast approach, we also realized that blasters could just as easily send updates to each other, even further simplifying the software and expanding the range of play, as discussed in the results below.
Standards
To enable communication between the PC, via PuTTy, and the base station, we serialized data according to the UART standard. An additional IC connecting the serial port to the microcontroller implemented the RS-232 standard, which sets standards on pin configurations, as well as electrical and timing characteristics. We found UART useful and straightforward for both printing out status updates and for accepting user input upon startup, and most importantly for printing out status updates during debug. The RF transceiver and microcontroller communicate using the Serial Peripheral Interface (SPI) bus, an implementation that already existed in the drivers that we selected. The laser conforms to the ANSI Z136 class IIIA specifications: output power does not exceed 5 mW and beam power density may not exceed 2.5 mW/cm2. Our laser tag system is considered a Digital Device under FCC regulations for RF equipment since it is a small electronic device to be used in a residential environment by the general public. It operates at 2.4 GHz, an allowable frequency for such devices.
Intellectual Property
Our project does not infringe on the intellectual proprty or patents of others. All commercially available laser tag systems use infrared light as opposed to actual lasers, a major difference between the systems. The laser tag concept itself is not owned and many different variations exist in the market.
Hardware
Overview
The hardware can be grouped into three categories: voltage regulation, shot detection, and microcontroller processing and peripherals. Both the blasters and base station have voltage regulation and processing/peripheral blocks, but the base station does not have a shot detection block.
Voltage Regulation
The pupose of the voltage regulation block is to convert a relatively high voltage into a lower voltage that can power the microcontroller and its peripherals. In the blaster’s case, the power source is a 9V battery. For the base station, a 12V DC power supply is used. Regardless, the voltage regulation stage takes this power as its input and outputs a 5V DC signal.
his stage is relatively simple and contains only a few components. B1 in the diagram models the power source, which is either a 9V battery or a DC power supply. This feeds into a 1N4001 diode, whose purpose is protect our circuit from being damaged should power be connected backwards. When the positive and negative leads are connected correctly, the diode allows power to flow through the circuit. When the terminals are connected backwards, the diode is reverse biased, preventing any damage to other components. A power switch between the voltage regulator and the diode allows us to easily turn our device on and off. Finally, we have a LM340L-5 voltage regulator. This component takes the high voltage in and outputs a steady 5V signal. The two capacitors simply filter out noise that might be riding on top of this signal. The 0.1uF ceramic capacitor is small and has the ability to filter out fast transients. Although the small ceramic capacitor is fast, it lacks capacity. The slow 1uF electrolytic capacitor complements the speed of the smaller capacitor with its larger capacity.
Shot Detection
The shot detection block’s mission is catch any lasers that are shot at the user and to also give information to the microcontroller that can determine where the user was hit.
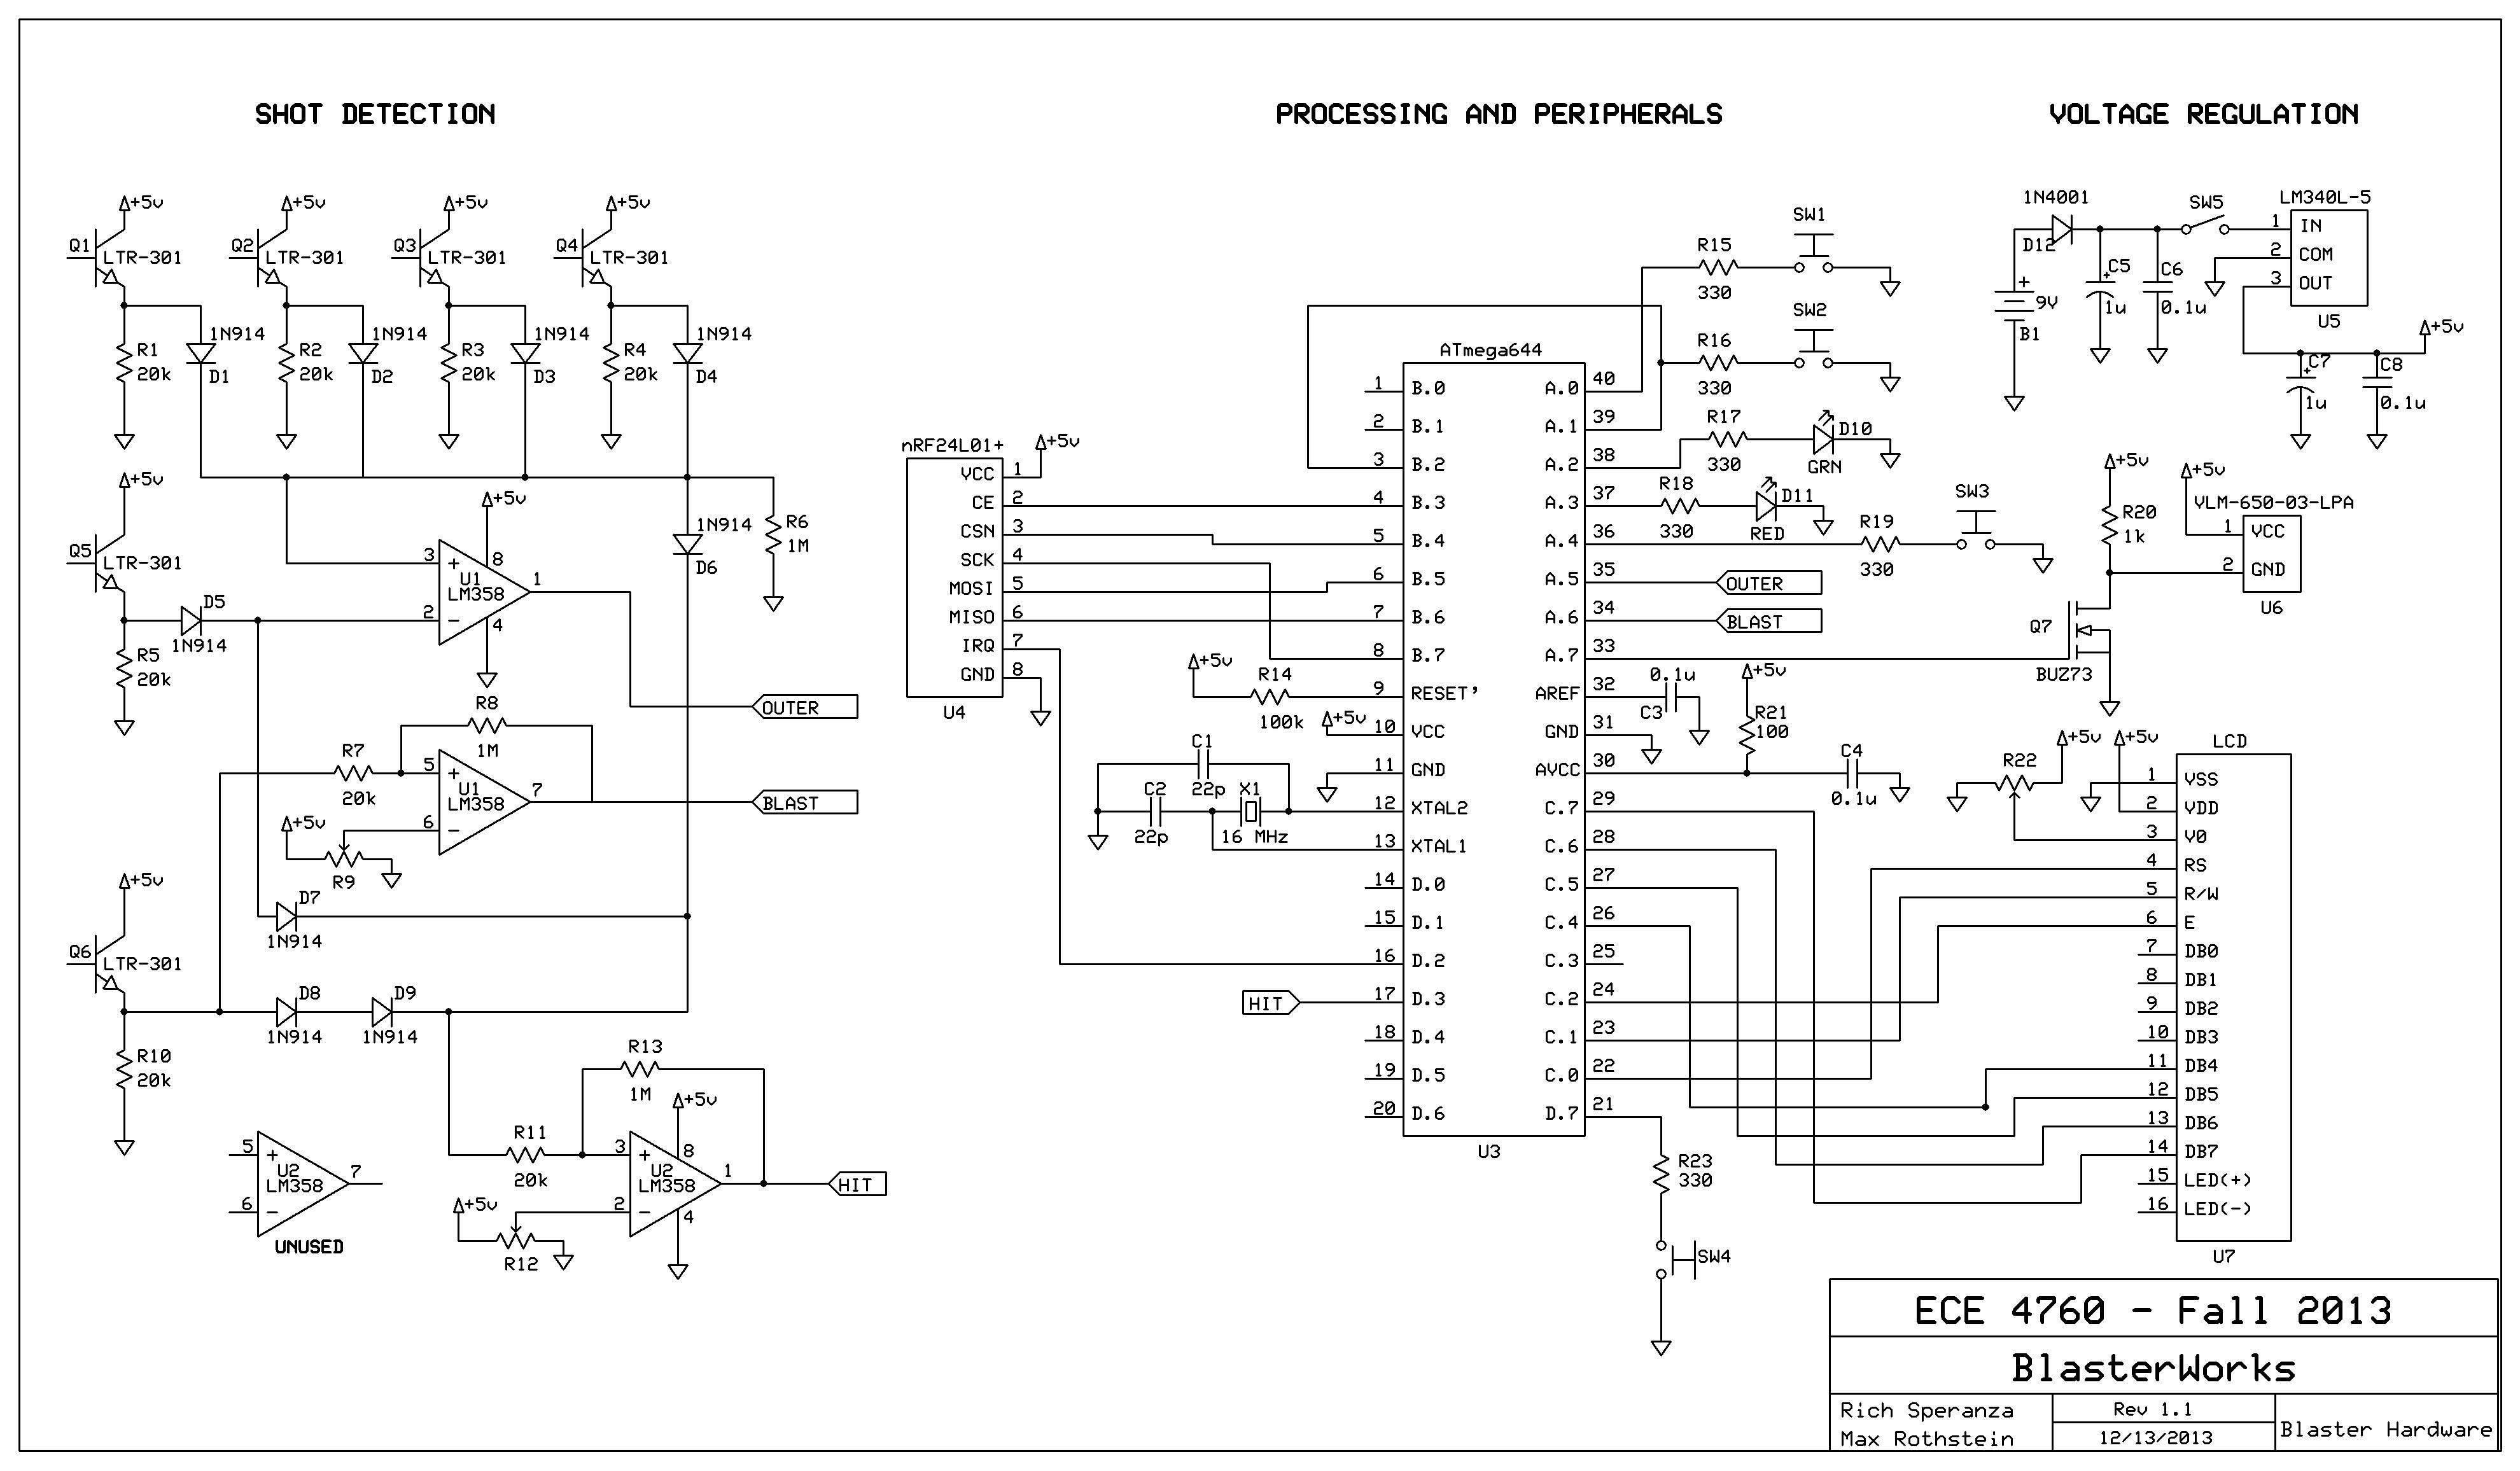
By looking at the schematic, we can see that there are a total of six LTR-301 phototransistors. Q1-Q4 on the schematic correspond to the four outer detectors on the user’s chest plate. Q5 is the sensor for the inner detector on the chest plate. Finally, Q6 is the last sensor which is placed on the user’s blaster. These sensors can be thought of as a normal BJT, however, instead of biasing the base manually, the laser does the work for us. Without any light shining on the base of the phototransistor, the device is turned off and there is an effective open between the collector and emitter. As light hits the component, the BJT begins to turn on, allowing the 5V from the collector flow to the emitter. Something worth noting is that this device is not an “all or nothing” device. The voltage at the emitter is not always either 0V or 5V. Depending on how hard the component is hit by light, the device may only be partially on. This behavior is the reason why comparators are needed.
Parts List:
| Category | Part | Vendor | Part Number | Cost | Quantity | Total Cost |
|---|---|---|---|---|---|---|
| Blaster | ||||||
| Shot Detection | Phototransistor | Digikey | LTR-301 | $0.33 | 6 | $1.98 |
| Fast Switching Diode | 4760 Lab | 1N914 | $0.1 | 9 | $0.9 | |
| Op-Amp IC | 4760 Lab | LM358P | $0 | 2 | $0 | |
| 8-Pin DIP Socket | 4760 Lab | $0.5 | 2 | $1 | ||
| 20kOhm Resistor | 4760 Lab | $0 | 8 | $0 | ||
| 1MOhm Resistor | 4760 Lab | $0 | 2 | $3 | ||
| 10kOhm Potentiometer | 4760 Lab | $0 | 2 | $0 | ||
| 2″ Solder Board | 4760 Lab | $1 | 2 | $2 | ||
| Core | 9V Battery | Digikey | EN22 | $2 | 1 | $2 |
| 9V Harness | Digikey | BH9VW | $1.51 | 1 | $1.51 | |
| 1uF Capacitor | 4760 Lab | $0 | 2 | $0 | ||
| 0.1uF Capacitor | 4760 Lab | $0 | 2 | $0 | ||
| Microcontroller | 4760 Lab | ATmega644 | $2 | 1 | $2 | |
| Custom PC Board | 4760 Lab | $4 | 1 | $4 | ||
| Peripherals | 650nm Class IIIA Laser Module | Digikey | VLM-650-03-LPA | $13.18 | 1 | $13.18 |
| Dual-Concave Lens | Surplus Shed | L5315 | $4.00 | 1 | $4.00 | |
| MOSFET | 4760 Lab | BUZ73AH | $1.26 | 1 | $1.26 | |
| 1kOhm Resistor | 4760 Lab | $0.00 | 1 | $0.00 | ||
| 330Ohm Resistor | 4760 Lab | $0.00 | 6 | $0.00 | ||
| Green LED | 4760 Lab | $0.00 | 1 | $0.00 | ||
| Red LED | 4760 Lab | $0.00 | 1 | $0.00 | ||
| Wireless Transceiver | 4760 Lab Surplus | nRF24L01+ | $0.00 | 1 | $0.00 | |
| Momentary ON Push-Switches | 4760 Lab | $0.00 | 4 | $0.00 | ||
| 10kOhm Potentiometer | 4760 Lab | $0.00 | 1 | $0.00 | ||
| 2×8 LCD Screen | All Electronics | CFAH0802A-NYG-JT | $3.25 | 1 | $3.25 | |
| BLASTER SUBTOTAL | $37.08 | |||||
| x2 BLASTERS | $74.16 | |||||
| Base Station | ||||||
| Microcontroller | 4760 Lab | ATmega644 | $2.00 | 1 | $2.00 | |
| RS232 Interface IC | 4760 Lab Surplus | MAX233CPP IC | $0.00 | 1 | $0.00 | |
| Custom PC Board | 4760 Lab | $4.00 | 1 | $4.00 | ||
| DC Power Supply | Previously Owned | $0.00 | 1 | $0.00 | ||
| 330Ohm Resistor | 4760 Lab | $0.00 | 2 | $0.00 | ||
| Green LED | 4760 Lab | $0.00 | 1 | $0.00 | ||
| Red LED | 4760 Lab | $0.00 | 1 | $0.00 | ||
| Wireless Transceiver | 4760 Lab Surplus | nRF24L01+ | $0.00 | 1 | $0.00 | |
| RS232 Serial Connector | 4760 Lab Surplus | $0.00 | 1 | $0.00 | ||
| BASE STATION SUBTOTAL | $6.00 | |||||
| Miscellaneous | ||||||
| 40 Pin DIP Socket | 4760 Lab | $0.50 | 3 | $1.50 | ||
| Header Pins | 4760 Lab | $0.05 | 102 | $5.10 | ||
| 6″ Solder Boards | 4760 Lab | $2.50 | 3 | $7.50 | ||
| Wood Board | Lowe’s | $2.00 | 1 | $2.00 | ||
| Foam | Michael’s | $0.50 | 1 | $0.50 | ||
| Cardboard Vest | Scrapped | $0.00 | 2 | $0.00 | ||
| SUBTOTAL | $16.60 | |||||
| PROJECT COST | $96.7 |
For more detail: Laser Tag with wireless logging using Atmega644