Summary of ATSAMD21g18 Bootloader With J-link Debugger
This guide details the process of burning a custom bootloader onto an ATSAMD21g18 microcontroller, specifically for the Sparkfun SAMD21 Development Board. It covers necessary hardware setup using SWD programming, soldering connections, and software configuration via Atmel Studio and Arduino IDE to enable firmware uploads.
Parts used in the ATSAMD21g18 Bootloader Project:
- Sparkfun SAMD21 Development Board
- J-Link EDU (or SWD compatible programmer)
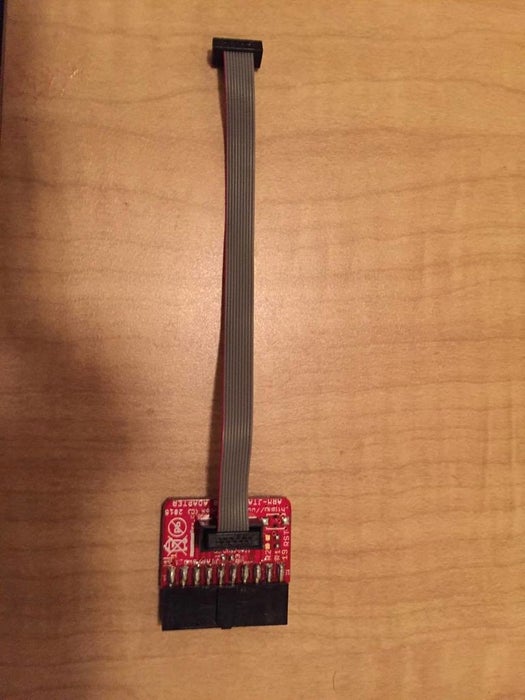
- Olimex JTAG 20 PIN 0.1" TO 10 PIN 0.05" adapter
- 10 Positions Header Connector 0.050" (1.27mm) Through Hole Gold
- Micro USB Cord
- Soldering station
- J-link EDU debug probe
- 10-pin IDC ribbon cable
For those of you who have used the SAMD21 from sparkfun and are looking to burn a custom bootloader to the ATSAMD21g18 chip microcontroller unit (MCU) or develop your own printed circuit board application, this instructables page will take you through the necessary steps for burning the bootloader operation.
This instructables will show how to bootload a SAMD21 Development Board sold by Sparkfun Electronics and will also give you some insight on how to burn a bootloader for other ATSAMD21g18 devices such as the Adafruit Feather M0 and the Arduino Zero.
Step 1: Materials Needed
–Soldering Equipment–
This instructables page will assume you have some soldering experience. If you don’t, no worries there is only one component you need to solder together. Below is a video for an introduction on how to solder made by electronhacks on youtube.
Here is the link for a soldering station I would recommend buying (no solder included):
https://www.amazon.com/Weller-WLC100-40-Watt-Solde…
—Required Materials —
All of the materials for this tutorial can be bought from ww.digikey.com
- Sparkfun SAMD21 Development Board
- J-Link EDU (or any other SWD compatible programmer)
- Olimex JTAG 20 PIN 0.1″ TO 10 PIN 0.05″ adapter
- 10 Positions Header Connector 0.050″ (1.27mm) Through Hole Gold
- Micro USB Cord
— Required Software —
The Arduino IDE https://www.arduino.cc/en/Main/Software
You will also need to download Atmel Studio. I use version 7 of ATMEL Studio.
Step 2: Understanding Bootloader and Serial Wire Debug (SWD)
This may seem like a daunting thing to understand, but this is important for those of you who are looking to use the ATSAMD21g18 chip for printed circuit board applications.
–Bootloader–
So what is a bootloader? Well a bootloader is a small code that allows you to upload firmware (source code) that makes your microcontroller adaptable for different applications. When you buy the ATSAMD21g18 chip from a electronics vendor such as digikey, you will need to do whats called “burning the bootloader” to make it compatible to program over the arduino IDE.
–Serial Wire Debug (SWD)–
The ATSAMD21g18 chip uses an ARM Cortex-M0+ processor and can be programmed through Serial Wire Debug (SWD). Programming through SWD requires an external programmer such as the J-link EDU or ATMEL ICE BASIC. Most ARM Cortex-M based processors require an external programmers.
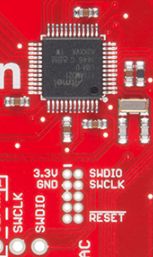
For the SAMD21 development board there is a 10 pin interface for SWD. While not all the pins are required, these are the essential ones:
- VCC – 3.3 V power
- GND (two separate pins) – ground
- SWDCLK – Clock
- SWDIO – Bidirectional Input/Output
Step 3: Hooking Up Everything!
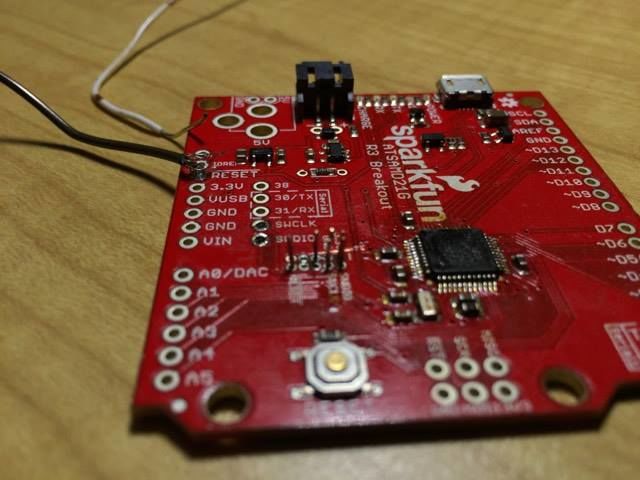
- The very first thing you should do with the SAMD21 development board is to solder the 10-pin interconnectors to your board. In my case, I ran out of interconnectors and manually soldered on the individual pins I required. I would recommend against this since it does require a lot of fine soldering and taking things apart.
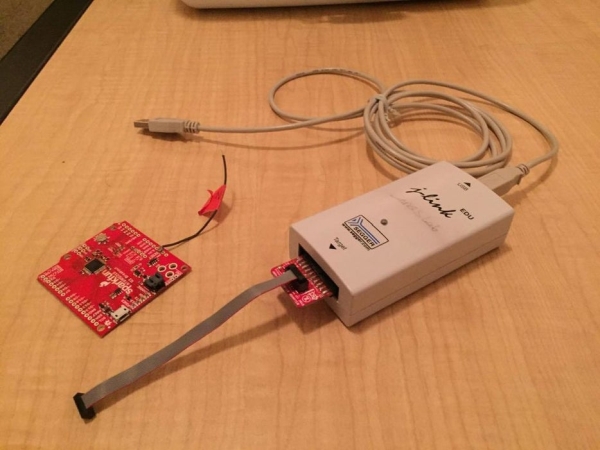
- From there, plug in your olimex J-link adapter to your J-link EDU debug probe and attach the 10-pin IDC ribbon cable which came with adapter.
- Plug in the other end of the ribbon cable to your SAMD21. Note that the red wire on the ribbon cable should be on the side labeled as 3.3V on the SAMD21 board.
- Plug in both your SAMD21 board and your J-link EDU to your computer’s USB ports.
Step 4: Erasing ATSAMD21g18 Chip
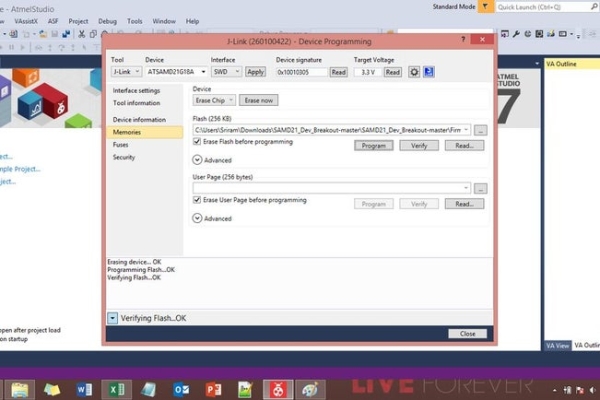
For burning the bootloader, we need to use ATMEL Studio. Once you have it opened, go to tools > Device Programming (or Ctrl+Shift+P).
The Device programmer window should open.
- On the top bar of interface settings, under tool click on J-link or the debugger you are using.
- Under Interface select SWD and click Apply.
- Click Read Device Signature make sure target voltage is 3.3V
– Click on Device memories and select erase chip.
You should get something in the output terminal that says “Erase…Ok”
Step 5: Burning the Bootloader
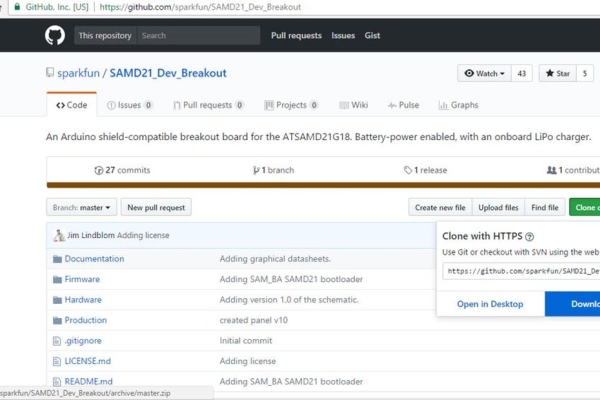
Follow the link to the Sparkfun Github Repository and download the zip file and unzip it to your preferred destination.
– Click on Fuses and select program. This verifies the internal registers of the ATSAMD21 chip.
– Finally to burn the bootloader, click back on Device memories. Under the bar labelled flash, click on the browse for file icon and find the folder where you extracted the zip file you got from github labelled “SAMD21_Dev_Breakout-master” Under Firmware, make sure you search for all file types as we will using the samd21_sam_ba_sparkfun.bin file. Click on the file and select open. Finally, select program right next to flash and you will get a response in the output prompt saying: “Verifying Flash…OK” . Congratulations you have successfully bootloaded the SAMD21 chip!
Source: ATSAMD21g18 Bootloader With J-link Debugger
- What is a bootloader?
A small code that allows you to upload firmware to make your microcontroller adaptable for different applications. - How do I program the ATSAMD21g18 chip?
The chip uses Serial Wire Debug (SWD) which requires an external programmer like the J-link EDU. - Which essential pins are required for SWD on the SAMD21 board?
The essential pins are VCC at 3.3V, GND, SWDCLK, and SWDIO. - Can I use this tutorial for other devices?
Yes, it provides insight on how to burn a bootloader for other ATSAMD21g18 devices like the Adafruit Feather M0 and Arduino Zero. - What software is required for this project?
You need the Arduino IDE and Atmel Studio version 7. - How do I erase the chip before burning the bootloader?
In Atmel Studio, go to Device memories and select erase chip after setting the tool to J-link and interface to SWD. - Where can I find the bootloader file?
Download the zip file from the Sparkfun Github Repository labeled SAMD21_Dev_Breakout-master. - Which specific file must be selected to flash the bootloader?
You must search for and select the samd21_sam_ba_sparkfun.bin file.