Summary of ATTiny85 Game Timer – Get Rid of That Old Hourglass!
This project is an ATTiny85-based game timer for timed board-game turns. It uses a binary two-LED selector for four preset times (30, 60, 90, 120 seconds), a start/reset button, millis()-based timing, and a piezo buzzer for music and time-up sound. It is programmable in the Arduino environment, prototyped on a breadboard, then soldered onto PCB, powered by a small LiPo battery, and housed with simple finishing touches.
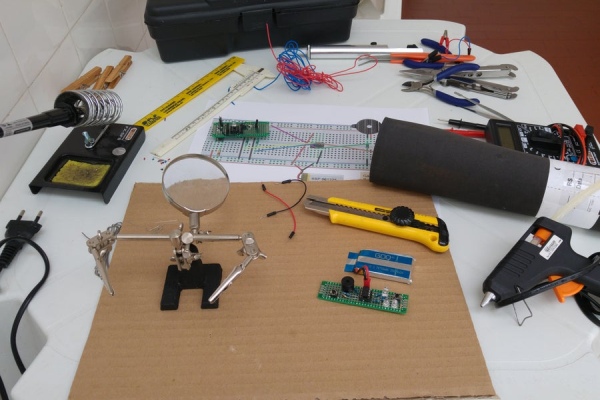
Parts used in the ATTiny85 Game Timer:
- ATTiny85 (8-pin DIP, e.g., Attiny85-20PU, burned @8MHz internal)
- 8-pin IC socket
- Piezo speaker
- Yellow LED (5mm THT)
- Blue LED (5mm THT)
- Red LED (5mm THT)
- 470Ω resistors (3)
- 100Ω resistors (2)
- 22kΩ resistor (1)
- 10kΩ resistors (2)
- Pushbutton (start/reset)
- LiPo battery (110 mAh)
- Battery contact headers
- Wires
- PCB
- Soldering iron and solder (tools)
- Multimeter (tool)
- Desoldering pump (tool)
- Hot glue gun and hot glue
- Board support (optional)
- Scissors or x-acto knife, pliers, tweezers
- EVA sheet (insulation/bumper)
What did I make? =
This is a little project that uses ATTiny85 to make a simple “game timer”, intended to be used with board games that demand timed turns, like “Rummikub” or “Scrabble”. Never wait for all that sand getting down for the next turn again!!
The working is simple:
– A binary preset time selector (00=30s; 01=60s; 10=90s or 11=120s), indicated by two leds showing the selected time;
– A start/reset button that can be pressed anytime.;
– “millis()” counting system [doesn’t use delay()];
– turn on “music” and time’s up buzzer; and
– fully programmable in Arduino environment.
= Why did I make it? =
I was tired of searching Game Timer apps for my smartphone. None of them pleased me. So, why not to build one myself?
Much cooler indeed!
Sorry for any english misspelling, it’s not my mother language.
Step 1: Previous Knowledge

This Instructable assumes that you know:
- How to code in Arduino Environment;
- How to program ATTiny85 (either using Arduino or other uploader);
- How to assemble parts in a breadboard (for prototyping); and
- How to solder components in a PCB.
Step 2: Gathering Materials

Shopping List
Amount / Part / Type / Properties
- REUSABLE:
- 1 UPLOADER (AVR Programmer, Arduino or any other, just for programming ATTiny85) – mine is the one at the photo.
- Soldering iron
- Board support (optional, but highly advisable)
- Scissors or x-acto knife
- Hot glue gun
- Pliers
- Tweezers
- Multimeter
- Desoldering pump
- CONSUMABLE
- 1 Piezo Speaker
- 1 Yellow (595nm) LED leg yes; pacote 5 mm [THT]
- 1 Blue (430nm) LED leg yes; pacote 5 mm [THT]
- 1 Red (633nm) LED leg yes; pacote 5 mm [THT]
- 3 470Ω Resistor bands 5;
- 2 100Ω Resistor bands 5;
- 1 22kΩ Resistor bands 5;
- 2 10kΩ Resistor bands 4;
- 2 Pushbutton
- 1 attiny85 tipo Atmel AVR; variante dip08 THT; pacote dip; versão Attiny85-20PU (burned @8MHz internal)
- 1 LIPO-110mAh variante 110mAh; pacote lipo-110
- 1 8-pin IC socket
- 1 PCB
- contact headers (for using with the battery)
- EVA sheet
- Hot glue
- Wires
Total cost (excluding the program uploader) = LESS THAN 10 DOLLARS!!!
Step 3: Breadboard Mounting

It’s advisable testing the circuit and programming at the breadboard first, so you can be sure the project works!
Step 4: Program and Test
Upload the following (commented) code to your ATTiny85 and see if it works.
For me, I’ve used Arduino as ISP to program the ATTiny85 (@8MHz internal). I’ve used this zipped file (arduino-tiny-0150-0020) to add a working sound “board info”, that makes the Tiny compatible with sounds.
Remember to check if the sounds are working correctly. Not all the “boards info” for the Tiny are compatible with sounds.
Step 5: Soldering
Once you have successfully tested your project, it’s time to get it more serious.
I won’t show each step of mounting the components at the PCB because mine might be different from yours.
The trick here is to “solve the puzzle” and make all the components fit in a appropriate order in the PCB.
Tips:
- Bend the legs of the components so you can “stick” it to he PCB, to easy the soldering;
- Put the legs of connected components in the same hole or in adjacent holes: it will make it more easy to solder;
- Save the cut legs of the components so you can use it to make connections;
- Use short strips of wire to make connections that need to be insulated of others because of the circuit layout; and
- Use the multimeter to check the connections/continuity of the circuit.
Step 6: Finishing Touches
As for the finishing touches, do the following:
- Plug in the batteries and…
- TEST IT! MAKE SURE IT WORKS BEFORE THE STEPS BELOW;
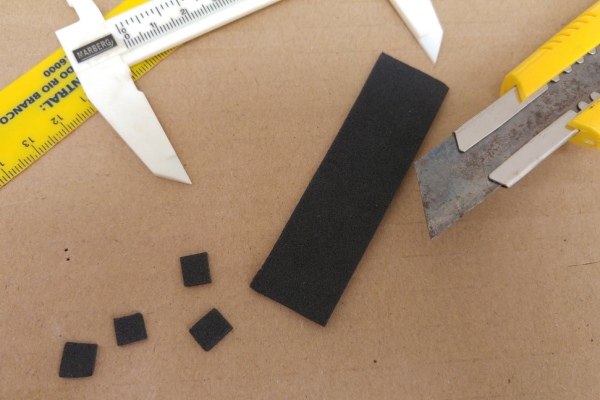
- Cut some EVA squares, to function as a “bumper”. Hot glue it. Then, cut a rectangle the size of the PCB to insulate and protect the soldering. Hot glue it again. The fourth picture shows the final results;
- Strip a bit of the wire so you can get a little piece of the insulating plastic. Put these in the battery headers so you won’t invert the battery sides. Use the tweezers;
- You may put it in a beautiful 3D printed box if you want to, but it’s gonna lose some of it’s “charm’; and
- Now, just…
Step 7: GAME ON!

Source: ATTiny85 Game Timer – Get Rid of That Old Hourglass!
- What times can be selected with the timer?
The binary selector provides four preset times: 30s, 60s, 90s, and 120s. - How is the selected time indicated?
Two LEDs show the binary selection corresponding to the chosen preset time. - Can the start/reset button be pressed anytime?
Yes, the start/reset button can be pressed at any time. - Does the project use delay for timing?
No, it uses the millis() counting system and does not use delay(). - Does the timer produce sound when time is up?
Yes, it uses a piezo speaker to play music and a buzzer sound when time is up. - How is the ATTiny85 programmed?
The ATTiny85 is programmed in the Arduino environment, for example using Arduino as ISP and a compatible boards package. - Should the circuit be tested on a breadboard first?
Yes, it is advisable to test the circuit and program on a breadboard before soldering to PCB. - What battery is used to power the timer?
A small LiPo battery (110 mAh) is used as the power source. - Are any special board info files required for sound?
Yes, a specific Tiny boards package that is compatible with sound is used; not all Tiny boards info are compatible with sounds.