Summary of BBQ Temperature & Meat Sensor on ESP8266 With Display
This article guides users in building a DIY BBQ temperature controller using a Wemos D1 mini and ESPeasy. The device monitors ambient and meat temperatures via thermocouples, displays data on an LCD, and automatically activates fans to regulate heat based on potentiometer settings. It integrates with Domoticz for real-time monitoring and logging.
Parts used in the BBQ Temperature Controller:
- Wemos D1 mini
- MAX31855 Thermocouple module including probe (2x)
- Potentiometer 10k Ohm
- LCD 2004 incl I2C module
- IRF 520 mosfet
- Fan 5v (2x)
- LM2596 DC supply
- Housing
- Connectors for thermocouple (2x)
- DC connector female (2x)
- DC connector male (1x)
- Nut and bolt M3 x 30
- DC powersupply at least 5v
- Twin-wire cable
- Old USB mini cable
In this Instructable I will show you how to make your own version of a BBQ tool that measures the current temperature in your barbecue and turns on a fan to light it up if needed. Additional to this there is also a meat core temperature sensor attached, and this all is (in my case) connected to Domoticz: real time read out of current temperatures and also logging.
Supplies:
Things you need:
- Wemos D1 mini (1x)
- MAX31855 Thermocouple module including probe (2x)
- Potentiometer 10k Ohm (1x)
- LCD 2004 incl I2C module (1x)
- IRF 520 mosfet (1x)
- Fan 5v (2x)
- LM2596 DC supply (1x) – set output to 5v, input can vary
- Housing (1x)
- Connectors for thermocouple (2x) – (connect to both MAX31855’s with the probes)
- DC connector female (2x) – one for DC in (depending on DC power supply socket)
- DC connector male (1x) – for connecting the fans
- Nut and bolt M3 x 30
- DC powersupply at least 5v
- some twin-wire – for connecting the fans.
- old USB mini cable – for powering the D1 mini
Tools you need:
- Soldering station
- Drills in several sizes
- Cutting tool for display
Step 1: Preparing Your Housing

At first, measure the size of the display. Make a cutting in the top of the housing to the display fits in nicely. Then make two holes at the location of the mouting holes in the backplate of the LCD (see photo).
Than use the bolts M3x30 to mount the display in the housing, see other picture from the top.
Now we start connecting / soldering all the parts together.
Step 2: Soldering

Now it’s time to connect all the parts together, see picture and below:
Wemos D1 mini -> MAX31855 (BBQ)
3v3 -> VCC
GND -> GND
D6/ GPIO12 -> SO
D5 / GPIO14 -> SCK
D8 /GPIO15 -> CS
Wemos D1 mini -> MAX31855 (meat)
3v3 -> VCC
GND -> GND
D6/ GPIO12 -> SO
D5 / GPIO14 -> SCK
D4 /GPIO2 -> CS
Wemos D1 mini -> Potmeter
3v3 -> VCC
GND-> GND
A0 -> Pot
Wemos D1 mini -> IRF520
D0 -> SIG
GND -> GND
Wemos D1 mini -> LCD2004
D1 / GPIO5 -> SCL
D2 / GPIO4 -> SDA
5v -> VCC
GND -> GND
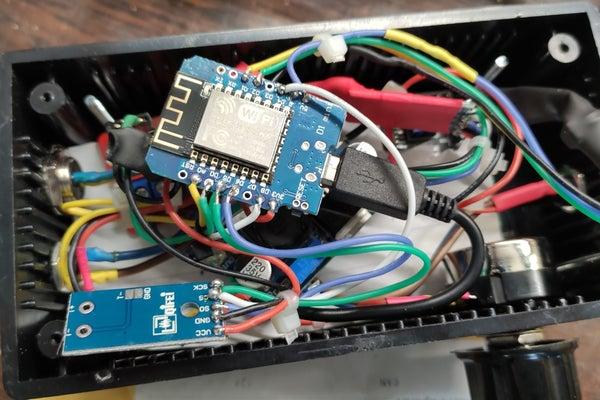
Step 3: Put It Al in the Housing

So now it’s time to put it all in the housing. The displays is already mounted in there. You just put al the parts in, gently and that the signal parts are not touching. See the picture how i did it.
Also, this is the moment to drill the several holes for the connectors. In my case, I put the power in on one side, and the sensors / fan output on the other site.
Step 4: Software
The Wemos D1 mini should be flashed with ESPeasy for this tutorial, but you can use your own choice. How to install ESPeasy see: https://www.letscontrolit.com/wiki/index.php/ESPEa…
Configure all the attached devices to the right GPIO’s (see pictures for my configurations)
- Analog input (potmeter) to D0 / ADC (TOUT)
- Fan: GPIO 16
- BBQ sensor: GPIO15
- LCD2004 display: GPIO4,5,0
- Meat sensor: GPIO2
Task Settings
Analog input:
You need to configure the 1024 measurement points to “normal” degrees. I used 50 to 250’C but you can adjust this to your liking under “two point Calibration”. See pictures. Interval to 1 sec, value with 0 decimals
Temperature sensors (BBQ and Meat):
Measurement interval to 5 sec (does not change that much)
LCD2004:
Find the right I2C adress, this is some trial and error (or when you know the adress choose that one). Adjust display size to the right size (4×20). At the lines, fill in the desired text and values. See picture how I did this (it’s in Dutch).
Enable the rules under “Tools” and than select “Rules” and “Old Engine”.
Than make a rule, to control the fan (make sure your naming of the devices and the values are the same, otherwise it’s not working):
on Meting#Temperature<[Waarde#Analog] do
let,1,[Waarde#Analog]-[Meting#Temperature]
if %v1%>5
GPIO,16,1 //turn on fan
endif
endon
on Meting#Temperature>[Waarde#Analog] do
let,2,[Meting#Temperature]-[Waarde#Analog]
if %v2%>5
GPIO,16,0 //turn off fan
endif
endon
It’s time to test it! Be sure the ESP8266 can connect the wifi network, otherwise it won’t start up!
Step 5: Time for BBQ

Now mount the fans together and mount them on the BBQ. See pictures how did this. Now it’s to start the “BBQ guru” and start BBQ’ing!
Source: BBQ Temperature & Meat Sensor on ESP8266 With Display
- How do I connect the MAX31855 sensors to the Wemos D1 mini?
The BBQ sensor connects SO to D6, SCK to D5, and CS to D8, while the meat sensor connects SO to D6, SCK to D5, and CS to D4. - What software is required to flash the Wemos D1 mini?
The device should be flashed with ESPeasy, though other choices are possible if configured correctly. - How do I configure the analog input from the potentiometer?
You need to configure the 1024 measurement points to normal degrees under two point Calibration, setting the interval to 1 sec. - Can I adjust the temperature range for the BBQ sensor?
Yes, you can adjust the range under two point Calibration, such as using 50 to 250 degrees Celsius. - Does the system log temperature data?
Yes, the project is connected to Domoticz for real-time readout of current temperatures and logging. - How does the fan control logic work in the rules?
The rule turns the fan on if the difference between the target analog value and actual temperature exceeds 5 degrees, and off if the temperature exceeds the target by more than 5 degrees. - What GPIO pins are used for the LCD display?
The LCD2004 uses GPIO4 for SDA, GPIO5 for SCL, and requires power connections to 5v and GND. - Is it necessary to know the I2C address of the display?
You must find the right I2C address through trial and error or select the known address to adjust the display size. - What happens if the ESP8266 cannot connect to the wifi network?
If the ESP8266 cannot connect to the wifi network, it will not start up. - Where should the fans be mounted after assembly?
The fans should be mounted together and attached directly to the BBQ grill.