A relative asked me one time if i could create a switch that reacts to clapping your hands. So i’ve orderd some stuff to create a project and decided to make a instructable so everyone could have a awesome switch like that.
The microcontroller is the brain of this project. A sound sensor is connected to the microcontroller, the sensor is sending analog data when sound is detected. The microcontroller is programmed to detect large differences in sound. When a high enough difference is detected, meaning a clap, the microcontroller sends a signal to the relay. The relay switches and the light turns on. When clapping a second time, the light will turn off again.
Supplies:
Physical stuff:
- 1x ATmega328P Xplained Mini with cable for programming
- 1x 5v relay module 1-channel (KY-019 or similar)
- 1x Sound sensor module (KY-038 or similar)
- 1x Breadboard
- 6x Male-Male jumper wire
- 1x light socket with cord (or any other device you want to turn on)
- 1x lightbulb
- 1x resistor* (I use 220 Ohm)
- 1x LED*
Software (download):
- AtmelStudio 7.0(https://www.microchip.com/mplab/avr-support/atmel-studio-7)
- Putty (www.putty.org)*
* For testing purposes
Step 1: Connections
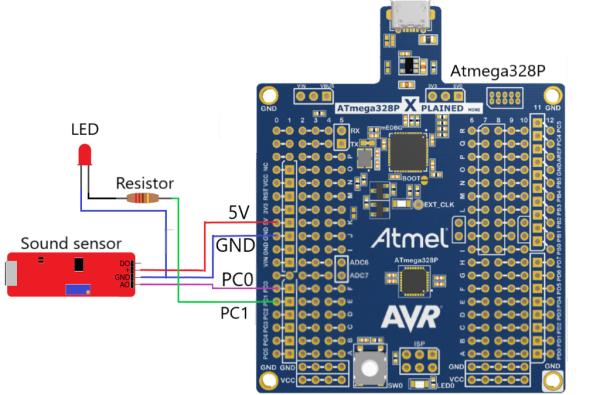
Connect all the wires as shown in the image.
Step 2: Creating the Program
I like to code in C so this project is written in C.
If you have not yet downloaded and installed the needed software, download and install it now.
Now follow these next steps:
- Open AtmelStudio.
- Click on “File” -> “New” -> “Project”.
- Click on “GCC C Executable Project”. Give your project a name and location to store. Click “Ok”.
- Search for the ATmega328P. Click “ATmega328P” -> “Ok”.
- Click in the Solution Explorer on “main.c” to open the main program.
Step 3: Adding Code
Delete the code already present in main.c
Copy and paste the following code in main.c
#define F_CPU 16000000

#include <avr/io.h>
#include <util/delay.h>
#include <stdlib.h>
#include "usart.h"

#define MINIMALVALUE 5
void InitADC();
uint16_t ReadADC(uint8_t ADCchannel);

double val1, val2;

int main(void)
{
	// Initialise the USART
	USART_init(9600);
	USART_putstr("#USART init\n");
	// Initialise the ADC
	InitADC();
	USART_putstr("#ADC init\n");

	// PC1 pin of PORTC output, the rest input.
	DDRC = 0b00000010;
	// set initial values to PORTC low.
	PORTC = 0b00000000;

	while(1)
	{
		//reading potentiometer value
		// read value and store in val1
		val1=ReadADC(0);
		_delay_ms(1);
		// read next value en store in val2
		val2=ReadADC(0);
		char str[10];
		// the ReadADC() gives the value back in integers. If we want to debug or see the value on putty,
		// the value needs to be converted to characters so the USART can print it.
		itoa(val1,str,10);
		USART_putstr(str);
		USART_putstr("\n");

		// if the 2 values have a certain difference. A sound is detected and switches a port.
		// MINIMALVALUE can be changed, increasing will make it less sensitive. Decreasing will make it more sensitive
		if(val1-val2 > MINIMALVALUE || val2-val1 > MINIMALVALUE)
		{
			PORTC ^= 0b00000010; // LIGHT ON UC
			_delay_ms(200);
		}
	}
}

void InitADC()
{
	// Select Vref=AVcc
	ADMUX |= (1<<REFS0);
	//set prescaller to 128 and enable ADC
	ADCSRA |= (1<<ADPS2)|(1<<ADPS1)|(1<<ADPS0)|(1<<ADEN);
}

uint16_t ReadADC(uint8_t ADCchannel)
{
	//select ADC channel with safety mask
	ADMUX = (ADMUX & 0xF0) | (ADCchannel & 0x0F);
	//single conversion mode
	ADCSRA |= (1<<ADSC);
	// wait until ADC conversion is complete
	while( ADCSRA & (1<<ADSC) );
	return ADC;
}
Step 4: Adding USART
The USART is a serial communication protocol that can be used on the microcontroller. I use it on the microcontroller to see analog data from the sensor.
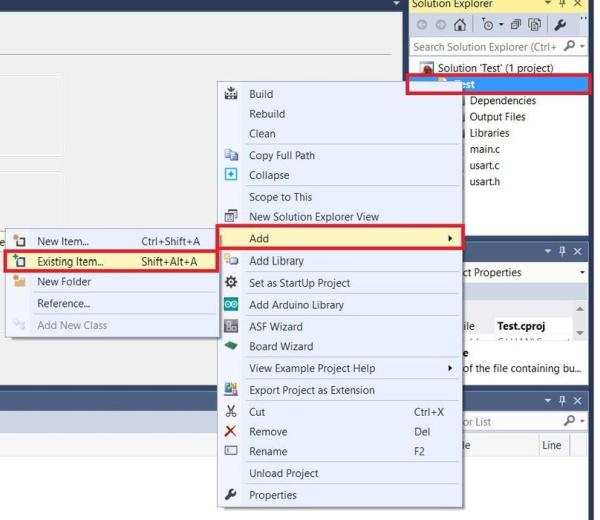
The USART is already programmed correctly, containing a header(.h) and source(.c) file. Download the 2 files and add them to your program in AtmelStudio.
Right-click on the project name in the Solution Explorer. Click “Add” -> “Existing Item…” and select the 2 downloaded files.
Step 5: Running the Code
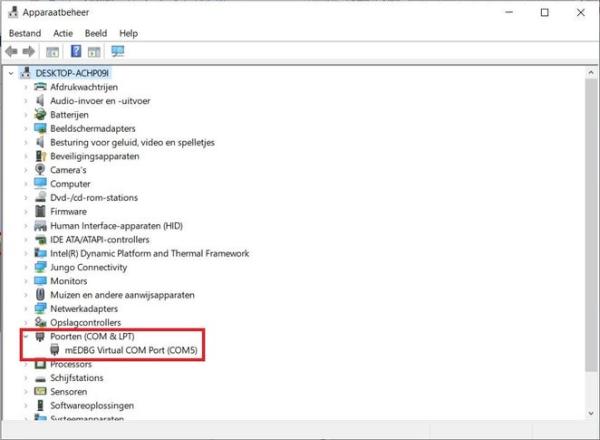
Connect the microcontroller to the computer. Search on your computer for “device manager” and open it. Look for “Ports (COM & LPT)” and remember the COM-port the microcontroller is on.
Open PuTTY and click on “Serial” type the COM-port you have found of the microcontroller and click “Open”. A terminal pops up, leave it for now.
Go back to AtmelStudio to select the right tool for programming the microcontroller.
- Click on the hammer tool.
- Select the “mEDBG*ATML” debugger/programmer.
- Select interface “debugWIRE”.
- Click “start without debugging”.
The program wil build and write.
When the program runs correctly you would see integer values in puTTY. Using a screwdriver i can change the value seen in puTTY by turning the screw on the sensor. My sensor gives the values from 0 to 1000 when turning the screw all the way. Im turning the screw to 100(10%) of the total value. I have found out that this works for me.
Step 6: Change Sensitivity
To adjust the sensivity when the light turns on you can use 2 options, but choose one not both:
- Change sensor screw;
- Change code value.
I use option 2. Increasing the MINIMALVALUE wil make it less sensitive, decreasing makes it more sensitive.
#define MINIMALVALUE 5
Source: Clap-on Switch