Summary of Debugging AVR Code in Linux With Simavr
Simavr is a Linux simulator for AVR microcontrollers (like ATTiny85) that runs ELF/HEX code, provides VCD trace output, and integrates with GTKWave for waveform inspection. The article shows installing dependencies on Ubuntu, building simavr from git, running provided tests, simulating an ATTiny85 program, and using GTKWave traces to debug a timer-register mistake that prevented an LED from blinking.
Parts used in the Debugging AVR Code with Simavr:
- simavr source code (from git://gitorious.org/simavr/simavr.git)
- run_avr simulator executable (built from simavr)
- avr-gcc / avr-libc toolchain (to produce ELF/HEX files)
- libelf-dev
- libglut3-dev
- gtkwave
- git
- build-essential (compiler tools)
- test/ example .axf or .o files (from simavr tests and user code)
- Optional: an OpenGL libGL.so symlink fix on Ubuntu if needed
I recently started programming AVR chips, namely the ATTiny85. They can be programmed using C, compilers are readily available in Ubuntu, and you can do a LOT with them – just search for avr on this site! Anyway, I was having some trouble with my project today – the LED wouldn’t flash! I couldn’t figure out what was going on, as debugging these things is non-trivial. That is, until I discovered simavr.
It’s a simulator for AVR in Linux that can take your ELF or HEX code and run it as if it’s actually on-chip, but gives you hooks and the possibility of dumping trace files. I’ll go through a simple example.
Step 1: Git It

There are a few dependencies on Ubuntu (which is what I use all the time):
sudo apt-get install avr-libc libelf-dev \
   libglut3-dev gtkwave git build-essential
I had to remove some crappy Mesa symlink for OpenGL in 10.10. Only do this if you have problems compiling related to -lGL,
sudo rm /usr/lib/libGL.so
cd /usr/lib
sudo ln -s libGL.so.1 libGL.so
cd
Finally, use git to download the source code:
git clone git://gitorious.org/simavr/simavr.git
Now, build it.
cd simavr
make
If you get any errors, leave me a comment. I’d be happy to help. You should have a new program called run_avr in the simavr subdirectory once that completes.
Step 2: Try a Test

There’s tons of tests that come with the software. They’re located in the (surprise!) tests subdirectory in the code. You can run one like this:
./run_avr ../tests/atmega88_example.axf
You should see something like this:
AVR_MMCU_TAG_VCD_TRACE 00c6:00 - UDR0
AVR_MMCU_TAG_VCD_TRACE 00c0:20 - UDRE0
Loaded 1760 .text
Loaded 114 .data
Loaded 4 .eeprom
Starting atmega88 - flashend 1fff ramend 04ff e2end 01ff
atmega88 init
avr_eeprom_ioctl: AVR_IOCTL_EEPROM_SET Loaded 4 at offset 0
Creating VCD trace file 'gtkwave_trace.vcd'
Read from eeprom 0xdeadbeef -- should be 0xdeadbeef..
Read from eeprom 0xcafef00d -- should be 0xcafef00d..
simavr: sleeping with interrupts off, quitting gracefully
Notice it made a VCD trace file? Let’s see what that looks like in GTKWave!
Step 3:
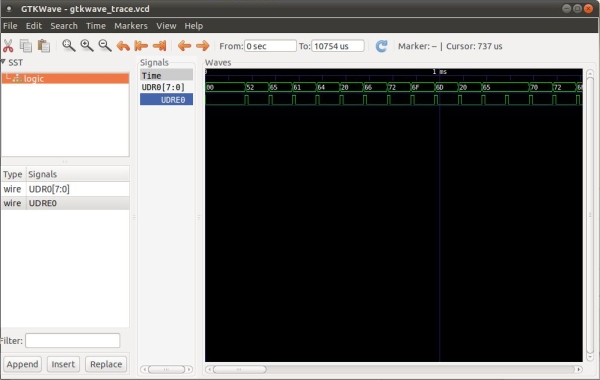
gtkwave gtkwave_trace.vcd
You can drag and drop the Signals on the left into the Signals list by the Waves dialog to make them show up. You can also right click the Signals and change their properties (like making them display in binary).
Step 4: How It Worked for Me

You specify the chip you want to simulate on the command line, and you can give it the object file created by avr-gcc (ELF format) to make it run. I also specified the frequency here as 8Mhz.
run_avr -mcu attiny85 -freq 8000000 -t ~/repos/life/code/avr/tutorials/ctc_ledblink.o
This produced this wonderful output:
AVR_MMCU_TAG_VCD_TRACE 0053:00 - TCCR0B
AVR_MMCU_TAG_VCD_TRACE 004a:00 - TCCR0A
AVR_MMCU_TAG_VCD_TRACE 0038:01 - tick
AVR_MMCU_TAG_VCD_TRACE 0038:02 - reset_timer
AVR_MMCU_TAG_VCD_TRACE 0038:08 - OC0A
Loaded 136 .text
Starting attiny85 - flashend 1fff ramend 025f e2end 01ff
attiny85 init
Creating VCD trace file 'gtkwave_trace.vcd'
avr_timer_configure-0 TOP 31250.00Hz = 256 cycles
avr_timer_configure-0 TOP 488.28Hz = 16384 cycles
avr_timer_configure-0 TOP 488.28Hz = 16384 cycles
avr_timer_configure-0 A 2450.98Hz = 3264 cycles
avr_timer_configure-0 TOP 31250.00Hz = 256 cycles
avr_timer_configure-0 A 156862.75Hz = 51 cycles
simavr: sleeping with interrupts off, quitting gracefully
Now that I had the trace file, I looked at it with gtkwave like in step 3. I used my datasheet and compared the registers with what I expected, and I was setting my timer registers backwards! Whoops! Anyway, it would have taken me a much longer amount of time to solve it without simavr – this way it only took a few minutes to get it up and running and find my problem. I highly recommend you try it out!
If you’d like to see some sample code, here’s the source for the test I did above:
https://github.com/hank/life/blob/master/code/avr/tutorials/ctc_ledblink.c
Source: Debugging AVR Code in Linux With Simavr
- How do I install the dependencies for simavr on Ubuntu?
Install avr-libc, libelf-dev, libglut3-dev, gtkwave, git, and build-essential via apt-get as shown in the article. - How do I get simavr source code?
Use git clone git://gitorious.org/simavr/simavr.git to download the source. - How do I build simavr after cloning?
Change into the simavr directory and run make; run_avr will be produced in the simavr subdirectory. - How do I run a provided test with simavr?
Run ./run_avr ../tests/atmega88_example.axf from the simavr directory to execute a test example. - How do I simulate my own ATTiny85 ELF/OBJ file?
Invoke run_avr with the mcu and freq options, for example run_avr -mcu attiny85 -freq 8000000 -t path/to/your.o. - How do I view signal traces generated by simavr?
Open the created gtkwave_trace.vcd file with gtkwave and add signals from the left pane into the Waves list. - Can simavr help debug timer/register issues?
Yes; the VCD traces let you compare register values against the datasheet, which helped identify reversed timer registers in the article. - What if I get OpenGL linking errors building simavr on Ubuntu?
The article suggests removing a bad /usr/lib/libGL.so symlink and recreating it to point to libGL.so.1 if -lGL related errors occur. - Where can I find the example code used in the article?
The ctc_ledblink.c example is available at https://github.com/hank/life/blob/master/code/avr/tutorials/ctc_ledblink.c as referenced in the article.