Summary of Delta Robot using atmega32 micrcontroller
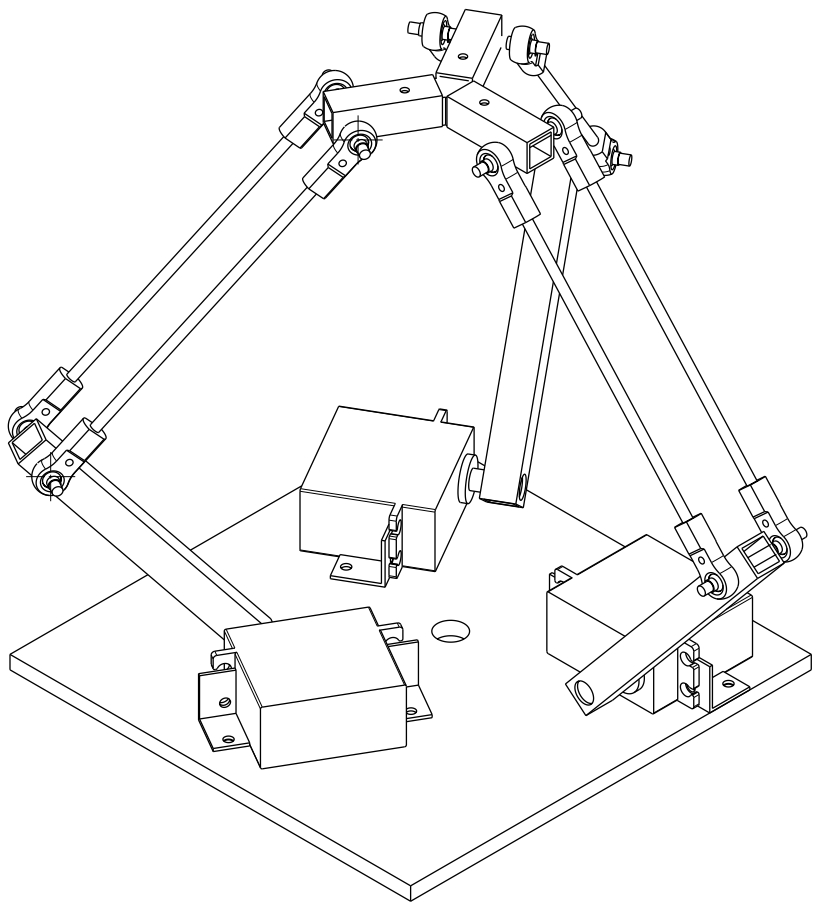
This weekend robotics project involves building a small robot using common model making supplies and hardware store materials, requiring minimal tools. Key materials include servos with M3 threads, ball joints, polycaprolactone, threaded rods, screws, and aluminum profiles. The aluminum is cut and drilled for assembly. Servo control is efficiently managed by using two timers on a microcontroller, allowing up to 10 servos to be handled with minimal processing load, enabling additional functions like command decoding or inverse kinematics. The project can be controlled via UART or I²C interfaces.
Parts used in the Little Robotics Project:
- 3 Servos with M3 thread in the axis (e.g. HX12K)
- 12 ball joints with M3 threads and 3mm holes in the sphere (e.g. Kavan Maxi Ball links 1405)
- About 4 grams of Polycaprolactone (e.g. ShapeLock or Friendly Plastic)
- 850 mm of M3 threaded rod
- 27 M3 screw nuts
- 3 M3 screws, 5mm long
- 3 M3 screws, 15mm long
- 400 mm of 10mm square hollow aluminum profile (1mm wall thickness)
- 150x150 mm metal or wooden mounting plate
- Microcontroller of choice (not specified)
And now for something completely different: A little robotics project for the weekend.
The described robot can be build entirely from model making supplies and materials from the hardware store.
Also only very few tools are needed. A metal saw, a drill press, a vice and optionally a tap will suffice.
And here you can see what you can get:
From the model making store you need:
- 3 Servos with M3 thread in the axis (e.g. HX12K)
- 12 ball joints with M3 threads and 3mm holes in the sphere (e.g. Kavan Maxi Ball links 1405)
- about 4grams of Polycaprolactone (Sold under names like ShapeLock or Friendly Plastic)
Form the hardware store you need:
- 850mm of M3 threaded rod (sometimes also available for model making)
- 27 M3 screw nuts
- 3 M3 screws 5mm long
- 3 M3 screws 15mm long
- 400 mm of 10mm square hollow aluminum profile (1mm wall thickness)
- 150×150mm metal oder wooden plate for mounting
(To control the robot you need a microcontroller of your choice.)
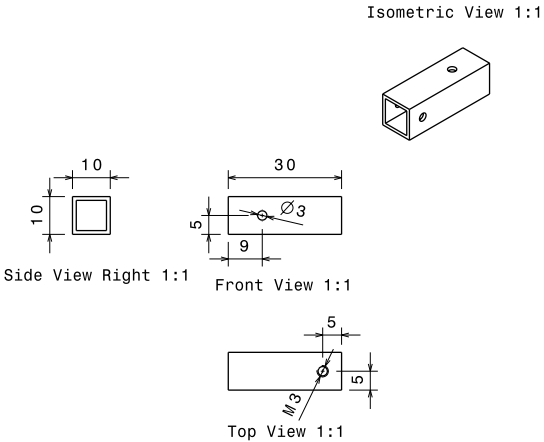
The first step is to divide the aluminium profile in three pieces of 100mm length and three pieces of 30mm length.
Then 4 holes are drilled and tapped in each of the pieces according to the following drawings.
One timer is used to generate an interrupt every 20ms / number_of_servos. On each of those interrupts one servosignal is switched on and a second timer is started. This timer is set to overflow after 1-2ms according to the desired position of the servo. When the overflow interrupt of the second timer occurs, all servosignals are switched off. This way you do not a variable to save the current servo, because only one servos is active at a time anyway. On the next interrupt of the first timer the process repeats with the next servo. The desired positions can be saved in an array.
With this method up to 10 servos can be controlled with only two timers and very short interrupt service routines. This way there is much remaining processing power left for other calculations such as receiving and decoding commands via the UART or I²C. Maybe you can even fit the inverse kinematics into the µC. For more Detail: Delta Robot using atmega32 micrcontroller


