Summary of DIY USB password generator using ATtiny Microcontroller
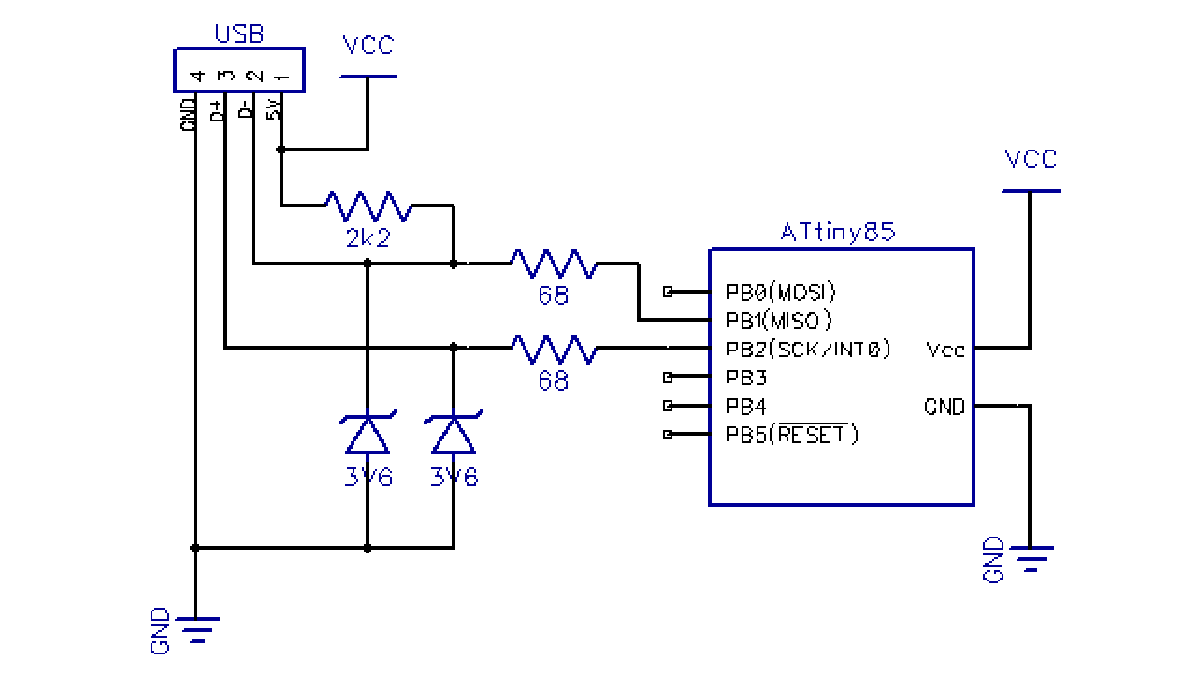
The article describes a DIY USB HID keyboard device using an ATtiny85 microcontroller that types a stored password automatically when plugged in. It stores passwords in EEPROM, allowing regeneration via CAPS LOCK key presses. The project uses minimal hardware stripped from a previous ATtiny85 USB tutorial, omitting unnecessary components while still functioning reliably. The device is enclosed in a repurposed USB flash drive case, with a USB cable added instead of the original connector. The circuit is assembled on a small veroboard with careful soldering of the USB connector, zener diodes, resistors, jumpers, and microcontroller.
Parts used in the USB HID Password Typing Device:
- ATtiny85 Microcontroller
- USB cable (short section)
- Zener diodes
- Resistors
- Jumpers (wires for connections)
- Veroboard (2×8 pads)
- Old 512 MB USB flash drive enclosure
- Optional 0.1 μF capacitor (recommended between VCC and GND)
Having done half a dozen V-USB tutorials I decided it’s time to whip up something cool. As USB keyboards were an area untouched. I decided to make a small USB HID keyboard device that types a password stored in EEPROM every time it’s attached. A new password can be generated just by tabbing CAPS LOCK a few times (4 times to start password regeneration and one tab for each password character generated, 10 is the default password length). Below you can see the device in action:
The place I work at requires me to change my password every few months so this would be one way to skip remembering a new password altogether. (as long as I remember to write it down before regenerating a new one so password can be changed:).
What is inside?
The device is powered with a simplified version of the hardware I used in my ATtiny85 USB tutorial – I stripped away the LCD, reset pullup and both capacitors. If you’re better in cramming components inside enclosures I suggest adding at least a 0.1 uF capacitor between VCC and GND, but it seems to work fine even without it:

The enclosure was graciously donated by an old 512 MB flash drive. I couldn’t make myself to break the USB connector from the circuit board inside. So I stripped appart a short USB cable instead (shown on left):
After some thinking and iterative soldering. I managed to cram everything on a tripad veroboard with 2×8 pads with the following initial setup:
Soldered the connector first. Then the zener diodes. Then resistors and jumpers, and finally VCC, GND and the ATtiny itself. I used the following tricks to make all ends meet:
For more detail: DIY USB password generator using ATtiny Microcontroller