Summary of IoT Scale
This article guides users in building a custom IoT scale using a Particle Photon to monitor weight and detect unauthorized access via mobile alerts. The project involves 3D printing a mounting structure, wiring a load cell and display to the microcontroller, and configuring software for calibration and app integration. It serves as a DIY solution for weighing items while enabling remote monitoring capabilities through the Particle ecosystem.
Parts used in the IoT Scale:
- Particle Photon (or similar Particle device)
- Load Cell
- HX711 ADC
- M4 screws
- M5 screws
- Breadboard
- Wires
- USB power supply and USB cable
- Android phone (minimum Lollipop)
- SSD1306 display (Optional)
- 3D printer (for mounting structure)
In this Instructable we will make an IoT scale! You might ask: “What in the world do I need an IoT scale for?”, and that is a good question! In truth, you probably don’t need one but you also don’t need a Tesla but you’d get one if you could 😛
But in all seriousness, this scale will allow you to monitor the status of anything you place on it. So let’s say theoretically you have some sneaky family members whole like to steal your candy and you want to make sure they don’t you could candy on this scale, lock the scale, and then be notified whenever someone takes some!
Ready for a device that will both weigh stuff for you and keep your favourite treats safe? Let’s begin!
Step 1: What You Need!
Here is a list of everything that is needed for this project:
- Particle Photon (or similar Particle device)
- Load Cell and HX711 ADC (I bought mine here)
- M4 and M5 screws
- Breadboard
- Wires
- USB power supply and USB cable (For Photon)
- Android phone (minimum Lolipop)
- Particle App (Setting up Photon)
- IoT Scale App
Not Mandatory but very helpful!
- SSD1306 display
- 3D printer (For printing mounting structure)
Step 2: Software Part 1
Note: Before beginning make sure the Photon device you are going to use has already been setup and claimed. Steps for setting up Particle devices can be found here
You will need two pieces of software:
- scale.ino and proper libraries can be found on the projects GitHub repository here
ensure you download all the files in the “ Photon Files” folder including the libraries for the SSD1306 display - IoT Scale app
The IoT scale app can be downloaded from the Google Play Store here
Alternatively, the code for the app is open source and you can find it in the same place as the above software.
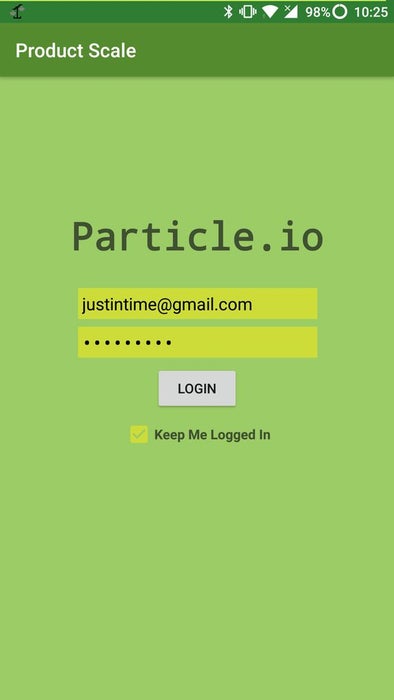
The app will be used to tare the scale, read its value, lock the scale, and receive alerts. Simply sign in using your Particle.io login!
Step 3: Software Part 2
You will now need to flash the scale.ino file to the photon. The easiest way to do this is using the online IDE that particle provides. if you use the online IDE you will have to create a new app and then copy and paste the code from the files you downloaded into the online IDE as it doesn’t support uploading files. Make sure that the files you create have the same names as the ones you downloaded.
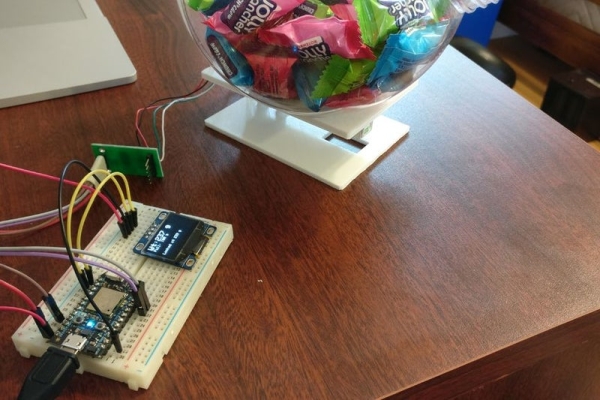
Step 4: Hardware

In this step, we will mount the load cell.
First, you need to 3D print the two .stl files from the GitHub project found here
After printing the two pieces you will need to pre screw the screws into the mounting points of the printed beds. Make sure you use the right size of screw! M4 in the top and M5 in the bottom! (You scale may have different size screws, if so you may have to design your own 3D printed platform with the right screw sizes)
Then attach both plates to the load cell in a z-patter as shown ensuring you put the bottom plate on first! The bottom has a cut out so that you can screw the top plate on after! Also, make sure the sticker with the arrow is pointing the right way! (Doesn’t really matter but if you’re going to do something do it right :p)
Step 5: Wiring
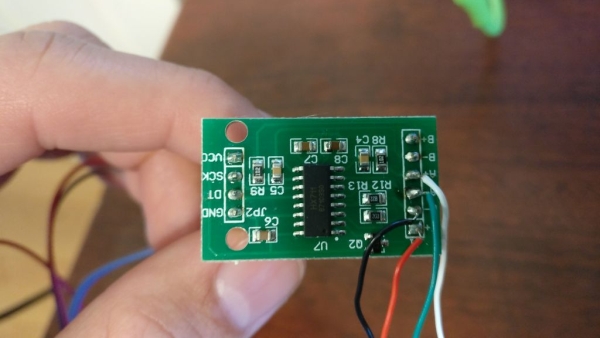
Load Sensor:
If you purchased the same Hx711 and load cell I did then you can look at the picture above to see where to solder the wires from the load cell on to.
For connecting the HX711 to the Photon follow below:
HX711 –> Photon
VCC –> 3V3
GND –> GND
SCK –> A3
DT –> A2
Display:
Note: I am using a 4 pin variant of the SSD1306 so make sure you follow the correct connection process for you’re display!
Display –> Photon
VCC –> 3V3
GND –> GND
SCL –> D1
SDA –> D0
Step 6: Calibration
If the scale is not reporting proper values you may have to change the value passed to the set_scale function on line 47 of the scale.ino file.
For calibration steps refer to these steps
Note: For a known mass I just used my phone with no case on it
Step 7: Fin!
And that’s all you need to do! Above is a video which you can watch to learn how to use the app!
In this instructable, I didn’t really encase the final product. Right now everything is kinda exposed which isn’t so good cause things can get unplugged easily! But I did this on purpose! It’s up to you to decide how you want your scale to look! Make it your own!
Enjoy your new app connected IoT scale!
Source: IoT Scale
- What is the primary function of this IoT scale?
The scale allows you to monitor the status of anything placed on it and send notifications if items are removed. - How do I set up the HX711 module with the Photon?
Connect VCC to 3V3, GND to GND, SCK to A3, and DT to A2 on the Photon. - Can I use a different microcontroller instead of the Particle Photon?
Yes, the guide mentions that a similar Particle device can be used. - What screw sizes are required for the 3D printed mounting plates?
You need M4 screws for the top plate and M5 screws for the bottom plate. - How do I calibrate the scale if values are incorrect?
You may need to change the value passed to the set_scale function in line 47 of the scale.ino file. - What software is needed to run the scale?
You need the scale.ino code from the GitHub repository and the IoT Scale app from the Google Play Store. - Is a 3D printer mandatory for this project?
No, it is not mandatory but very helpful for printing the mounting structure; otherwise, you must design your own platform. - How does the user receive alerts when someone takes an item?
The scale sends a notification via the IoT Scale app when the lock is triggered or movement is detected.