Summary of MIDI Handpan With 19 Tonefields on Upper and Down Side…
This article details a DIY MIDI handpan project featuring 19 volume-sensitive tonefields with USB connectivity. The creator built the instrument using foam from an old mattress for sound isolation and plywood for the pads to ensure accurate trigger response. The build requires no programming skills, utilizing a standard Alesis drum trigger interface mounted inside the base. The tutorial covers cutting foam, sawing wooden tonefields, testing piezo sensors for consistent volume output, and assembling two versions: one with external triggers and another with internal triggers and bottom notes.
Parts used in the MIDI Handpan Project:
- Alesis Drum Trigger I/O
- Two pieces of 10 cm foam (approx. 51 cm diameter)
- 4 mm Plywood for tone fields (10.5 cm diameter)
- 8 mm Plywood for the central plate (approx. 53 cm diameter)
- Thin isolated flexible cable (blue for ground, orange for hot)
- Two small standard stripboards
- 10 Stereo headphone jacks
- Duck tape
- Piezo sensors (EPZ-27MS44W or similar)
- 20 mm metal tube for circular blade
- 4 pieces of 20 mm wooden log (for internal version)
- 2 pieces of 16-pin flat cable
- Male and female 16-pin print connectors
- Metal mounting pieces and screws
- USB-cable with A and B connector ends
Introduction
This is a tutorial of my custom made MIDI handpan with 19 volume sensitive tonefields, Plug’n Play USB capability, and a lot of easy to use parameters for adjusting the pads for your individual needs. It’s not a design award winning model 😉 but it perfectly fits to my needs in practicing handpan playing at home.
The building process is easy, but it takes some time. (Due to Corona lock down I had enough time in the last months to make this device). If you wanna make your own model and you have fun in cutting, sawing, a little soldering, then probably this is a project for you.
You don’t need any Arduino programming knowledge, because I used a standard drum trigger interface, that I mounted inside the base. The total costs for the materials are about 150.- Euro.
The usage of such a standard Trigger module (in my case an Alesis Drum Trigger I/O that I got second hand for 90.- Euros) has some important advantages, that I will describe in step XXX in this tutorial.
To play this instrument you need a PC or Mac, a DAW or a VST Player for free and some headphones or Speakers.
A few words why I did this and how I started by making a prototype with only 8+1 tonefields
I am a handpan player and one day I dreamed to have a MIDI-device with several tonefields, on which I can play similar to the playing techniques on Steelpans.
My intention was:
+ To have a practicing pad
+ To check out different scales before buying a real steelpan
+ The possibility to play calm via headphones
+ Using different soundfiles like Piano-Samples, Drumkits, Synths and so on in my DAW
I searched the web and found a site of a guy from Chile, who made a very nice electronic MIDI Handpan out of a really beautiful wooden body. But because my skills in shaping wood are not so good and so are also my electronic and programming skills, I began to look for alternative materials and techniques.
Months later deep in the night on the way to my home I found the right material standing very lonely near the street….. it was an old foam mattrass in a area of trash!! Now the idea for that device was born 🙂
The foam has really good characteristics: it is easy to cut with a knife for putting it into the right shape, it is lightweight and the most important fact: the material muffles the mechanical trigger impulse from one pad to the other pads, so a finger hit on one trigger will only trigger this pad and not the others.
For the drum pads I decided to use 4 mm Plywood after several experiments with different materials.
My first idea was the traditional layout with 8 Tonefields in the circle and one in the middle called “Ding”. In this version the drum trigger interface was outside the whole thing, standing beside on a table connected via a 15-pin cable.
In the middle of the building process I got the idea, why not putting the interface inside the instrument and why not use all 19 available inputs? Yeah! So the instrument grew….
In this instructable I will present you both versions
Go through every step until you reach step “If you want the faster solution”. This step will bring you to the version with tonefields only on the upper side. The steps after that show, how to build the version with bottom notes and inside trigger device.
So now it’s time to start! 🙂
Feel free to ask me, it can take some days till I will answer, but I am really interested in what other ideas you will have…
Step 1: What You Will Need
List of materials:
- A drum trigger (I used the Alesis drum Trigger I/O)
- Two pieces of 10 cm foam (I used an old mattrass) with diameter about 51 cm
- Plywood 4 mm for 9 or 19 pads of 10,5 cm diameter. Important note: Check out the quality before buying. I saw some pieces and found some big holes inside. Or I had some pieces of wood that were not flat enough or a kind of wood that was too soft. The harder the wood, the better it will transmit the knocking impulse to the piezo while playing, especially when you hit the edge areasof the tone field
- Plywood 8 mm for the plate in the middle with diameter a little bigger than your foam (about 53 cm)
- Some meters of thin isolated flexible cable, I took blue for “ground” and orange for “hot”
- 2 small standard stripboards
- 10 Stereo headphone jacks (0,99 Euro)
- Duck tape
You will need these extra materials for the smaller version and EXTERNAL drum trigger:
- The number of piezos that you wanna have in the end plus some more (Important information about these Piezos and why you should have some more, go to step “Mounting the piezos”)
- 15 pin Sub-D cable, 3 meters with one male and one female end
You will need these extra materials for the version WITH bottom notes and drum trigger INSIDE:
- 4 pieces of 20 mm wooden log, about 6 cm long
- The number of piezos that you wanna have in the end plus some more (Important information about these Piezos and why you should have some more go to step “Mounting the piezos”)
- 2 pieces of 16-pin flat cable, about 30 cm each
- 2 male 16 pin print connectors (Try to figure out the photo, what I mean, in german it’s called “Pfostenstecker”)
- 4 female 16 pin print connectors (Pfostenbuchse)
- 2 metal pieces + 4 screws + 2 female screws to mount the drum module
- 2 angled metal pieces + 2 screws + 2 female screws for to mount the display
- 3 meter USB-cable with A and B connector end
Tools:
- A non permanent pen
- Ruler, yardstick
- Jigsaw and when you have: a table for sawing circles
- Cyanoacrylate adhesive(Sekundenkleber)
- Universal glue
- Soldering bolt and tin solder
- Electric drill
- Sandpaper
- Boxcutter
- Big bread knife with serrated blade
- Big scissors (those big ones for cutting paper are good), it should fit well in your hands because you will use this for some hours…
- 20 mm metal tube to build a circular blade for cutting out holes in the foam
- Plier
- A small bench wise
Step 2: Cutting the Foam Base
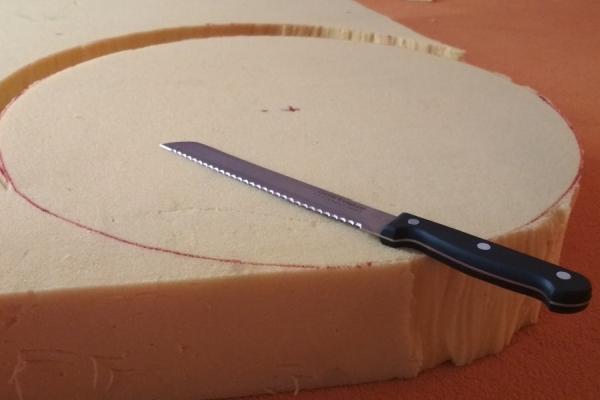
- Draw a circle on the mattress by using a non-permanent pencil . I used a diameter about 51 cm
- Take a big knife with a serrated blade (e.g. a bread knife)
- Begin to cut the circle (take care of your fingers!) Try to give only a minimum pressure to the knife
- The result should look like a big cheese wheel
- Now you have to decide if you wanna have 8 or 9 tonefields in the ring area
- Because I decided to get 8 fields I made 3 even lines on the upper side (see photo). So I got 8 markers for the next steps
- Now start with one of the 8 or 9 fields. Take the scissors and cut off all material in that way, that you will get 8 or 9 similar flat areas. That job takes a little time
- Let a 2 cm rim at the bottom side
Step 3: Sawing the Tone Fields

Some words to the position of the tonefields:
Although the muffling characteristic of the foam prevents knocking impulse that you give on one tonefield from triggering a neighbouring tonefield, you should have a minimum space between the tonefileds. I checked out that 4 – 5 cm space is enough. In the upper area some of them have only 2 cm space and therefore I have some triggering of a neighbouring field in some playing situations.
BUT: When you are playing real steelpans you will recognize, that playing on one tonefield is always triggering other tonefields. That’s a natural characteristic of steelpans. The most scales of steelpans are designed in a way, that the sound of neighbouring tonefields doesn’t cause in inharmonic sound. So I think the mechanical insulation of the tonefields need not to be 100% perfect.
Now let’s start sawing:
- I used a special stand for my jigsaw in that way that the saw is fixed upside down inside a plastic ground, so you can use it like a band-saw. If you have no special stand for your jigsaw you can use it also in the common way by hand. Be careful in this process!
- The blade should be a special one for sawing narrow curves, those let you saw really good circles.
- At this time you should make a decision of the numbers of tonfields you wanna have on your instrument.
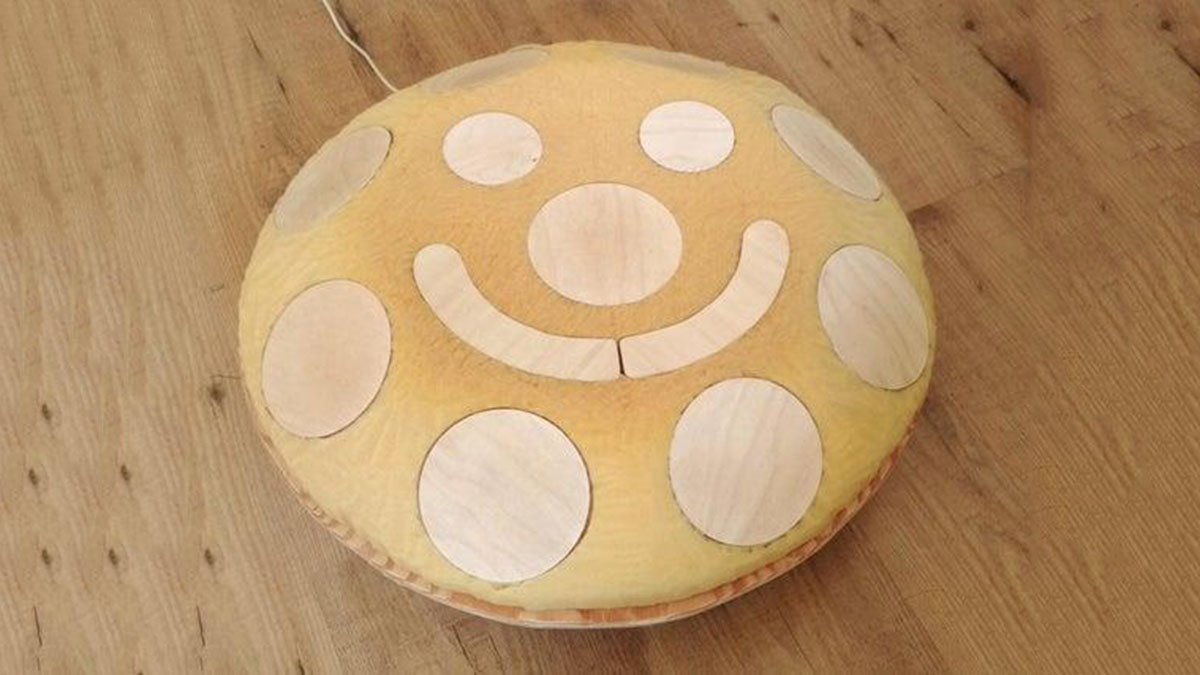
- The diameter I decided was 10,5 cm for the normal sized tone fields and 7 cm for the smaller ones. For the “smiley mouth”, i used 2 quarters of a circle, they are about 3,2 cm wide.
- Draw your circles on the wood and begin sawing.
- Important note: The saw will produce some splinters on one side of the wood, that’s normal. On the other side you should get an exact edge
- After the sawing process begin to polish the edge of the upper side of the pads, so that they get a little bit rounded. When you later play on the instrument, the fingers will knock sometimes on this edge. Rounded edges will give you more playing comfort.
- Now you could paint the pads with colours or wax the surface.
Step 4: Mounting the Piezos
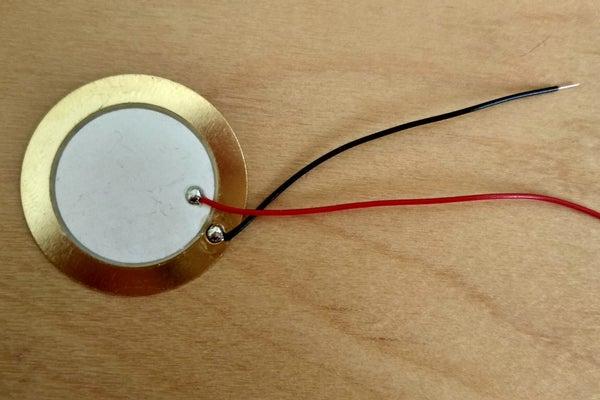
Important Information about the piezos:
In my area (Germany) the exact type I used is EPZ-27MS44W (27 mm diameter, 4400 Hz, 200 Ohm, 21.000 pF). I am shure other models will also work properly. I took these because they are very cheap, only 0,39 Euro and they have some cables already mounted and the diameter is really big enough.
Before you buy them, I really recommend to have some more of them, the reason is:
Electrical output differs from one to another piece. Some of them produce more voltage than others. This is normal within a range of tolerance for this product. When I tried different pieces in my DAW, I noticed this difference very well. The result was a higher or a lower MIDI volume and this was really remarkable.
The solution was a simple selfmade test station!
Unfortunately I forgot to make any photos, so I try to put it into words here…
The Piezo test station:
I took a base out of 30 cm x 10 cm wood, where I mounted a kind of a „sliding board“ formed of paper which ends about 5 cm above the base. At this endpoint on the base I draw a circle of 30 mm diameter. Now I cabled one input of my drum trigger interface into two cables beside the test station. I started my DAW and zoomed very deep in track view. By pressing record I could see the volume amount of the incoming Volume data.
Now I began to test every piezo. Just by laying a piezo on the circle, clambing the two cables to the piezo and let roll a small plastic marble on the sliding board. You should always use the same level when starting the marble. Make about 5 to 10 trials per piezo to get a useful average of the volume signal. When I evaluated a aproximate average of the volume data, I devided all tested piezos into 3 groups: low, middle and high. For my project I now used the piezos of only one of these 3 groups. The exact amount of output voltage is not important, but the difference between the different piezos.
Although the Midi drum trigger interface gives the opportunity to adjust the relation between incoming voltage and MIDI volume output signal, it is important to seperate out those piezos that give a very low or a very high voltage.
Because the piezos are really cheap I buyed about 40 pieces. I am shure I will make other MIDI devices one day…
So now we gonna glue the piezos onto the pads:
- Use a very fine piece of sandpaper and make the surface of the piezo a little bit rough. Be sure to use the right side where no cables are mounted!
- And do the same in the middle of the wooden pads.
- Now use some drops of cyanacrylate adhesive and glue the piezos on the surface.
- Press with your fingers for 30 seconds (be careful to get no glue onto your skin).
- Don’t use a bench wise (Schraubstock), it could damage the piezo!
- Now take 2 pieces of thin cable about 25 – 30 cm long and solder them.
- After that fix the cables with tape.
- Do that with everysingle tone field
Source: MIDI Handpan With 19 Tonefields on Upper and Down Side…
- What materials are best for muffling mechanical impulses?
An old foam mattress is recommended because it muffles the mechanical trigger impulse from one pad to others. - How can I ensure consistent volume levels across all pads?
You should test each piezo sensor individually and group them by voltage output, using only sensors from the same group. - Can I build this device without Arduino programming knowledge?
No, you do not need programming knowledge because the project uses a standard drum trigger interface. - What is the minimum space required between tone fields?
A minimum space of 4 to 5 cm is sufficient to prevent triggering neighboring fields, though 2 cm was used in some areas. - Why should I buy more piezo sensors than needed?
Electrical output differs between pieces, so buying extras allows you to select only those with matching voltage ranges. - What tool is best for cutting the foam base?
A big bread knife with a serrated blade is suggested for cutting the foam circle. - How do I improve playing comfort on the edges of the pads?
Polish the edge of the upper side of the pads to round them off slightly. - What software is required to play this instrument?
You need a PC or Mac with a DAW or VST Player and headphones or speakers. - Is the total cost of materials high?
The total costs for materials are approximately 150 Euros. - What type of adhesive should be used for the piezos?
Cyanoacrylate adhesive is used to glue the piezos onto the wooden pads.