
Summary of Nokia5110 graphical display interfacing with AVR ATmega16/ATmega32
The Nokia 5110 is a graphical display with a 48x84 resolution and backlight, utilizing SPI communication for microcontroller interfacing. This article details the connection between an ATmega16/32 microcontroller and the display, outlining specific pin mappings such as Reset to PB0 and Din to MOSI. It further explains the software initialization process, which involves including necessary header files, resetting the display, and configuring operational modes like additional mode and voltage bias through specific hexadecimal commands.
Parts used in the Nokia 5110 Display Interfacing:
- Nokia 5110 Graphical Display
- ATmega16 Microcontroller
- ATmega32 Microcontroller
- SPI Master Library File (SPI_Master_H_file.h)
- Character Array Header File (N5110.h)
Introduction
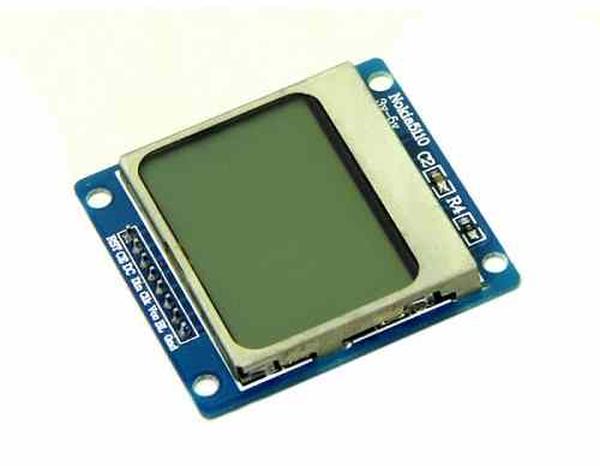
Nokia5110 is a graphical display that can display text, images and various patterns.
It has a resolution of 48×84 and comes with a backlight.
It uses SPI communication to communicate with a microcontroller.
Data and commands can be sent through microcontroller to the display to control the display output.
It has 8 pins.
For more information about Nokia5110 display and how to use it, refer the topic Nokia5110 Graphical Display in the sensors and modules section.
For information on SPI in ATmega 16, refer the topic on SPI in AVR ATmega16/ATmega32 in the ATmega inside section.
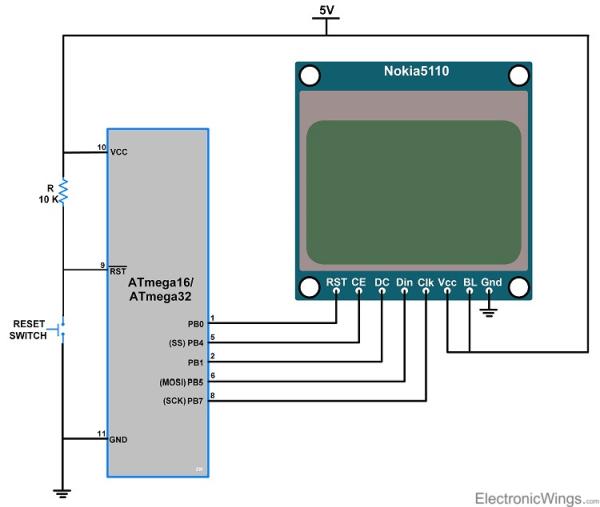
Circuit diagram
- Following circuit diagram shows the complete interfacing of Atmega16 / 32 to nokia5110 display.
- The pin connection is, reset pin of display is connected to the PB0 pin, CE is connected to SS(PB4) pin, DC is connected to PB1 pin, Din is connected to MOSI(PB5) pin, clk is connected to SCLK(PB7) pin of microcontroller.
Programming for Nokia5110 Display
- In the coding, first step is to initialize the SPI_Master_H_file.h library and N5110.h header files.
- SPI_Master_H_file.h file contains definition of SPI initialization.
- N5110.h file contains all the characters and symbols array definition.
Initialization of Nokia5110
- In initialization of Nokia5110, the first step is to reset the display by sending low to high pulse to reset pin.
- Send command 0x21H for set the command in additional mode (H=1).
- Then set VOP=5V by sending command 0xC0H.
- Set the temp. coefficient to 3 by sending 0x07H.
- Set the voltage bias system using 0x13 command, it is recommended for n=4 and 1:48 mux rate.
- Send the command 0x20 for basic mode operation (H=0).
- And then send 0x0C for normal mode operation.
Read More: Nokia5110 graphical display interfacing with AVR ATmega16/ATmega32
- What are the main features of the Nokia 5110 display?
The display can show text, images, and patterns with a resolution of 48x84 and includes a backlight. - How does the Nokia 5110 communicate with a microcontroller?
It uses SPI communication to send data and commands for controlling the display output. - Which pins on the ATmega16/32 connect to the Nokia 5110 display?
Reset connects to PB0, CE to SS(PB4), DC to PB1, Din to MOSI(PB5), and clk to SCLK(PB7). - What libraries must be initialized before programming the display?
You must initialize the SPI_Master_H_file.h library and the N5110.h header file. - What is the first step in initializing the Nokia 5110 display?
The first step is to reset the display by sending a low to high pulse to the reset pin. - How do you set the command in additional mode?
Send the command 0x21H to set the command in additional mode where H equals 1. - What command sets the VOP to 5V?
Send the command 0xC0H to set the VOP to 5V. - Which command configures the temperature coefficient?
Send 0x07H to set the temperature coefficient to 3. - What command switches the display to basic mode operation?
Send the command 0x20 to switch to basic mode operation where H equals 0. - How do you enter normal mode operation after initialization?
Send the command 0x0C to enable normal mode operation.
