2 weeks ago my daughter had a genius idea to make a quick reaction game with rainbow colors (she’s a rainbow expert 😀 ). I instantly loved the idea and we started thinkering how we could make it into a real game.
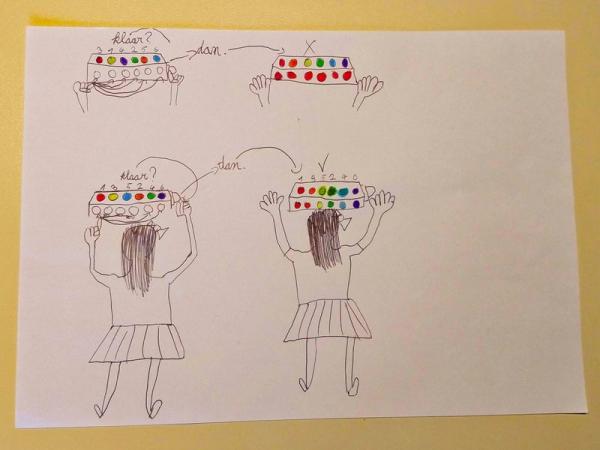
The idea was. You have a rainbow in randomly shuffled colors and the challenge is to sort the colors as fast as possible into a beautiful rainbow.
I had some RGB leds and a bunch of arcade buttons laying around so that would be perfect to make it into reality. As the brains of the game I choose an Espruino.
Espruino is an awesome micro controller that’s programmed with Javascript. It super easy to program and has a lot of power. I really love it.
Step 1: The Design of the Case
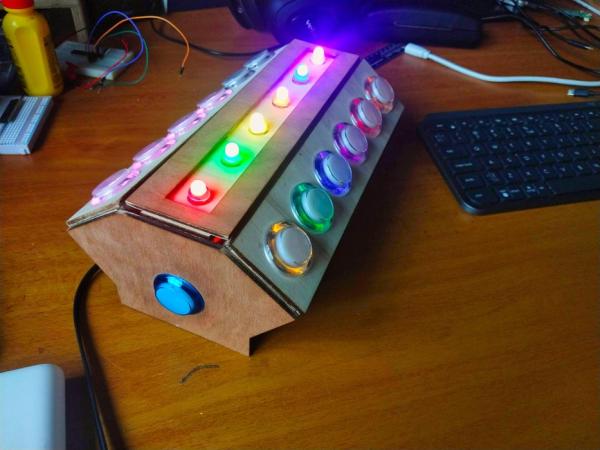
I had a string of 25 RGB leds (WS2811) and 16 transparent arcade buttons so that would be more then enough to make it into a 2 player game. That would be even more fun! It would be cool to even add more players, but lets start with an easier version 😉
The idea was to put the lights on top and each player has 7 buttons in front of him. The difference between blue and indigo was a bit difficult to see in the RGB leds so we decided to only use 6 buttons for each player.
So I needed a top plate with the 6 LEDs and for each player a box with 6 buttons and 6 LEDs.
I created a box using https://makeabox.io/ and edited the result in Inkscape to add the button and LED wholes. Inside the box there are separators to keep the light from shining onto the other buttons.
I’ve added the lasercutter files if you want to use the same layout as mine.
With a ledstrip you could save a lot of space and integrate the leds into the buttonbox. But I already had this LED string, so I used this one.
All wood is glued together, which is, after all, it’s a bit of an issue because now it’s very hard to reach the arcade button pins if a cable would snap of.
Step 2: Wiring Everything Together
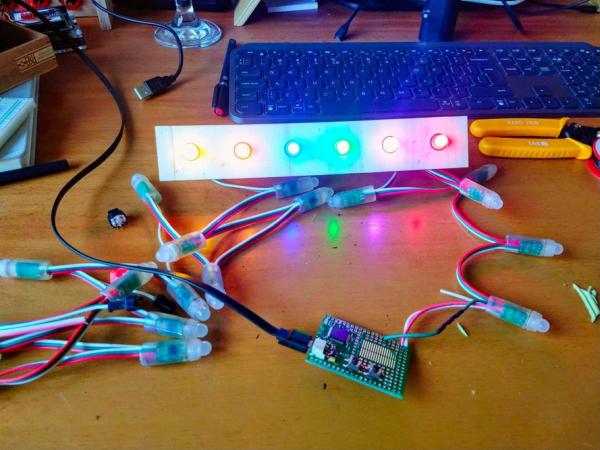
The LED string only uses 3 wires. So I only needed a 5V power (red), ground (white) and signal (green). If you also use an Espruino be sure to check the tutorials on their website. The one for the RGB LEDs is very clearly explained.
I’ve cut the LED string into 3 parts of 6 LEDs and then connected those together with extra wires. This way, all LEDs are all using the same array which saves me 2 extra ports on the board and it’s easier to program.
Connecting the buttons was a bit more difficult. I wanted to use as less possible ports on the board so I was thinking of using a I2C setup but failed terribly at it. I couldn’t get it to work so I looked after something else.
Eventually I found a tutorial on Espruino for a Keypad which is wired as an Keypad Matrix with 16 buttons. This looked fairly easy to implement so I went that way. I only needed 12 buttons so I would need a 3×4 matrix.
In a keypad matrix all buttons are wired into columns and rows. This way you only need 8 ports for 16 buttons. In my setup I only needed 2 times 6 buttons so that’s a total of 7 ports on the board (4 rows with 3 columns). It still is a lot less then connecting the 12 buttons separately and the Keypad module of Espruino is really easy to use.
I found a good tutorial about the keypad on circuit basics that helped me a lot with the wiring of the buttons.
When I managed to connect all my buttons I got very frustrated because the connectors constantly slipped off and it was getting late. So I taped everything together on the box and totally forgot to take pictures. Also not very user friendly the day I need to reconnect a wire in 1 of the boxes.
Step 3: Writing the Code
Espruino is programmed in Javascript so for me it’s far less complex then writing code for Arduino.
The code could use some optimization but it does the job for now. There’s also a bug (maybe it’s a feature 😀 ) where you can’t press 2 buttons at exact the same time. But it makes it a little more challenging (read frustrating) to play the game, so I haven’t investigated the issue yet, I kinda like it this way (if you loose it’s extra frustrating).
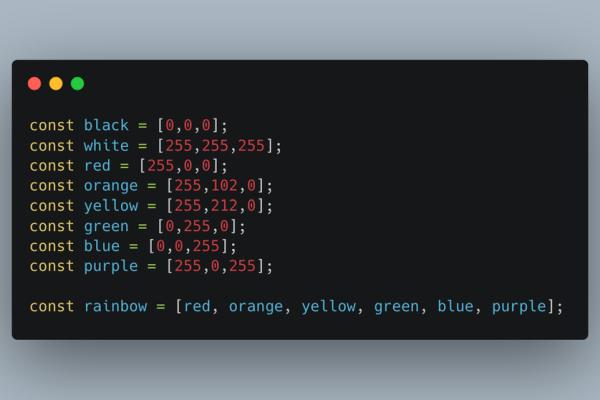
Programming the LEDs is kinda easy. Every LED in the string is 3 values in an array. So if you have an array like [255,0,0,255,0,0] you have the first 2 LEDs red.
In a quick overview.
1. First I define my colors and make an array of all colors
2. Then I define the player settings, like the button IDs and which index each player has in the LED string
3. On the start of the game I shuffle all the colors in the rainbow array and store that info into a new Array. Then I reset all LEDs and light up the top LEDs with the shuffled rainbow colors
4. Finally we have the code that listens for the key events. I store all input into an array and check if this array is in the correct sequence.
5. A nice extra I added yesterday it that the winners gets treated with an awesome rainbow animation 😀
There’s still a lot of things I have in mind to make it more fun but that’s something for later 😉
I’m not able to upload the full source code so I’ve put it on Gitlab
https://gitlab.com/marzsman/tap_tap_rainbow
Step 4: Have Fun With It!!! ????
When my daughter and I where writing down her idea and thinking about how it should look, I instantly liked the idea. But I must say, I never thought it would be that much fun to play. We already had some big rainbow tapping battles 😀
I hope anyone will have as much fun with it as we have.
It’s also the first full project I made in such a short amount of time and something a did with my 8 year old daughter AND it’s also my first instructable (FINALLY!), so yeah in a way it’s a very special project to me. So I hope like it!
If you have any questions or suggestions I’m happy to hear them!
Source: Tap Tap Rainbow – a 2 Player Quick Reaction Game