
Summary of Using Push Button Switch with Atmega32 and Atmel Studio
This beginner tutorial explains how to interface a push button switch with an Atmega32 microcontroller using Atmel Studio. It details configuring input pins, reading switch status, and implementing logic where pressing the button turns on an LED for three seconds. The circuit utilizes a 16 MHz crystal for clocking, specific components for power-on reset, and a pull-down resistor for the switch input.
Parts used in the Push Button Switch with Atmega32 Project:
- Atmega32 microcontroller
- 16 MHz crystal
- 10µF capacitor
- 10KΩ resistor
- LED
- Current limiting resistor
- Push To On switch
- Pull down resistor

This tutorial is meant for beginners in the field of Atmel AVR programming. I hope that you already read my first tutorial Blinking LED using Atmega32 and Atmel Studio. In most of the embedded electronic projects you may want to use a push button switch to give user inputs to the microcontroller. To use a push button switch with a microcontroller, first you should configure the corresponding pin as input. Then we can easily read the status of that input pin and make required decisions. There are two types of push button switches Push To On and Push To Off, here we are using Push To On switch. In this tutorial a press at the switch turns ON the LED for 3 seconds.
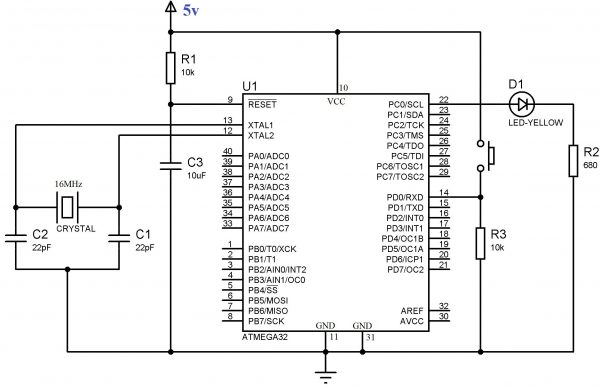
As described in the first tutorial 16 MHz crystal is used to provide clock to the Atmega32 microcontroller. 10µF capacitor and 10KΩ resistor is used to provide Power On Reset (POR) during the startup of microcontroller. LED is connected to the first pin of PORTC (PC0) of the microcontroller and a resistor is used to limit current through it. Push Button Switch is connected to the first pin of PORTD (PD0) of the microcontroller and a pull down resistor is provided to make the input LOW whenever the switch remain unpressed.
for more detail: Using Push Button Switch with Atmega32 and Atmel Studio
-
How do you configure a pin for a push button switch?
You must first configure the corresponding pin as an input. -
What type of push button switch is used in this tutorial?
A Push To On switch is used. -
How long does the LED stay ON when the switch is pressed?
The LED turns ON for 3 seconds. -
What component provides the clock to the Atmega32?
A 16 MHz crystal is used to provide the clock. -
Which components are used for Power On Reset?
A 10µF capacitor and a 10KΩ resistor are used. -
Where is the LED connected on the microcontroller?
The LED is connected to the first pin of PORTC (PC0). -
Where is the push button switch connected?
The switch is connected to the first pin of PORTD (PD0). -
Why is a pull down resistor provided for the switch?
It makes the input LOW whenever the switch remains unpressed.
